Site sections
Editor's Choice:
- Expansion joints in buildings
- Chaber - what is it and its purpose
- Sharpening wood cutters: manual work, using grinding wheels and a grinding machine
- Belts and sandriks, crackers and volutes - secret codes of architecture on the example of the old Saratov Sandriks in architecture
- Surface grit - tooling work
- Maximum load on the balcony slab: how much can a balcony withstand in a panel house?
- Projects: symbols on drawings for water supply and sewage
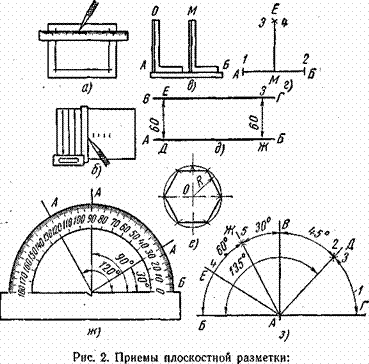
- Marking and marking details How to mark the details with curved contours
- Tools for slotting Tools for slotting
- Tools for chiseling Slotting tools
Advertising
| Section a and correctly executed. Reading drawings with sections. Some special cases of simplifications |
|
In any manufacturing, construction industry for the manufacture of parts, designs use certain images. They represent the view of an object from different points of view and sometimes imply the use of a section or section technique. This approach in engineering graphics is carried out in accordance with certain standards. They clearly stipulate the types of sections, allowing to bring this technology to uniform standards. This allows engineers, workers to properly understand such images. The quality of the entire production process and the final result of the organization’s work directly depend on this. Therefore, there are special requirements for creating images. Image Execution StandardThe implementation of schematic images, their cuts, various types of sections, cones, beams, drawing them on the drawings regulate various standards. The main one is the Unified System (ESKD) "Images - views, sections, sections". This GOST was introduced on January 1, 1968. He stipulates that the image is considered as a projection of the object on the plane at a certain angle. GOST "Images - views, cuts, sections" says that there should be a minimum number of such drawings. But thanks to them, the specialist must receive complete information about the object. Therefore, all images, according to their content, GOST divides into types, sections and sections. This document also sets the types of symbols, inscriptions and signs. GOST 2.305-08 regulates that all images should be applied to the drawing using orthogonal (rectangular) projection technology. Ideally, the object is in the middle between the observer and the project plane. But due to the fact that some nodes and elements require consideration from a different angle, this condition is violated. Therefore, the types of sections, the drawings of which are used in production conditions, are called images. For their implementation, the standards regulate a number of simplifications and abbreviations. cut and sectionSections, sections, views - these are the three main categories in the construction of engineering graphics. They are different in content. Therefore deserve detailed consideration.
A view is a drawing of the surface of a part that is turned towards the observer. To simplify the work of the engineer, in this figure it is allowed to designate invisible surfaces. The main view is the image of the detail in front. But there are other varieties of it. The detail is also depicted on the left, above, right, behind or below. A cut is a drawing of a detail that a plane (one or several) has mentally cut through. The section will show what is in the plane of the section and behind it. But the section is also called the consideration of an element in which a plane has cut it in a certain way. But the figure shows only what was in this cutting plane. What is behind it is not visible on the drawing. These definitions are necessarily taken into account by a specialist who performs technological tasks using engineering graphics. Remote and overlaid sectionsESKD standard types, sections, sections reveals with the help of a certain classification. According to this approach, it is possible to better understand the approval of standards for the implementation of graphic images of parts. Sections are rendered or imposed. Both of these subspecies are not included in the section.
It is preferable to use the removed sections in the engineering graphics. They are usually placed in the gap between the constituent elements of the same species. Such a contour (as well as the image included in the section) is applied with thick lines to the drawing. If the section is superimposed, its borders are denoted by solid, but thin borders. To denote such images, use dotted lines. They are applied thinly and not denoted by any letters or arrows. But to mark the trace of the cutting plane it is necessary to use a thick open line. It is designated by arrows, which make it clear the direction of gaze. The very same plane of dissection is designated in Russian capital letters. The inscription of the section of wires, nodes or parts is made according to the type "А-А". At the same time, the final and initial strokes should not cross the contour. Letters are assigned in alphabetical order without repetition or omission. The font in size should be 2 times the number designating dimensions. The letters are relative to the title block in parallel. And it does not depend on how the cutting plane is located. The position of the cutting planeDepending on the position of the cutting plane, there are several types of images that are regulated by GOST. Views, sections, sections, according to generally accepted rules, are defined in space relative to the horizontal plane. Accordingly, the cutting plane can pass horizontally, vertically, or tilted through the object.
In the first case, the section view is viewed transversely, parallel to the horizontal plane. In many drawings, this type of engineering graphics is called a plan. Such slices may also be called differently in each manufacturing process. Vertical cross sections assume the placement of a slice perpendicular to the base. And the inclined species form a certain angle between the horizontal and secant planes. It is different from the direct. Vertical sections are frontal (parallel to the frontal projection line) or profile (parallel to the profile projection line). If the cut is directed along the height or length of the object, this is a longitudinal section. But there is another orientation of the drawing. There are types of cross sections that have a perpendicular orientation in the space of the section plane, relative to the length or height of the object. In the drawing, the position of the cross section is indicated by arrows and is indicated by an open line. The number of cutting planesFor simple parts, it suffices to use only one section plane. This is enough to understand how a technician should manufacture this part. But for complex pieces this is not enough. For example, there are types of sections of beams that need to be mentally cut in a more complex way. For this, standards regulate the use of several cutting planes. They can be broken or stepped. The orientation of the planes in this matter plays an important role.
The angle at which they relate to each other determines the name. If the planes, when joined, form a right angle, this is a stepped cut. When this ratio is characterized by another slope, the section is broken. When complex sections at the intersection of the planes with each other carry out strokes. On the final and initial ones, arrows are indicated in the direction of the observer's view. They are located 2-3 mm from the stroke. Letters are placed near the arrows at the intersections from the position of the outer corner. The cut itself in this case is always marked by the type "A-A". Local sectionThe section is allowed to perform only in one specific place of the object. Such a limited consideration of the workpiece device is called local. It can be applied anywhere in the drawing by pointing the associated image area with an arrow. This is convenient for the image of long, but permanently shaped objects.
Such an image may be limited to the smallest break line. Due to their long lengths, wire cross-sections can be performed using this approach. Such a slice stands out against the background of a solid image. These lines do not coincide with other borders of the drawing. The local section is indicated on the image by type "A". The type associated with it also indicates the corresponding letter designation. Additional sectionImages (views, sections, sections) can be made on planes that are not parallel to the main projection slices. They are called optional. Such an approach in engineering graphics is used when it is impossible to show any part of the subject on the basic types without distorting the shapes or sizes. This section is signed by type "A". The object corresponding to the additional section type is associated with it with an arrow and is signed with a similar letter. The pointer also makes it clear the direction of the eye of the observer. If the additional slice is located directly on the projection of the corresponding image, the inscription and the arrow should not be applied to the drawing. Additional types of sections can be rotated. But the main position of the subject is preserved. A “turn” sign is added to the “A” type lettering. The use of this approach avoids the application of hatching on the drawing. It makes it difficult to understand and degrades the purity of the image. Therefore, such techniques can improve the quality of graphics. SymmetryThe types of sections are allowed to be placed in the gap, which is formed between the parts of one image. This can be done on the continuation of the track of the plane of the slice. But such an approach is permissible only with a symmetrical figure, which is obtained by cutting. The section is carried out to any part of the drawing field. It is also possible to perform a turn. For symmetrical sections in the drawing, no trace of the plane is shown. Also there is no inscription on this cut. Asymmetrical sections are made in the gap or superimposed on the drawing. The trace of the plane for such graphics is depicted, but they are not signed with letters. Also missing any inscription. The removed section is encircled by a thick, solid contour. If it is applied, the line for its designation is used thin, continuous. If an object has several identical sections, their contour is denoted by a single letter. Only one cut is drawn. SimplifyImages (views, cuts, sections) for their ease of understanding can be simplified. Standards and regulations govern this process.
For symmetrical shapes, it is allowed to draw only one half of the slice or most of it with a clipping line. When an object has several identical elements, only one of them is drawn. The remaining identical parts are drawn schematically. The projection of the intersection lines is allowed to be simplified. But only if their detailed image is not required. Performing a drawing of simple figures, for example, if you need to consider the types of sections of the cone, use a certain approach to the graph. This simplifies the understanding of the drawings. When one surface changes with a specific pattern, it can be interrupted. If one surface smoothly passes into another, their boundary is not indicated or is indicated conditionally. Non-hollow symmetric parts and products in the drawing are shown not dissected with a longitudinal section. And if the size of the part of the product in the drawing is less than 2 mm, it is depicted with a departure from the main scale. For designation of flat surfaces can draw diagonals in solid lines. It should also be borne in mind that electrical or radio devices are simplified by the relevant type of product standards. These are the main simplifications that are regulated by the Unified system for design documentation. They are most often used to construct drawings for large-scale industries where it is required to depict complex parts, components or mechanisms. Some special cases of simplificationsIf cuts, sections, views are shown for regularly changing surfaces in the drawing, they can be broken. This is done in a certain way. There are three choices. The first type involves the use of a continuous thin polyline. It can go beyond the border of the image by 2-4 mm. Also, the contour of the parts can be connected by a solid wavy line or hatching. To simplify the drawing, it is allowed to make a dotted line between the section plane and the observer. Also to improve the understanding of graphics using complex sections. When depicting the holes of some parts (hub keyways, pulleys), only their contour is given. If a recess located on a round flange is not in the cutting plane, it is depicted in section. In case there is an ornament on a detail, a continuous grid, it is allowed to depict only a small part of it or to simplify the elements of the drawing. Such methods allow to achieve the purity of the drawing, to facilitate its understanding. Indeed, the use of engineering graphics to create all kinds of objects involves the use of a single symbolic language. He should know every specialist whose work is associated with this type of images. The quality of the final result depends on it. Having studied the types of sections, you can understand the basic principles of their implementation and understanding. Applying the recommendations of the standards, you can achieve good cleanliness of the drawing. This facilitates the process of its interpretation. Understanding the difference between the view, section and section, knowing their classification and technology of correct drawing design, a specialist can create the correct image. It can be easily understood by the technician who performs the workpiece or the finished product, and will be able to create components and parts that meet all the requirements. The quality of the entire production depends on this process. List the simplest geometric bodies. Ticket number 17 For the two specified types, build a third view or draw the missing lines in the drawing. Perform technical drawing details. 1. List the geometric bodies (the simplest). Perform a technical drawing of several geometric bodies. 2. Types of notation sections on the drawing The simplest geometric bodies are: cylinder, prism, cone (full and truncated), pyramid (full and truncated), ball, torus. Moreover, the cone, cylinder and ball are the bodies of revolution. To show the transverse shape of the parts, use images called sections (Fig. 13). In order to get a section, the detail is mentally cut through an imaginary cutting plane in the place where it is necessary to reveal its shape. The figure obtained as a result of cutting the part with the cutting plane is shown in the drawing. Consequently a cross section is an image of a figure, which is obtained by mental dissection of an object by a plane or several planes. The cross section shows only what is obtained directly in the section plane. For clarity of the drawing section emit hatching. The inclined parallel lines of the hatching are drawn at an angle of 45 ° to the lines of the frame of the drawing, and if they coincide in direction with the contour lines or axial lines, then at an angle of 30 ° or 60 °.
Outsourced section. The contour of the imposed section is encircled by a solid thick line of the same thickness as the line adopted for the visible contour of the image. If the section is taken out, then, as a rule, they draw an open line, two thickened lines, and arrows indicating the direction of the sight. On the outside of the arrows put the same uppercase letters. Above the section write the same letters through a dash with a thin line below. If the section is a symmetrical figure and is located on the continuation of the section line (dash-dotted), then no symbols are applied.
Overlaid section. The contour of the superimposed section is a continuous thin line (S / 2 - S / 3), and the outline of the view at the location of the superimposed section is not interrupted. Overlaid section is usually not denoted. But if the section is not a symmetrical figure, the strokes of an open line and arrow are drawn, but the letters are not applied.
On the production and in everyday life there are parts of complex shape, when the use of only species (as a means of graphic representation of the external shape of objects in the drawings) is not enough. In this case, images such as sections and cuts are used to identify the shape of the part, and first of all its internal shape. § 24. Drawings containing sections24.1. Assignment of sections. By section called the image of the figure, resulting in the mental dissection of the object plane. This image, along with the views used in the drawings for details, when there is a need to show their transverse shape or explanation of the shape of an element. Consider a pictorial image of a part called a shaft (fig. 141, a). The shape of the part is a whole combination of cylinders of different diameters and conical chamfers. In the details there are various recesses, holes. Drawing such a detail (Fig. 141, b), even if there is its axonometric projection, does not provide a sufficiently complete picture of the elements of the part, their shape and size. In order to completely show the shape of the part, you can increase the number of views in the drawing, but from this the drawing will become cumbersome and obscure. To identify the shape of the specified part, as well as to reduce the number of images in the drawing, sections have been applied (Fig. 141, c). Fig. 141
24.2. Receiving sections. GOST defines a section as an image of a figure obtained as a result of a mental dissection of an object by a plane. The plane that is used to get the cross section is called secant. Figure 142 shows an example of obtaining a cross section to identify in detail the shape of a recess, which is called the keyway.
Fig. 142 The detail in the place of its mental dissection by the plane is conditionally disconnected. The secant plane together with the sectional figure is rotated to align with the plane of the drawing (see arrows in Fig. 142 b). In the cross section they show only that figure, which is obtained directly in the section plane (Fig. 142, c). In the drawing, it is conventionally distinguished by shading with thin lines at an angle of 45 ° to the horizontal line.
24.3. Placement and designation of sections in the drawing. Sections can be placed in free space format or superimposed on the image details. Based on this, depending on the location on the drawing, the sections are divided into external and superimposed. Position the part image out of the contour at any place in the drawing field (see. Fig. 142, c). They are considered preferred because they do not clutter the image with unnecessary lines. The contour of the pronounced section is encircled by a continuous thick main line of the same thickness (s) as the thickness of the line adopted for the visible contour of the image. To show where the secant plane passes, it is sometimes conditionally designated (see bookend I). To designate a rendered section, as a rule, an open line is drawn - two thickened dashes (Fig. 143). The arrows indicating the direction of sight, are located at the outer ends of the open line. On the outside of the arrows put the same uppercase letters of the Russian alphabet. Sections are designated by type A-A or BB (see Fig. 141, c).
Fig. 143 If the section is a symmetrical figure and is located on the continuation of the section line (dash-dotted), then the arrows and letters do not cause (see. Fig. 141, c). The taken-out sections are allowed to be placed in the gap of the same species, i.e., between its parts (Fig. 144). The conditional rupture of the part is shown by a solid wavy line (Fig. 144, a) or by a solid thin line with a break (Fig. 144, b). Fig. 144 Combined with the view (Fig. 145). The contour of the image at the location of the superimposed section is not interrupted. Such sections do not designate (Fig. 145, a). And only in the case when the section is an asymmetrical figure, the strokes of an open line and arrow are drawn, but they are not marked with letters (Fig. 145, b).
Fig. 145 The contour of the superimposed section is encircled by solid thin lines from s / 3 to s / 2. By construction and location, the cross section must correspond to the direction indicated by the arrows. However, it is allowed to place the taken sections with a turn, adding to the inscription A-A or B-B the conditional graphic sign O, which means “turned” (fig. 146).
Fig. 146 For several identical sections of the same part, one section is drawn, and the section lines are marked with the same letter (Fig. 146). If the cutting plane passes through the axis of the surface of revolution, which is a hole or recess, then the contour of this hole or recess in the cross section is shown in full (Fig. 147, section A-A).
Fig. 147
24.4. Graphic designations of materials in sections. Parts, other products are made of various materials: metal, wood, plastics, glass, rubber, etc. The standard ESKD provides graphic designations of materials in sections. Some of them are shown in Figure 148.
Fig. 148 So, for the image of metals and hard alloys, hatching is used with inclined parallel thin lines at an angle of 45 ° to the contour line of the image or its axis. The slope of the lines can be taken right or left, but, as a rule, in the same direction in all sections relating to the drawing of the part shown. The distance between the hatching lines (pitch or frequency) is chosen 1 ... 10 mm depending on the size of the hatching area. The frequency of hatching should be the same and uniform for all sections of the part. On educational drawings of the A4 format, in a workbook, this distance can be equal to 2 ... 4 mm.
Using the visual image of the objects specified in Figure 149, draw in the workbook a main view (in the direction indicated by the arrow) with a superimposed section. Dimensions take arbitrary.
Fig. 149 Sketch the details (from nature) using sections. The sketch of the detail can also be made in a visual image (Fig. 150, a and b). Dimensions take arbitrary.
Fig. 150 In GOST 2.305-2008 the following requirements for the designation of the section are provided: 1. The position of the cutting plane is indicated on the drawing by a section line. 2. For the section line, an open line should be used (thickness from S to 1.5 S line length 8-20 mm). 3. With a complex section, the strokes are also carried out at the intersection of the cutting planes with each other. 4. At the initial and final strokes should be put the arrows indicating the direction of gaze, the arrows should be applied at a distance of 2-3 mm from the outer end of the stroke. 5. The dimensions of the arrows should correspond to those shown in Figure 14. 6. The initial and final strokes should not intersect the contour of the corresponding image. 7. At the beginning and end of the section line, and if necessary at the intersection of the cutting planes, they put the same upper-case letter of the Russian alphabet. The letters are put near the arrows indicating the direction of the sight, and at the intersections from the outside corner (Figure 24). Figure 24 - Examples of the designation of the cut 8. The section should be marked as “AA” (always in two letters through a dash). 9. When the cutting plane coincides with the plane of symmetry of the object as a whole, and the corresponding images are located on the same sheet in direct projection connection and are not separated by any other images, for horizontal, frontal and profile cuts do not mark the position of the cutting plane, and cut the inscription is not accompanied. 10. Frontal and profile cuts, as a rule, give a position corresponding to that adopted for the given object on the main drawing image. 11. Horizontal, frontal and profile sections can be located on the site of the corresponding main species. 12. It is allowed to place a cut on any place of the drawing field, as well as with a turn with the addition of a conventional graphic symbol - the “Rotated” icon (Figure 25).
Figure 25 - Conditional graphic symbol - “Rotated” icon Section - the image of the figure, resulting in the mental dissection of the subject of one or more planes. The cross section shows only what is obtained directly in the section plane (Figure 26).
Figure 26 - Shaft cross section It is allowed to use as a secant a cylindrical surface, which is then developed into a plane (Figure 27).
Figure 27 - Section of a cylindrical surface Instead of the word expanded, a conventional graphic designation is used — the “Expanded” icon, the shape and dimensions of which are shown in Figure 28. Figure 28 - Deployed Icon Sections are divided into superimposed (Figure 29) and handed down (figures 30, 31). Offset sections are preferred, they are allowed to be placed in the gap between parts of the same type (Figure 30).
Figure 29 - Example of the image of the superimposed section
Figure 30 - Example of a rendered section image, located in the gap between parts of the same species
Figure 31 - Example of a rendered section image In cases where the section is a symmetrical figure, the section line is not drawn. The axis of symmetry of the imposed or superimposed section indicates a dash — a dashed thin line with no letters and arrows, and no section line (Figures 26, 29). The contour of the taken-out section, as well as the section included in the section, is represented by solid main lines, and the contour of the superimposed section is represented by solid thin lines, and the contour of the image at the location of the superimposed section is not interrupted. In all other cases, an open line with an arrow indicating the direction of sight is used for the section line and is designated with the same uppercase letters of the Russian alphabet (in construction drawings, uppercase or lowercase letters of the Russian alphabet or numbers). The section is accompanied by an “A-A” type of inscription (Figures 31, 32).
Figure 32 - Example of designation of sections For several identical sections relating to the same object, the section line is designated by one letter and one section is drawn (Figure 33).
Figure 33 - Example of designation and images of identical sections For asymmetrical sections, located in a gap or superimposed, a section line is drawn with arrows, but they are not marked with letters (Figure 34).
Figure 34 - Example of asymmetrical sections If the cutting plane passes through the axis of the surface of revolution bounding the hole or recess, the contour of the hole or recess in the section is shown in full (Figure 35).
Figure 35 - An example of the implementation of sections by holes Remote element - an additional separate image (usually enlarged) of any part of the object that requires graphic and other explanations regarding the shape, size and other data. Figure 36 shows an example of a detail design.
Figure 36 - Example of the layout of the external item The remote element may contain details that are not indicated on the corresponding image, and may differ from it in content (for example, the image may be a view, and the remote element - a cut). When using a remote element, the corresponding place is marked on the form, section or section of a closed solid thin line - a circle, oval, etc., with the designation of the remote element in a capital letter or combination of a capital letter with an Arabic numeral on the line shelf - callouts. Above the detail image indicate the designation and scale in which it is made. The remote element should be located as close as possible to the corresponding place in the image of the object. Conventions and simplifications - These are the rules that allow you to make a drawing more simple, understandable and reduce the time for its implementation. GOST 2.305-2008 establishes the following conventions and simplifications: 1. If the view, section or section represents a symmetrical figure, it is allowed to draw half of the image bounded by the axial line or slightly more than half of the image with the line drawn in the latter case (Figure 37).
Figure 37 - An example of a simplified image of a symmetrical part
Figure 38 - An example of the image of the object with the same, evenly spaced elements 2. If an object has several identical, evenly spaced elements, then one or two such elements are fully shown on the image of this object, and the remaining elements are shown in a simplified or conditional way. It is allowed to depict a part of an item with proper instructions on the number of elements, their location, etc. (Figure 38). 3. On views and sections, it is allowed to simply depict the projections of the lines of intersection of surfaces, if they are not required to be precisely constructed. For example, instead of curved curves, circular arcs and straight lines are drawn (Figure 39).
Figure 39 - An example of a simplified image of the lines of intersection of surfaces 4. A smooth transition from one surface to another is shown conditionally or not at all (figure 40).
Figure 40 - Example of a simplified image of a smooth transition between surfaces 5. Details such as screws, rivets, keys, non-heel shafts and spindles, connecting rods, handles, etc., in the longitudinal section, are shown conventionally uncut. Balls are always shown uncut. As a rule, nuts and washers are shown not dissected on assembly drawings. Elements such as flywheel spokes, pulleys, gears, thin walls such as stiffeners, etc., are shown uncoded if the cutting plane is directed along the axis or the long side of such an element. If there is local drilling, indentation, etc. in such parts of the part, then a local section is made (Figure 41).
Figure 41 - Example of the image of local cuts on the shafts Section- the image of the figure, resulting in the mental dissection of the subject of one or more planes. Sections are usually used to identify the transverse shape of the object. The cross-sectional figure in the drawing is distinguished by shading. Dashed lines are applied in accordance with the general rules. Section formation procedure: Sections that are not included are divided into: Taken out; Outstanding sections are preferred and are allowed to be placed in the gap between parts of the same species. Overlaidcalled sectionwhich is located directly on the type of item. The contour of the superimposed section is performed by a solid thin line. The cross-sectional shape is placed in the place of the main view where the cutting plane passes, and shaded.
Symmetry axis superimposed or removed section indicate a dot-and-dash thin line without designation with letters and arrows and the section line is not drawn. Sections in the gap. Such sections are located in the gap of the main image and perform a solid main line. Outstanding sections have: If the cutting plane passes through the axis of the surface of revolution bounding the hole or depressions, then their contour in section is shown completely, i.e. perform according to the cut rule. If the cross section is made up of two or more separate parts, then a cut should be applied, up to a change in the direction of gaze.
Portable items |


Popular:
New
- Markup definition. Planar marking. Types of markup. Questions for self-test
- Pipe bending machines Various variations of pipe bending machine
- Safety during filing
- What should be the sharpening angle of the scriber
- Drawing on preparation of contours of future product
- Modern ways of cutting metal and its defects
- Kerner - so that the drill does not slip off!
- Objects of inanimate nature Examples of the influence of inanimate nature factors on plants
- Finishing joinery
- Block breakdown in AutoCAD - simple and effective teams from practitioners