Site sections
Editor's Choice:
- Expansion joints in buildings
- Chaber - what is it and its purpose
- Sharpening wood cutters: manual work, using grinding wheels and a grinding machine
- Belts and sandriks, crackers and volutes - secret codes of architecture on the example of the old Saratov Sandriks in architecture
- Surface grit - tooling work
- Maximum load on the balcony slab: how much can a balcony withstand in a panel house?
- Projects: symbols on drawings for water supply and sewage
- Marking and marking details How to mark the details with curved contours
- Tools for slotting Tools for slotting
- Tools for chiseling Slotting tools
Advertising
| Grooving machines for metal: device, features, making their own hands. Tools for chiseling Slotting tools |
|
Joiner's tools are the most popular tools in the home workshop. This is explained by the fact that with all the diversity of modern innovations, wood remains the most important hand-made material, without which it is difficult to imagine everyday life. there is any man who prefers to do many housekeeping work with his own hands. A joiner's tool is a necessary accessory for a self-respecting owner, that is, for someone who is ready to do everything himself, and not to run to the store when needed. A joiner's tool is a wide range of various tools for woodworking and the manufacture of various wooden handicrafts and wooden parts constructions. In urban conditions it is difficult to talk about the organization of a full-fledged carpentry workshop, but it is quite possible to organize a small area for carpentry work. For the operation of such a corner, hand carpentry tools, an equipped place for carpentry work and equipment (including improvised devices) are needed. An important condition for the organization of the workplace is to ensure the availability of the tool and the safety of work. In order to properly store the joinery tools, care should be taken of the shelves and racks where the tool for the carpenter will be arranged in a specific order. The workplace should be a first aid kit for first aid for injury. Care should be taken to secure the location of electrical points.
Main toolkitBasic carpentry tools are used for cutting, processing and joining wooden parts. It may be of universal use or intended for highly targeted use. Shock toolkit. The impact tool is used to join the workpieces, and is used when gluing and processing wood, for example, with a chisel. The main representatives of this group are:
Tools for sawing and cutting. The sawing and cutting tool of the joiner is used for cutting wooden parts to size and cutting out various shapes. Its main types:
Tools for planing. To prepare the surface required:  The tools of this type include files. They differ in shape and grain. Used for final processing and grinding of the surface. Tool for drilling and chiselling. If necessary, the formation of holes, grooves, grooves used the appropriate tool carpenter. A drill is usually used for drilling holes. Drilling tools such as the brace and gimlet are often used in carpentry work. For their use a set of drills of different diameters is needed.
Tools for measuring and markingCarpentry work can not be carried out qualitatively without careful marking and appropriate measurements. For measurements, the following basic carpentry tool is used: a square (in the form of perpendicular bars, with a ruler scale on one) - to check the perpendicularity; center finder (isosceles triangle); erunok (control angles 45 ° and 135 °); Mulka (strap fastened by a hinge) with the installation of any desired angle; joiner's meter; ruler; calipers; level or level for checking a horizontal or vertical surface; plummet; roulette. As used: carpentry compasses with the ability to draw a circle of up to 3.5 m; gauge - to draw the forming straight, parallel to the main line, and transfer dimensions from the drawing to the part (gauge has the form of a bar with slats fitted with teeth); comb - for the formation of spines and angular joints; from the bottom - drawing lines to ensure a good articulation of elements. Auxiliary devicesFor high-quality carpentry work, various standard or home-made devices are used. The most common are the following devices: clamps, clamps and clamp clamps, clamps for reliable bonding of elements, presses, wooden and metal vices, stops, linings with a stop, a box to facilitate cutting at different angles, servants to maintain long parts, plinth to facilitate planing thin bars, sawing table when using a jigsaw, bench board, pincers to hold the parts. Manual chipping of wood.For the formation of nests, grooves and eyelets of rectangular cross section in the details of the wood used bits (GOST 1185-80). Chiselsdistinguish carpentry (Fig. 32, but)and carpentry (Fig. 32, b).A chisel consists of a blade with a blade at the end and a handle. In order to avoid the split of the handle from being hit with a hammer, a steel ring is placed on top of it. The handle should be tightly and securely mounted on the shank, it should not be sharp corners or irregularities. Cloth bits and handles covered with colorless waterproof varnish. Rectangular-shaped sockets with bits are chosen by marking, and when slotting through nests, marking is applied on both sides of the part (Fig. 33, but),non-through - on the one hand (Fig. 33, b).Before chipping, the part is placed on the table or
AT) d) Fig. 32. Chisels and chisels: but- carpentry bits, b- joinery chisels, at- flat chisels, g- semicircular chisels; I- canvas 2 - handle 3 - ring, 4 - cap workbench and firmly secure it. When gouging through nests in order to avoid damage to the table cover or workbench, a piece of defective board is placed under the part. The bit must match the width of the socket to be selected. If in several parts it is necessary to choose the same nests, they are put in the foot and select the nests simultaneously in all the details. The slotting of the nests begins like this: the chisel is set with a chamfer facing inwards, retreating 1 ... 2 mm from the marked risks, and lightly hitting a mallet or hammer on the handle deepens it into the wood (Fig. 33, at)and again hit the handle with a mallet or hammer, and then, shaking it, remove the wood and thus continue chiselling (Fig. 33, d). Retreat from marking risks by 1 ... 2 mm is necessary so that later this place can be cleaned with a chisel. In order to increase labor productivity, reduce worker fatigue and comply with safety requirements for chiselling, you need to take the right position: you need to sit so that the hand, which contains a mallet or a hammer, passes over both legs. When chiselling ensure that the edges of the nests are not wrinkled. To avoid creasing of edges, the slope of the bit should always be directed toward the middle of the slot. When slotting through nests, wood is chosen first on one side, and then, turning the part, on the other.
Fig. 33. Work chisels: but- selection of a through nest, b- sampling of the blind nest, at- the position of the bit (initial and final) on the marking of the socket, g- nest slotting procedure For stripping and sampling sockets, grooves, spikes, chamfering used flat chisels(Fig. 32, c), and for stripping rounded spikes and processing concave and convex surfaces - semicircular chisels (Fig. 32, d) (GOST 1184-80). As in chisels, chisels canvases are made of tool steel with heat treatment of the working part, the handles are made of the same wood species as chisels. Wooden handles are made of hardwood and must have a metal cap. The cutting edge (blade) must be sharp. The shape and size of the collar should provide sufficient support for the handle. Burt should not have sharp corners. Pens are varnished. In flat chisels, the canvas is a smooth, smooth strip ending in a sharp blade. The chisel blade in the work acts like a knife, cutting or dividing the wood fibers. When podstragivanii chisel hold the right hand for the handle. Move the chisel as far as possible along the fibers. When cutting with a chisel with the right hand, press the butt end of the handle, and with the left press the canvas with the chisel against the wood. The fingers of the left hand should not be in front of the chisel. The cut chips should be thin, soft and curled, not split. Semicircular chisels treat curved surfaces and hollow out the holes of a curved shape. Chisel angle taper (25 ± 5) °. When working with a chisel, blows with a mallet or hammer are applied strictly in the center. Work chisel shown in Fig. 34
d) e) e) g) Fig. 34. Chisel work: but- cleaning of the cut places, b- transverse trimming, at- pruning along the fibers, g- chamfering, d- chamfering from the end, e- cleaning the butt, well- cutting from under the shoulder In order to avoid injury when working with a chisel, you should not cut in the direction of the supporting hand on yourself, on the weight, with the detail resting on the chest and in the case when the part lies on your lap. Leaving chisels and chisels with a blade to yourself or on the edge of a table or workbench is not possible, as if you drop a tool, you can get hurt. Mechanized chiselling.The electric colliers choose rectangular-shaped sockets, grooves, etc. The cutting tool of the electric colliers is a continuous grooving chain, which is a set of links (cutters) that are connected pivotally. Manual electric slotterIE-5601A (Fig. 35) has a built-in asynchronous squirrel-cage rotor electric motor, in which a drive sprocket is mounted on the end of the rotor shaft, driving a cutting chain stretched on the guide ruler. The depth of chiselling regulate the stroke. The head with the chain moves along guide columns mounted on the base. The chain is tensioned by movement with a stop screw and ruler. The head is lowered when the lever device is pressed - the handle, and automatically rises with cylindrical springs. Depending on the size of the holes chosen, the rulers and chains of the required size are installed. The width of the groove, obtained in one pass, is equal to the width of the chain, and the length of the groove - the width of the guide line plus the double width of the chain. To select grooves of different sizes, a set of chains and rulers is required. When you
by machining a series of consecutive sockets to a straight line, you can form a groove of the required length. The depth of the hole to be selected is controlled by a travel stop set to the desired size. When lowering the head, it rests on the base. Before starting work, it is necessary to sharpen the chain well, then put it on the sprocket and ruler of the electrician. The electric sinker is installed so that the chain is above the nest that is chosen. The material being processed or the part is placed on the table and firmly fixed. It is forbidden to work as an electric sinker if the part is not fixed or is on weight. EL-5601A: / - chain 2 - spring guide column, 3 - shield 4 - electric motor 5 - casing, b - lever device (handle), 7 - screw, 8 - guide line, 9 - base After turning on the electric motor by pressing on the lever device (handle), the electric arm is lowered together with the ruler and the chain tensioned on it. The chain should be lowered smoothly, without jolts, so that it is introduced into the wood gradually. The feed rate of the chain depends on the size of the selected sockets, the hardness of the wood being processed. When the chain comes out of the socket, it is necessary to ensure that the edges do not have stabs, tears, which are obtained by quickly removing the chain from the socket. The rubbing parts of the electric sinker must be coated with a lubricant. At the end of the work, the chain, sprocket and guide line are washed in kerosene and lubricated with engine oil. The electric sinker can be used as a stationary machine by attaching it to the table so that the guide line with the chain is perpendicular to the plane of the table, and the plane of the ruler is parallel to the edge of the table. If during operation the body of the electrolinker becomes very hot, it is necessary to loosen the pressure and relieve the electric motor, change the blunt chain or loosen the chain tension. If the chain beats, you need to tighten it. In the case when the chain or the ruler is very hot, you need to adjust the tension of the chain, to eliminate the possible distortions of the ruler. If at chipping it turns out small chips in the form of chips, install a new chain. If the nest, the groove in the process of chiselling are oblique, it is necessary to align and strengthen the ruler extending to the side. When working with power tools you need to use protective glasses. The body of the electric sinker must be grounded. 4 Joiner's, carpentry and parquet works
Fig. 36. Drills hand and drilling tools: but- first drill, b- center drill, at- screw drill, g- twist drill, d- brace, e- drill, well- boring- gimlet: / - push head, 2 - crankshaft 3 - a pen, 4 - ring switch, 5 - ratchet mechanism, 6 - cartridge, 7 - head, 8 - threaded handle 9 - steel rod, 10 - cartridge, 11 - undercutter 12 - center (tip) Manual drilling of wood.Round (cylindrical) holes for round studs, dowels, bolts are chosen with drills consisting of a shank, a rod, a cutting part and elements for chip removal. For drilling apply perovy, center, screw, spiral drills. Drill bits(fig. 36, but)have a gutter shape; they choose the holes mainly for dowels. The groove is also used to emit chips. Due to the fact that he can not completely throw the chips out, in order to avoid overheating it often has to be removed from the hole. Therefore, the holes are unclean and not accurate enough. Drills have a length of 100 ... 170 mm, diameter 3 ... 16 mm with a gradation of 1 ... 2 mm. Center drill bits(fig. 36, b)drill through and shallow holes across the fibers. Drilling deep holes with these drills is difficult due to poor ejection of chips. Work drills in one direction only. The drill is a rod, ending at the bottom of the cutting part, consisting of a trimmer, blade and guide center (tip). The diameter of the center drill 12 ... 50 mm, length depending on the diameter - 120 ... 150 mm. When working with these drills, you need to do pressure, otherwise they will not be introduced into the wood. Screw drills(Fig. 36, c) is used for drilling deep holes across the fibers. The end of the drill has a fine-thread screw. When they drill, the holes are clean, since the chips are easily removed through the screw channels. The diameter of the drill 10 ... 50 mm, length 40 ... 1100 mm. Twist drills(fig. 36, d)depending on the shape of the cutting part, they come with a conic sharpening (GOST 22057-76) and with the center and undercutters (GOST 22053-76). For removal of chips in the rod there are grooves located on the screw lines. Drills with center and undercutter are produced with a diameter of 4 ... 32 mm, and with conical sharpening - with a diameter of 2 ... 6 mm (short series) and 5 ... 10 mm (long series). The drills are driven by a crank and a drill. Kolovorot is used for drilling holes when performing carpentry and formwork work, and also used for wrapping and unscrewing screws for glass and other types of work. Brace with ratchet(fig. 36, e)is a crankshaft, in the middle of which is a handle for rotation. At one end of the crankshaft is located a cartridge for fastening drills, on the other - a pushing head. The ratchet should rotate to the right and to the left, and the direction of rotation is set by a switch ring. Chuck jaws should provide secure fastening tools. You can wrap bolts, screws with a rotary knob, for which, respectively, socket wrenches (square or hexagonal) and screwdrivers are inserted into the cartridge. Drills with a shank diameter up to 10 mm can be mounted in the brace. To screw the screws, screwdrivers are inserted into the brace. The crank, consisting of a cranked rod, four-jaw chuck, ring-switch, is made of structural steel. All parts of the kolovorot have a protective electroplated coating. Holes with a diameter of 5 mm drilled drill drillDrill (Fig. 36, e)it is a screw-threaded rod with a handle. At one end of the rod there is a cartridge for mounting the drills, and at the other - a head. The rod, and with it, the drill bit is rotated by moving the threaded handle up and down. For drilling deep holes use drill(Fig. 36, g), which is a rod with an eye for a handle located in its upper part, and with a screw drill at the other end (in the lower part). Shallow holes in the wood of hardwoods under the screws drilled gimlet(fig. 36, h)having a diameter of 2 ... 10 mm. In order to avoid splitting the wood, the gimlet is periodically removed from the hole and cleaned of chips. When using drills, holes are chosen by marking or pattern. The center of the holes is pre-punched with an awl. Before starting work, the drill should be well sharpened with a file with a small notch or on a special machine, and then firmly fastened in the chuck or drill bit. Drilling techniques are shown in Fig. 37. During operation, it is necessary to ensure that the axis of rotation of the bend or drill coincides with the axis of the hole. When drilling vertical holes, the push knob is held with the left hand, and the right one is rotated by the handle. Deep through holes are drilled on the markup with two
Fig. 37. Techniques for drilling with a material rotation: but- horizontally laid, b- fixed in the vice of the workbench vertically ron details. When drilling holes on one side of the part, before exiting to the other side, the pressure on the rotary pressure knob should be loosened, so that spalling or splitting in the part does not form. Under the part in which the holes are drilled, enclose the board. They work with a brace like this: stack the workpiece-part on the workbench and mark the point of the hole. Then the crank handle is covered with the fingers of the right hand, and the pressure head - with the fingers of the left hand. When drilling with the left hand, press on the head, and the right one rotates the crankshaft. The brace or drill cannot be held so that the drill is turned towards the worker. Press on the pressure knob of the bend, the drillers need only hands. Work drills that have cracks and other defects, it is impossible. In case of poor-quality drilling, the following defects occur: the size (diameter) of the hole is not maintained, caused by the beating of the drill due to improper fixing of it in the brace; ragged hole surface - when drilling with a blunt or improperly sharpened drill. Mechanized drilling of wood.For mechanized drilling apply manual electric drilling machinestires,consisting of a housing, an electric motor, a gearbox, a switch with a trigger drive, a current-carrying cable and a plug connection. At the end of the spindle there is a cartridge for mounting drills. Spiral drills are mainly used for drilling holes with electric drilling machines. Before work, the machine is carefully inspected and checked, after which the drill is inserted into the cartridge and firmly fixed, and then the electric motor is turned on by triggering the trigger. Within 1 ... 2 min work idly; if the motor is working normally, start working. When drilling holes, the pressure should be uniform; when sampling through holes at the end of drilling, to avoid jamming, the pressure should be slightly relaxed. If the motor does not work when turned on, there is no voltage or the switch is faulty. If the gearbox is too hot, check for grease. If when you touch the body of the drill "beats" with current, check the grounding. For screwing screws, bolts, nuts, screws use electric screwdriverIE-3601B. They can tighten screws with a diameter of up to 6 mm. When performing carpentry work, it is advisable to use an individual set of IN-18 hand tools for a building joiner, which includes a joiner's hammer, ax, pincers, hacksaws, rotary knives, single and double knife planers, sunflower, plumb bob, wooden kiyanka, sawing, flat chisels, screwdriver, carpentry chisel, screwdriver for screws with cross-shaped slots, triangular file, rack gauge, construction level, square, grinding block, folding wooden meter. The work tool is placed in a hand-made wooden suitcase-case of size 535 X 450 X 115 mm. Weight set 10 kg. Test questions.1. Tell us about the workplace carpenter, carpenter and device workbench. 2. What are the main elements of the tool? 3. Tell about the cases of cutting. 4. What factors influence the production of a pure treated wood surface? 5. Tell us about the purpose and methods of markup. 6. What tools are used when marking? 7. What templates are used for markup? 8. What types of tesca logs are there? 9. How is a log treated with 2, 3 and 4 edges? 10. What saws are used for hand sawing? 11. Tell us about the preparation of saws to work. 12. Tell us about the techniques of hand electric saws. 13. What tools are used for manual planing? 14. Tell us about the techniques of manual planing. 15. What is the purpose of manual electroplane? 16. Name the methods of work chisel chisel. 17. What are the basic rules for safety when cutting, planing, chiseling, drilling? 18. Tell us about the methods of work by an electroplane, electric drills. 19. List the rules for safe operation of power tools. A slotter designed for working on metal is an equipment with which it is possible to process hard-to-reach places in metal parts. The main purpose of such equipment, which belongs to the category of highly specialized, is the creation of elements of different profiles, which is carried out by removing the metal. Along with the professional, there are homemade machines of this type, but the principle of their work is almost the same. Features of slotting machinesBoth professional and homemade slotting machines consist of identical structural elements that allow such equipment to effectively perform all the functions assigned to it. The basis of any slotting machine is a frame on which its other structural elements are mounted: work table, dolbyak - a tool with sharp teeth, rocker mechanism, gearbox, drive, which can be mechanical, electrical and hydraulic. Hydraulically driven equipped with serial slotting machines, which are considered professional equipment. Work on this, more advanced equipment, due to the presence of a hydraulic drive is much easier and more convenient. Homemade machine for chipping metal has a simpler design, but it is able to successfully cope with many technological operations. The principle of operation of the slotting machine is shown in the video: In the design of professional slotting machines, there are a number of important elements: a cooling system, systems responsible for controlling equipment and ensuring uninterrupted operation of all units of the device. The hydraulic drive of the machine is placed inside its bed, and the programming of its work with the help of a special system allows the slider, which performs reciprocating movements, to execute them according to precisely specified parameters. The slotting machine for metal allows you to carry out a whole list of technological operations: the formation of key grooves, grooves and slots on surfaces of both flat and shaped type, making cuts and grooves in cylindrical and conical holes. It is possible to use such a machine for processing external surfaces whose height does not exceed 320 mm, as well as internal ones with a depth of not more than 250 mm. The movement of the working table of this equipment can be provided by manual or mechanical transmission, as well as performed in a straight line or in a circle, which makes it possible to carry out the processing of gear wheels and other parts made of round metal on such a machine. In contrast to the professional, homemade machine can perform processing of parts only in two planes, which significantly reduces its functionality. The principle of operation of the slotting machineProcessing of metal parts on the slotting machine is carried out by reciprocating motion, which in the vertical plane makes the slide and the cutter fixed in it. The working feed of the workpiece is carried out due to the movement of the table on which it is fixed. The slotting machine can operate in two basic modes: simple and complex. In the simple mode, the billet of metal is machined to the stop, and the cutter, moving to the required distances, creates a series of holes that do not differ in their shapes and sizes. Complicated mode involves the processing of holes at an angle and hard-to-reach surfaces located in the inner part of the workpieces. Perform such operations can only be on professional equipment. The machine, made by hand, is not suitable for them. Self-made slotting machines are best suited for equipping small industries and private workshops, where they can be used to process non-ferrous and ferrous metal blanks. For large-scale production, professional equipment is needed, often equipped with numerical control (CNC). You can get an idea of what the slotting cutters look like for the respective machines by the photo below:
Basic machine modelsThe most popular and widespread model of the slotting machine for metal is the “DG”, which is represented by 200 and 500 series. More modern and functional is the slotting machine of model S315TGI, which is also very popular with domestic manufacturers. Such a machine, in contrast to simpler models and devices made by hand, allows you to effectively carry out a large list of technological operations on metal. When choosing serial slotting machines one cannot simply focus on promotional videos, a number of important parameters should be taken into account. One of the most important characteristics is the maximum height of the workpiece that can be machined. Significant parameters of such a machine for metal are also: power, dimensions of the tool and the possibility of its adjustment, the presence of longitudinal and transverse stroke, the permissible angle of inclination and parameters of the speed of movement of the dolbyak. When choosing such a machine, you should also pay attention to its dimensions and weight, affecting its stability and ease of maintenance, to the equipment with additional devices that significantly increase the functionality of the device.
Making a slotting machine with your own handsTo make a do-it-yourself slotter with your own hands, at least its drawing is necessary. Any such equipment, in fact, is a hand-operated vertical planer. All structural elements of such a machine are placed on a massive base (350x350x20 mm), which is also its desktop. On the basis of such a homemade machine, a stand made of a steel rod with a diameter of 40 mm and a height of 450–500 mm is fixed. A longitudinal groove is cut through the entire height of the stand, and a groove is made at one of its ends, which is necessary for its connection with the flange. Such a flange, which is a massive washer with one central hole and three fasteners located around its circumference, is necessary to ensure reliable attachment of the rack to the base. The rack is inserted into the flange with its machined end and is securely fixed in it with the help of a welded joint, and the flange itself is attached to the base of the machine with a threaded joint. Drawings of the manual slotting machine with which you can cut slots and grooves:
The general scheme of the machine Console Mandrel-tool holder Caliper A holder and a console are mounted on the console, between which a compression spring is installed. A rather complicated device is a console, the construction of which consists of two hollow cylinders: a mandrel and a rack-mount, by welding connected by a jumper (square tube section 60x60x2.5). In each of the cylinders, a hole is made with an M12 thread, which is necessary for the fixing screw that holds the console from turning (in the column cylinder) and for installing the locking screw in the mandrel cylinder. On two opposite sides of the rack cylinder, it is necessary to weld the axles for the tool feed levers, which are made of half-pins or screws with an M12 thread. The levers and thrusts of such an improvised slotting machine themselves are made of steel strip with dimensions of 30x8 mm. Hinged to each other by pivot bolts, axles, levers and rods are worn on the axis of the mandrel cylinder and holder. It should be immediately noted that on a slotting machine, made by own hands, in one pass it is possible to carry out the processing of a piece of metal to a depth of 0.2–0.3 mm. We should also tell about the support of such a machine, which looks like a machine vise. Metal blanks to be machined are mounted in a three-jaw lathe chuck mounted on the upper movable support platform. With this caliper, which is reliable and easy to operate, the workpiece is supplied with respect to the cutting tool to the depth of processing. An example of another homemade, made in-house. Chisels and chisels are used for slotting sockets, cleaning edges and cutting planes, spikes, eyes, and cutting veneer (Figs 4,1 - 4,9). Industry produces bits from 6 to 22 mm with gradation in 2 mm, and chisels from 6 to 20 mm with gradation in 2 mm and from 20 to 40 mm with gradation in 5 mm. Such a set is sufficient for housekeeping and construction work, while for carpentry, narrow chisels from 1 to 6 mm with gradation in 1 mm are also required. The chisel differs from the chisel in greater thickness and a handle with a top shackle that protects the tree from being destroyed by a hammer. In the carpentry practice, hard knocks are not required, since deep nests are usually drilled out first, and then cleared. Chiselling with blows is inherent in carpentry work, thin carpentry details can be split. Therefore, it is enough for a joiner to have a set of chisels from 2 to 16 mm and two wide chisels of 25 and 40 mm, as well as two chisels of 6 and 12 mm.
Fig. 4. Tool for chiseling and drilling: Narrow chisels made of spring wire, files, grinding them appropriately on the emery wheel. With the exception of the cutting end, the metal should be “released”, heating on a weak flame until yellowness appears on the chiselled surface of the chisel (about 160 ° C). If this is not done, then the chisel will turn out to be brittle, since the metal of the file is hardened along the entire length. Stamens are placed on pins - wooden handles of rectangular cross-section with barrel-curved edges. (Round handles are less comfortable.) The handles must be cleaned and polished or coated with oil varnish. The nozzle should be parallel to the cutting edge of the tool, it helps accuracy in operation. For pins they take strong viscous wood - cornel, beech, and birch. To fit precisely, the hole is first drilled, observing the direction of the ribs, to a depth of 112 of the shank, and then burned with a hot shank deep into, without bringing it to the end. Driven in this way the chisel will sit firmly. Obliquely hammered handles correct, cutting the excess with the right side. Therefore, the handle preparation should be made somewhat larger in order to be corrected. Chisels are stamped, notched (thin) and forged (thick). Forged are characterized by a special tide - emphasis and a slight thinning of the pen to the cutting edge. Stamped - have parallel wide edges and require the installation of a thrust washer so that the handle does not tamp on the shank when struck. The quality of the chisel depends on the steel and hardening. Sharply honed chisel should without blunting to cut through 15 cm of beech or oak bar. If the steel is wrapped or crumbled - the tool should not be used. Sometimes you can improve the metal new hardening. The low cost of chisels allows you to make a choice before obtaining the desired qualities. As a rule, forged chisels safer. The length of the chisels is chosen based on the strength conditions: it is easy to break a very long and thin chisel. Typically, the length of the cutting part is 10–15 cm. Only for some works, for example, when chiseling in the planes or joining plane under the knife, the length of the feather is 20-22 cm. The feather in the wide face must be somewhat wider (1-2 mm) at the end . Wedge-shaped chisels are hard to work with, they get stuck in a nest and make work sloppy. The angle of sharpening wide chisels 20-25 °, narrow - 15-20 °. In the first case, the bevel width should be 2.5 thickness, in the second - 3-3.5 thickness of the chisel at the cutting end. For the selection of rounded grooves, semicircular chisels of different radii of curvature — from almost flat to semicircular, are used. Sharpen them both outside and inside, depending on the nature of the work. In addition, for simple carvings, chisels with a slanting edge, shorter and thinner, as well as semicircular, curved like a scoop, so-called cranberries, are used. The industry does not produce this tool; it is manufactured in a handicraft, forging way, from bearing rings, springs or thick springs. |


Popular:
New
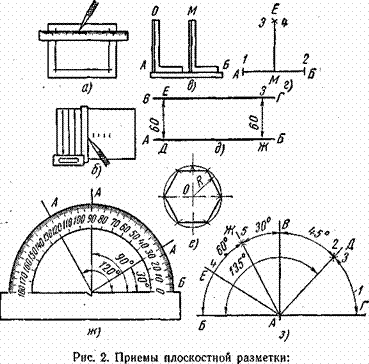
- Markup definition. Planar marking. Types of markup. Questions for self-test
- Pipe bending machines Various variations of pipe bending machine
- Safety during filing
- What should be the sharpening angle of the scriber
- Drawing on preparation of contours of future product
- Modern ways of cutting metal and its defects
- Kerner - so that the drill does not slip off!
- Objects of inanimate nature Examples of the influence of inanimate nature factors on plants
- Finishing joinery
- Block breakdown in AutoCAD - simple and effective teams from practitioners