Site sections
Editor's Choice:
- Expansion joints in buildings
- Chaber - what is it and its purpose
- Sharpening wood cutters: manual work, using grinding wheels and a grinding machine
- Belts and sandriks, crackers and volutes - secret codes of architecture on the example of the old Saratov Sandriks in architecture
- Surface grit - tooling work
- Maximum load on the balcony slab: how much can a balcony withstand in a panel house?
- Projects: symbols on drawings for water supply and sewage
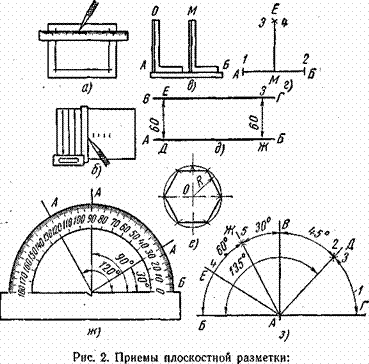
- Marking and marking details How to mark the details with curved contours
- Tools for slotting Tools for slotting
- Tools for chiseling Slotting tools
Advertising
| What should be the angle of sharpening scriber. Mark. We drill where necessary! What you need to know about the Kern |
|
Tool sharpening Every cutting tool gets blunt in the process of work, and therefore it needs to be sharpened from time to time. This operation is best and easiest to conduct on a grinding machine or other mechanical sharpener. Sharpening sharpening machine Sharpening chisels and crossbuttons. Taking a chisel in his hands, he gently applied to the rotating circle and move left and right with a slight pressure. Sharpening is subjected alternately to both faces. The angle between them - the angle of sharpening - can be different and varies depending on the hardness of the material being processed within the following limits: for aluminum and zinc - 35 °, copper and brass - 45 °, steel - 60 °, cast iron and bronze - 75 °. Sharpening angles are most conveniently checked against a pattern.
The rules for grinding the crossbutton are the same as for the chisel. Sharpening drills The figure below shows the front of the twist drill. Spiral Drill Front Spiral grooves along the drill axis are used to remove chips. The edge between the plane of the groove and the rear surface is the cutting edge. The angle between the edges is usually 116-118 °, but it can vary, depending on the hardness of the material being processed, from 90 to 140 °. When sharpening, the drill is held with the left hand, possibly closer to the front, and with the right hand, by the shank, shaking the drill smoothly. Sharpening drill The following conditions must be met: a) the cutting edges must be symmetrical, have the same angle of inclination and the same length; b) the transverse edge should be an angle of 55 ° with the cutting edge. Sharpening is checked by pattern.
Sharpening of the center punch is like sharpening drills. The tool is held with the left hand, pressing against the abrasive wheel, and with the right hand it is rotated evenly to obtain an even cone. The sharpening angle is 60 °, for pivoting centers - 120 °. Remember that it is impossible to press the tool strongly during sharpening, otherwise its working end will heat up too much and may be released - it will lose its hardening. During work, hot particles that can get into the eyes are separated from the tool and the abrasive wheel. Use protective eyewear or protective screen when sharpening! In case of contact with the eyes, immediately consult a doctor. TOOL-CUTTING TOOLINGAny cutting tool in the process of operation sooner or later blunts. If he is “one-time”, he has one road - to the dump. If the tool is really restored, why not take advantage of this opportunity? Based on this, we decided to prepare an article on how the cutting tool “brings to life”. Clarify the terminology. The cutting edge of the tool is formed by two converging planes (or curves, like drills). The angle of sharpening is the angle at the vertex of the convergence of these planes. The edge sharpness can be represented as the reciprocal of the width of the “pad” at the top or the diameter of the circle inscribed in it. In practice, the smoother the converging surfaces, the sharper the RC will be. Sharpening angles for different tools differ depending on the quality of steel and the material being cut: 17–25 degrees in a chisel, 25–40 degrees in a chisel piece, 30–40 degrees in a chisel, up to 60 degrees in a chisel, - 45–60, with knives - 20–30 degrees. All cutting tools in terms of sharpening techniques can be divided into "knives" (that is, that is longer than the width of the grinding stone) and "incisors" (that is already a stone: saws, mills, cutters and drills). Sharpening techniques of the latter are different from everything else. To the category of "knives", in addition to the knives themselves, we will assign scissors, knives of electrofunders and surface gages, as well as other length meter. Important note: scissors and knives woodworking equipment sharpened on one side only. Before sharpening, the tool must be cleaned of dirt, sawdust, tar and other things, since these substances easily and irreversibly clog the grinding stone. Knife sharpeningFirst you need to consider the cutting edge and decide from which abrasive to start. If the knife is new or badly blunted, you may want to start with a rough stone. Good sharpening cutting tools - it's just the ability to withstand the same angle when moving over the stone. Important note: never sharpen knives on a high-speed grinding wheel - it instantly releases and burns through the cutting edge. So, we wet the grindstone with water, put it on old newspapers or better in the recess, carved into the board according to the shape of the stone, and drive a knife along the stone, observing the angle of grinding. The knife should run on a stone at an angle as close as possible to a straight line. But since the stone is narrow, it is necessary to make some kind of oblique movement, moving the knife diagonally, that is, simultaneously along the stone and along the knife. A big mistake would be to sharpen the cutting edge in sections. Absolutely accurate transition will not work - a step is formed, and the knife will be bad to cut. It is necessary to sharpen until a burr, turned up, appears on the edge, which is revealed by a slight movement of a finger across the knife from the butt to the edge (you should not cut it along - you can cut yourself). When the burr appears along the entire length, the knife must be turned over and the other side sharpened.
The smaller the abrasive grain, the smoother the chamfers and the sharper the edges. After a small stone, you need to go to the emery paper, covered with abrasive up to a smooth surface, for example on a piece of glass or steel or on a flat part of the workbench.
Usually, cheap double-sided grinding stone is used first and then, successively, 120, 400, 600 (or 800) and sometimes 1200 emery papers. The most difficult and simple process is to maintain the same angle with all knife movements. It is worth noting that the constant practice is better than any ingenious devices - they break and also cost much more than a stone, which, by the way, is also present in them. The trick is to move the tool to be sharpened with a stationary wrist and carefully look at the upper plane of the tool. Then the angle is maintained very accurately. Scissors sharpen only with a chamfer, the plane adjacent to the other branch is only aligned on a fine sandpaper. Jointer knives, too, sharpen only with chamfer. Their peculiarity is that you often need to attach the edge to the ruler or glass in order to see the straight edge of the cutting edge and to avoid its rounding. Sharpening chisels and planer glandsChisels and planers have much in common. With a strong blunting or gouges on the cutting edge, which are caused by knots or nails, you must first profile it. By the way, the same is done in the manufacture of a cutter on a tree from hardened billet.
The most effective way of sharpening a piece of iron for a plane is with the help of an electrostatic.Here we need a high-speed electric torch. Often dipping a piece of iron into the water for cooling, you need to make a chamfer with an angle a little sharper than 25 degrees. In no case do not thin the edge of the piece of iron before the cutting edge appears, as the abrasive rubbing against the metal heats up the latter, and when you try to sharpen on a high-speed stone, the cutting edge will be immediately released and the tool will be damaged. When the thickness of the edge will be about half a millimeter, it is necessary to check the square angle perpendicularity of the cutting edge of the axis or the lateral side of the planer. Finally, sharpen the piece of iron in two ways. Best of all - on a low-speed electrosharp with a wet stone (pouring water into the pan and evenly pressing the piece of iron to the stone). If the width of the latter is insufficient, then it is necessary to drive a piece of iron from side to side.
A bolt with two nuts will help to observe the required angle when sharpening a piece of iron for a planer.If you do not have such a sharpener, you will have to work manually on an abrasive bar moistened with water. It is better to put it in the recess in the board - it is more convenient to keep it. Iron put on a stone at a selected angle or easier - chamfer on a stone, swaying back and forth until it gets up the whole chamfer. Sharpen movements along the stone and back, and better - describing the future cutting edge of the eight, in order to achieve uniform wear of the stone and maintain its flatness. When a burr appears, put a piece of iron on the stone with a plane and remove it with a couple of motions, after which they switch to a smaller abrasive, for example, turning over a double-sided stone. The final sharpening is done using sandpaper of various grains on the glass. Little trick. A bolt with a nut and two large washers can be used as a simple device to maintain the correct angle of inclination of the planer (see figure). Wood sharpeningSaws on wood, as a rule, are not always sold sharp enough (and large-tooth for the most part - just stupid). Again there is a need for sharpening, and for each type of work it is different. If the saw is not sufficiently divorced, it is first bred. If at hand there is no specialized wiring, you can do with pliers. The saw is clamped in a vice with teeth up, they sit down so that they can look along the canvas, and the teeth are bent in different directions through one, each time it is tilted by the pliers at the same angle. Usually a small wiring is always there initially, and you just need to increase it if you are dealing with a raw tree or large saws. If the saw is small and for accurate work, it is quite possible to leave the factory layout.
To sharpen the teeth using a triangular file. They sharpen the inner (with respect to the wiring) side of the teeth of the saw. The file is held so that the angle of the cutting edge is 60-45 degrees. In fact, it is easier and faster to sharpen one side of the teeth first, and then, turning the saw over, to sharpen the teeth of the other side. In this case, the movements are more of the same type - the saw turns out to be sharper. When sharpening saws, it is better to work alone and in silence by turning off the interference in the form of a radio and a TV, since careless movement either damages the instrument or causes a difficult healing wound. Tip: if, when cutting, the saw tends to go to the side, this means that the teeth are not evenly spaced - you need to increase their deviation from the side into which the saw leads. Sharpening saw bladesCircular saws are sharpened from the back surface, while working facing the material being processed. The front, which, when sawing, runs onto the material, remains as it is. The disc can be sharpened either directly in the machine (if we are talking about the equipment for the machine), or by removing it from the machine or the circular saw. In the first case, you first need to unplug the plug to avoid accidental start of the machine. The disc should be wedged, laying on both sides of it on a thin piece of wood and pressing them to the teeth. Tooth, which begins sharpening, it is necessary to mark the marker on the side, so as not to be mistaken in the work. When sharpening the first tooth, memorize the number of movements with a file or diamond file - all the other teeth will have to be sharpened with the same effort and the same number of movements of the abrasive tool as the first one. If the disc has been removed from the machine, hold it in a vice and follow the same procedures as described above. Next, the disk must be returned to the machine and sawed unnecessary wood. In case of strong noise or uneven feed, it is necessary to check whether the teeth are the same height. To do this, bring a marker to the cutting edge and slowly turn the disc with your hand one turn to the side opposite to the direction of rotation. Each tooth will be marked. After inspecting the disk, you can find teeth that are higher or lower than others. If the difference is large, it is necessary to carefully reduce the height of the teeth that are too long. Grinding millSharpening cutters are on the back or front surface.
Before sharpening from the cutter, you must first separate the guide bearing, otherwise you can spoil the tool.Shaped end mills are easier to sharpen on the front surface — either with a thin diamond bar or (with a narrow chip groove) with emery paper wrapped around a hardwood rail or a strip of steel. As the front surface is ground, the edge will sharpen, and the cutter diameter will decrease (slightly). With cutters with a guide bearing, you must first remove the bearing and only then sharpen them. An attempt to save a minute will end with a ruined bearing and a spoiled cutter. Sharpening turning toolsLathe cutters sharpen from the front and rear surfaces. There is only one nuance - the cutter narrows down, so that its side planes should not touch the workpiece at all, the contact should be only along the cutting face. The cutters of the fast-cut and carbide tipped grind on the grinding wheel. If the water supply machine is not provided, often dip the cutter in a container with water. Sharpening drillWhen sharpening the drill you need to hold it so that you get the desired angle of convergence of the cutting edges. In this case, the cutting edge should be symmetrical.
The easiest way to hold on podluchnik elektrotochila line with a felt-tip pen and keep the drill parallel to it. However, simply putting the drill along the line is not enough, you should also turn it to the desired angle around the axis, and then 180 degrees relative to the first position. You need an angle between the edge of the drill and the plane of the table, that is, the outer edge must be below the center, otherwise the drill will not cut the material, but drive along the back surface. There are various devices for controlling this angle, but it is easier to stand or sit at the table so that the glare from the lighting is on the outer part of the cutting edge, and then, without changing the body position, turn the drill in the fingers and catch the glare again - the edges will be sharpened under one angle of The sharpening of the drill on the back surface is called single, with a rather large bridge in the center that does not cut, but scrapes the metal. If you sharpen it, the drilling speed will increase. There are a lot of ways to jumper points. In factories, it is eroded by thin abrasive or diamond circles or at the corner of a wide stone. But you can undermine the jumper as shown in the photo. Goggles when performing sharpening are strictly required. Electric torchTo facilitate the work when sharpening tools, there are various electrocuts and sharpening machines. The choice of electrostatic is extremely simple. Such a machine consists of an asynchronous motor (such motors are perfectly mastered by industry), grinding wheels (they are interchangeable and are changed with a wrench), and covers. If the sharpener is taken not for industrial use, then the brand does not matter that much. Such equipment includes a short time, and its resource will be spent extremely slowly - even an inexpensive machine will last for many years. The diameter of the circle directly affects the price of the sharpener, so an amateur craftsman or a small enterprise should not strive for large diameters. Inspecting elektrotochilo before buying, try to move the shaft. If he not only rotates, but walks, then you have a marriage. Twist the stone with your hand and look at the free end of the shaft, does it vibrate? Best of all, of course, turn on the sharpener, but not all stores allow it. Sharpening machinesSharpening machines are divided into three groups. The first one is actually a high-speed electric drifter (about 3000 rpm), equipped with interchangeable holders for different types of tools. The second - highly specialized machines, for example for sharpening drills. Often they can not sharpen any other cutting tool. The third - machines equipped with low-speed circles with water cooling ("wet"). Rotation speed - 80-150 revolutions per minute. You can sharpen and edit any cutting tool, from high-speed steel drills to carbon steel knives. Low speed and water cooling are necessary conditions for removing the thinnest and sharpest cutting edge. Often these machines also have a polishing wheel for polishing the cutting edge. Work with electric grinder and sharpening machineAfter working on a machine with a “wet” circle, do not forget to pour water out of the pan and do not leave the stone in water in one side for a long time - the stone is saturated with water, loses its strength and turns into an eccentric that breaks the machine.
Abrasive wheels should always “run” onto the cutting edge of the tool to be sharpened, and polishers (leather, felt, vulcanite) “run away”, that is, rotate “from the worker”. Do not try to polish by rotating the circle “on yourself” - the object being processed will hit the circle, it will be captured and thrown in the direction of the operator. In addition to damage to the circle, you can get a serious injury. If you install the polishing wheel on a high-speed electric grinder, rotate the cover 180 degrees. To work on the polishing pad, either turn the machine around or approach it from the other side. Among the plumbing tools, there is one of such useful and simple hand tools as the punch. In this article we will talk in detail about this instrument, consider its purpose and types, and also focus on those details that should be remembered when buying a center punch in the store. Well, let's look at all this right now. What is a center punch and what is it for?As already mentioned, the punch is a hand tool designed for plumbing. So, it is used to mark the central holes (the so-called "cores"), which are necessary for the initial installation of the drill, or another visual mark. Externally, the punch is a metal rod having a circular cross section. One of the ends of the tool is the working part, and it is made in the form of a cone, whose angle at the top is 100-120 °. The process that is performed during the work with this tool is called “coreing”. It consists in blows applied by a hammer from the opposite part of the tool’s tool, the so-called butt pad. The use of this tool helps to avoid several unpleasant things - with its help, the drill slippage from the drilling point is excluded, and the corener helps to more accurately perform the drilling process, etc. You can buy a center punch in almost any store of plumbing and manual equipment. On the counter, it is easy to recognize it by the cylindrical shape, at the beginning of which there is a striker, and at the end is a pointed cone. In the middle part of the tool, there are notches or stripes that help hold it tightly in your hands. To get a mark using a center punch, you need to install it with a tapered end to the mark point, and strike the hammer with a hammer. The material from which the punch is made, as a rule, is a solid tool steel, hardened by thermal means. Note that this tool is often called “core”, but this is an erroneous expression. Types and types of center pinsAs we have said, the punch is a hand tool. However, at the same time, there are also automatic punchs, the so-called “crossbows”. This type of instrument suggests a completely different design and device. Outwardly, such a punch looks like a screwdriver, in the handle of which there is a spring and platoon-trigger mechanisms. These mechanisms make the striker move, and, in fact, leave marks on the metal surface.
The advantage of this type of center punch is the fact that it can be used to apply marks with one hand without using percussion instruments, respectively, without using the other hand. Also, the advantage of this center is the ability to adjust the force of impact. This, in turn, allows you to adjust it in such a way as to leave marks even on the softest or most fragile materials and parts that require increased accuracy and care when processing. And, of course, the automatic punch will significantly increase the speed of marking.
Another type of this tool is the electric punch. Its design provides a solenoid, which draws in the tool's core, and then applies a striking action on the center punch pin. As well as the automatic center punch, it is very easy to use, but its design is already somewhat outdated, therefore it is not so often to meet a tool of this type.
Also, there are centers with special mandrels. They will allow the mechanic to very quickly form a mark at a given distance, for example, from the edge, or, conversely, from the center of the part. In short, such a punch allows you to set labels on surfaces that have any specific features. To buy a center punch in a store, it is enough to pay attention to the material, look at its appearance, and look at the manufacturer. The tool from the known producer, is more preferable, than the center punch without any identification marks or distinctions. Therefore, pay close attention to these details, and then the tool will serve you for a very, very long time. More articles from the section: Hello. In this review, we will focus on the automatic kernel, acquired by me on eBay. If suddenly you decide to drill hard metal or a material with a smooth, even surface, the drill bit can slip off the intended point, leaving behind a fairly decent scratch. To avoid such situations, a punch is used, which makes a small depression (hole) in the surface of the material being processed. Typically, the punch is a metal rod made of carbide steel. One end of it is pointed, and on the other there is a “butt”. We put the edge in the place where we need to drill a hole - we hammer on the “butt” with a hammer and the hole is ready. Simple, but not always convenient, because firstly you need to use both hands, and, secondly, to constantly carry a hammer with you is also a so-called perspective. In order to simplify the process and an automatic center punch was created. But first things first. In a live center punch is not much different from what can be seen on the seller’s page and looks like this: Material: High-speed steel material HSS, Hardness up to HRC58 - 60; This tool has a more budgetary variation - without a red plastic handle. It just seems to me that because of a fairly stiff spring, it will not be very convenient to use them. So it is better not to save money here, especially since this performance cannot be called expensive. The total core length is 128 millimeters. Despite its apparent simplicity, the core device is difficult to call elementary. There are 8 details in it. On the mating side, resting on the needle, a bias spring is installed, which is compressed under load. Shock spring is located under the red plastic part, so that it can be used to adjust the impact force, which is important. For a start, a Soviet-era hammer was used as an experimental one: Duralumin: But a short video on how it all looks live (I apologize right away for focusing - my camera doesn’t know how to focus as I would like, but the essence of the process is clear): Summarizing everything that was written here, I can say that the tool met all the expectations placed on it. In its work it is trouble-free, besides using an automatic core is much more convenient and faster than usual. True, at first the center punch sometimes stuck and had to disassemble-assemble the impact part in order to restart the process. The installation of the eccentric spring helped to get rid of this problem. So if you have to make holes in solid steels, ceramic tiles, etc., then you can consider this product as an upcoming purchase. It is not expensive, but it will actually shorten the time of work and the integrity of the surface of the material being processed. On this, perhaps, everything. Thank you for your time and attention. I plan to buy +130 Add to favorites Review liked +102 +182 |
Study guide to prepare Workshop on plumbingSharpening center punch, scriber and compass feetThe quality of the markup largely depends on the health and accuracy of sharpening the marking tool. Before starting work, it is necessary to study the safety requirements for working on sharpening machines set out at the beginning of this chapter. Center pins (fig. 30) are sharpened in the following sequence. 1. Wear safety goggles and turn on sharpening motor.
Fig. 30. Sharpening center punch:
2. The center punch is taken with the left hand for the middle, and with the right hand - at the end opposite to the sharpened one. 3 Keeping the angle of inclination relative to the grinding wheel with a light pressure, apply the center punch with a cone to the rotating circle, with the fingers of the right hand evenly rotate the center punch around its axis. The position of the center axis relative to the circle should not change until a regular cone with a sharp tip is formed. The tip of the punch is periodically cooled in water to avoid discharging its working part. Check the correctness of sharpening carried out on a template (Fig. 31).
Fig. 31. Check sharpening center pattern A scribe (Fig. 32) is sharpened in the same sequence as the center punch.
Fig. 32. Sharpening scriber:
Consider the sequence of sharpening the legs of compasses (Fig. 33).
Fig. 33. Sharpening the legs of compasses:
1. The compass is taken with the left hand for the middle, below the arc with the locking screw, and with the right hand for the hinge connection of two legs (the legs should be in tight contact), 2. With gentle pressure, the compass is fed to the grinding wheel so that the compass foot is in relation to the circle at a certain angle, and the end of the first leg is sharpened; then the position of the legs change and sharpen the end of the second leg. After sharpening on the grinding wheel, the sharp ends of the legs of the compasses are adjusted on the bar, at the same time removing burrs on the inner planes of the legs and on the side faces of the conical part. With proper sharpening, both ends should have the same length and taper with the apex of the angle at the adjacent plane of contact of the legs (Fig. 33, b). test questions
|


 Do not attempt to drill only those areas where there is no burr. Continuous burr shows that one chamfer of the cutting edge of the knife received a plane along the entire length. When when grinding the second side of the burr appears on the already sharpened, it is necessary to turn the knife again and go to a smaller abrasive.


Popular:
New
- Markup definition. Planar marking. Types of markup. Questions for self-test
- Pipe bending machines Various variations of pipe bending machine
- Safety during filing
- What should be the sharpening angle of the scriber
- Drawing on preparation of contours of future product
- Modern ways of cutting metal and its defects
- Kerner - so that the drill does not slip off!
- Objects of inanimate nature Examples of the influence of inanimate nature factors on plants
- Finishing joinery
- Block breakdown in AutoCAD - simple and effective teams from practitioners