Site sections
Editor's Choice:
- Expansion joints in buildings
- Shaber - what is it and its purpose
- Sharpening wood mills: manual work using grinding wheels and a grinding machine
- Belts and sandriks, crackers and volutes - secret codes of architecture on the example of the old Saratov Sandriki in architecture
- Surface scaling - metalwork
- Maximum load on a balcony slab: how much can a balcony withstand in a panel house?
- Projects: legend on drawings for water supply and sewage
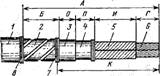
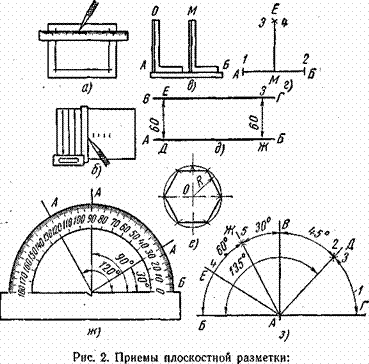
- Marking and marking parts How to mark parts with curved contours
- Slotting Tools Slotting Tools
- Mortising tools mortising tools
Advertising
| Santech designations. Projects: symbols on the drawings for water supply and sanitation. The image of the heating devices in the drawing |
|
Read times: 20 949 Regardless of the situation in which you need to urgently learn how to read the drawings, this instruction will help you learn to understand any drawing in the shortest possible time. The whole point of the method is to go from the big to the smaller and not get hung up on the little things. What is not clear - immediately look in google, since the purpose of this article is not to load you, but rather to set the desired vector. Step 1: learn the basics.Types of drawings
First you need to understand what are the drawings. Drawings are divided according to their characteristics. They are:
We divide the drawings by the target audience:
According to the method of using the drawings are divided into the following clusters:
Types and thickness of lines
Fonts and their sizesAccording to GOST 2.304-81, all fonts in the drawing should have a certain angle of inclination, line thickness, height, the distance between the letters. That is, you can not just take it, and write on the drawing in any font. In addition, in different places of the drawing, the inscriptions are made with different heights. . Design drawingsDepending on the type of drawing and its purpose, its design may vary. Basically, frames and stamps vary. Filling stamps
The main inscription (stamp) is intended for the image on a sheet with a drawing of the basic data:
All inscriptions, dimensions of the position of the stamp elements are set by GOST 2.104-68 (forms 1, 2, 2a, 2b and applications that establish a breakdown of the drawing into zones and drawing stamps for different paper formats. Step 2: Visual Perception
After studying the basic concepts, you can begin to study different types of drawings. This will help to better read and understand them. Examples of finished drawingsExamples of some types of drawings are presented on our website in the section. It presents screenshots and scans, and. YouTube TutorialsNext, we recommend that you familiarize yourself with the video tutorials on drawing in AutoCAD. You can do a web search on YouTube or on your own. But we, on our part, want to recommend you really useful channels (not advertising)
For starters, this will be more than enough. Step 3: drawing software
To open the drawings, you need to download and install on your computer specialized vector programs that can be divided: On a commercial component (paid and free)
The most popular are the compass 3D and AutoCAD. Step 4: Practice
If you do not have the time and opportunity to study this science, and you need to make drawings - you can order their production from us or. We accept orders in Ukraine and from the CIS countries (except Russia). Under the link below you can find out and payment methods. Any serious construction begins with the preparation of the project. This allows in advance, even at the level of diagrams and drawings, to compose and place all the engineering communications necessary for a comfortable stay in the room. The main ones, along with gas supply, heating and the chute, are cold and hot water supply with sewage and drains. For the convenience of planning and reading the designed documentation during construction, GOST developed, approved and regulated in SNiP the conventions of all systems mounted at construction sites, as well as the sanitary requirements for each of them. They also include detailed symbolism of the nodes required for bringing water into the house, filtering it and removing it from the sewage system. This table shows all the designations for water supply and sewage communications used in construction:
Symbols of water supply and sewerage are uniform throughout the Russian Federation and the CIS countries. Their change at their discretion is unacceptable. The reason is simple: any trained plumber should understand the drawing on the plumbing arrangement of the object. This will help to avoid errors in the technology of work and, of course, to provide the most efficient way to operate the facility’s water supply. Symbols on the drawings and diagrams for the installation of plumbing should be indicated during the construction of any construction object, whether it be a multi-storey building, a cottage or any industrial building. They also apply. in computer programs, for example, AutoCADused when creating projects of water supply and sewage facilities. Features of drawing diagrams and drawingsPlumbing symbols for symbols of various nodes are used both in the schemes of the object and its drawings. Both that and another type of graphic display of communications, as a whole, carries out the same task - the creation of a working draft, which is the main document during construction work. A scheme is a plan, the beginning of everything, most often based on a specific technical task. It runs on any medium, including a simple notebook. All elements of the upcoming design here can be fixed quite conditionally, only with the designation of the mounting nodes and their communication links at the facility. For example, like this:
Two-dimensional ( axonometric) schemes allow you to represent the object in two planes: in length and height or in length and width:
Isometric view more informative. It makes it possible to immediately evaluate the working area by length, width and height:
Even more visual for the designer is a three-dimensional image in computer format 3D. Using it is much easier to maintain the scale and size required. The presence of all sizes in all three planes, made in a given scale, turns a detailed and accurately executed scheme into a drawing. All drawings in construction projects are made on paper. This makes them more convenient to use on objects. On large construction sites equipped with computers, information is duplicated on special sites with the ability to view each drawing plot in 3D.
All symbols in the drawings must comply with GOST. Otherwise, it will be impossible to carry out the installation work exactly. It is also necessary to take into account the requirements of SPDS (system of project documentation for construction) for the development and accounting of documentation intended in order to install plumbing at construction sites. Only in this way can one gain confidence that the water supply of the house and its sewage system will work efficiently and safely. Symbols in drawings for water supply systemsBefore developing a water supply project for a building and, in particular, a country house, a whole group of factors is identified that can affect the functioning of the water supply system.
The process of creating a project goes through several stages:
In order to correctly place the symbols of the water supply on the drawings of the projected object, the designer needs to imagine what elements the water supply system consists of. The number of water supply elements and the material from which the sanitary fittings are made may be different in cost and quality, but this does not fundamentally change anything. Symbols of piping schemes and the corresponding complete set of the water supply system in all cases remain about the following in composition:
Conventional graphic designations of pipelines are aimed at showing the piping system of hot and cold water pipes. Cold water from the tee of the filtration system it enters the collector installed in the house. From there it is distributed through pipes to the existing plumbing points. Hot water It is connected to the heater and then, in the same way, is dotted. This diagram clearly demonstrates this:
Sewerage: design featuresThe sewerage system in any house or production room is divided into an indoor and outdoor module. The first covers cleaning inside buildings, the second provides for external sewage around the house. The internal sewer module is formed from a network of pipelines combined into one complex. From the house, this module has only one outlet, connected to the outdoor module by means of a check valve, which prevents the system from being overfilled with water in the event that the outdoor containers are full. Into which all internal and external drains from the external sewer supply are discharged, including “stormwater” if it is available on the site. Rain storm sewer
When designing, a number of calculations are made. The main ones are:
In addition, the project takes into account:
Symbols of domestic sewageThe internal sewerage system is designed to discharge drains from all plumbing installations available in the room. Water formed as a result of the life of its inhabitants, mainly moves through pipelines installed with a certain bias, in a natural way. In rare cases, this requires forced promotion. Watch the video The rooms in which the plumbing is located are planned close to each other. This helps to speed up the drain and reduces the likelihood of clogging of the sewer.
The sewer designation must take into account both internal and external sewer networks. Internal sewage includes signs indicating:
The designation of the sewer plug is mandatory. If there are several caps, the location of each should be indicated on the drawing. The domestic sewage system in residential buildings is designed in isometric pipelines with symbols, primarily as a system for household waste. At the same time, it provides gutters associated with storm sewers or special trays around the perimeter of the building. A special siphon is installed at the place where the drains from the house are released. If you decide, then we offer step-by-step instructions with a video tutorial, diagrams and projects. The symbol in the perspective view of the sewage system includes the elements that are the source of sewage waste:
The drawing also conventionally indicates the pipe receivers of sewage effluents, as well as their fittings, with which the effluents are discharged to cast-iron or plastic risers - tees, elbows, crosses. The attic of the riser to the roof is indicated in the drawing, which prevents the gas contamination of the room with unpleasant odors. Graphic symbols in the drawings of the external sewage systemExternal sewerage covers water treatment and spillway outside the house. It can be alloyed, semi-dividing, dividing. Alloyed sewage system is designed to collect all types of sewage into a collector and then sent to a treatment network. Semi-separation sewerage is aimed at the removal of all rainfall without dividing them into polluted and clean.
Symbols of sewerage in the drawings of the separation system include a storm and household network. Storm water outlets collect rainwater or industrial effluents and, without preliminary treatment, discharge them into a sewer well or reservoir.
Watch the video Graphic signs on wiring diagrams necessarily show:
Each of these elements has a certain function in the system of reception, transmission and treatment of sewage and storm water, and therefore must be installed both in the house and in the adjacent area. Article SummaryThe value of symbols in the practice of building design is difficult to overestimate. In the process of studying the material, a large amount of information is being worked out, relating not only to the equipment mounted on the object. It is important to create a drawing that would be understood by the direct performers of the work: it should be easy to read. It is for this that the conventions are intended. They can be alphabetic, digital, but the most graphic is graphic, symbolic, option. The icons used by the project executor allow the master reading the drawing to easily determine which element of the system to be created and where to install it. This greatly facilitates the installation of plumbing and sewage at the facility. A great advantage of the symbols is that with their help, according to GOST, not only plumbing communications, but also the plumbing itself can be applied to the drawing: sink, faucets, bathtub, shower, toilet bowl. Watch the video Each of these elements is displayed as a specific pattern. This makes it possible to immediately understand what should be installed in one place or another, and, ultimately, carry out work more quickly and efficiently. After reading this article, you will learn how to correctly and quickly display the sewage system, plumbing and heating system on the axonometric scheme. How to reflect all elements of communication in the drawingIn order to cope with this task, you will need a program for creating graphic drawings, sketches and diagrams. You can open any of the arsenal of construction programs, supplemented by such a function, or the one with which you are familiar. Before developing an axonometry, prepare apartments or other premises with communication networks. Drawing everything is not so difficult, especially if you have experience with engineering programs. On the sketch reflect all the pipes shown on the floor plan of the house. They are transferred to the electronic version of the axonometric scheme and reflect at an angle of 45 degrees. Important! This rule does not apply to horizontal sections. The lines are left unchanged. As designs in the electronic versionMost quickly you can build a drawing by cloning the entire scheme. To do this, select the "Insert" command, after which the integrated image is inverted. In order for the function to execute, it is given a value equal to 45 degrees (a number is written in the program). Preparing the basis in the electronic version, where on the plan marked risers, put the symbols in the form of points. To reflect all the floors in the building draw a vertical line. For the purpose of the best perception on the scheme reflect overlapping panels.
Important! Do not make the plates too long. Use the gap. The peculiarity of the axonometric scheme of sewage is a reflection of all the elements of sanitary devices: urinals, toilet bowls, sinks, floor drains and other devices for carrying out hygienic procedures. What is reflected in the diagram?On the axonometric drawing of the sewage it is necessary to show:
What data contribute to the drawingThe introduction of the following indicators describing the water supply system is mandatory when building an axonometric scheme. To such information belongs:
In addition to a number of basic data, accompanying documentation is attached to the diagrams, including the specification for materials and equipment. Sketch Design FeaturesHere attention is focused on the reflection of devices. If one element climbs onto another, and this happens in most cases, then a dotted line is used to indicate the displacement of the sanitary element in order to have a better visual effect.
Axonometric plumbing scheme should include readings of all pipe diameters. If the toilet on the outlet is not marked, then take a diameter of 50 mm, if it is - the minimum diameter should be 100 mm. These numbers are important to remember. For risers in 90% of cases, an indicator of 100 mm is used. Slopes in the same diameter will be 0.02, with a 50 mm index, they set the angle of inclination to 0.03. If you have already inflicted all the elements, mark the issues with a diameter greater than that of the risers, take the number of 0.02 as the slope. At the last stage of axonometric compilation, special notes are made on the basis of the site characteristics and the construction plan. Here they note the level of soil freezing, the location of the foundation, as well as other factors affecting the edits.
Features of the drawingsWhen making an axonometric scheme, pay attention to such moments:
Axonometric drawings of branches of heating and ventilationWhen working with engineering networks, calculations and graphical visualization act as important components of work on a residential project. In addition to the plan of the house and its facade, the package of documents required for construction is complemented by an axonometric communication scheme. On it you can visually explore a particular network: plumbing, heating, ventilation. Especially important is the use of such drawings in the arrangement of complex systems. The presence of axonometry of the heating project simplifies the work of installers in the process. What to look for when building a sketchBefore you reflect the axonometric scheme of heating the room in paper form or electronic form, carry out a series of calculations. The scheme itself is based on the collected data:
After receiving the appropriate calculations, their indicators are introduced into the scheme. Axonometric necessarily contains the technical characteristics of each of the network nodes (boilers and pumps used), length and diameter of pipes, heat consumption and information about other thermal properties of heating devices, such as radiators, convectors, registers. Getting to work on the axonometric drawing, first of all, determine the main ring of the coolant movement - the path to the most remote of the elements from the boiler and back.
Summarizing the studied, let's say that axonometry is performed on a mandatory basis, regardless of the type of communication system for structures of any type of purpose. Having a graphic drawing before our eyes, installers quickly determine how much work is to be done and how exactly the network looks. If a specialist understands axonometric and the drawing itself is executed correctly without any errors, then in the course of project execution it is possible to eliminate the occurrence of any difficulties associated with the installation of elements of the heating system, pipeline and other engineering networks. In order for the design, and after the installation of the water supply system, to be successful, it is necessary to correctly visualize on the sheet or in electronic form the building itself and the communication branches inside it. In this case, the graphic component of the project includes:
Remember that when working with a correctly defined axonometry, problems with 99.9% of cases do not arise. Because this stage is so important in the design of the future home or high-rise buildings. Do you want to seriously renovate and renovate an apartment? Then it will not be out of place to find out that one of the most basic stages of the overhaul of housing is the replacement of old plumbing and pipes with new ones. In addition, this is the most impressive item of expenditure in the budget allocated for this work. To reduce the already impressive costs - the normal desire of every zealous owner. Do you agree? To reduce them is quite realistic: do-it-yourself plumbing installation help. We will tell you how to do the wiring, how to move and connect plumbing equipment, what tools and materials are needed. You will learn how to independently change the pipes in the bathroom and connect plumbing fixtures. And in order to make it easier to understand the repair issue, the article contains thematic photo tutorials and video instructions. Standard projects of high-rise buildings are far from being satisfactory to everyone, and apartment owners are trying to redo plumbing according to their preferences. This complex of works is very troublesome and time consuming, however, if you study well the theoretical side of the issue and follow the instructions accurately, most of the work (if not all) can be done independently.
Which is better: sequential or collector circuit?Today, the two generally accepted are used - consistent and collector. The sequential (or as plumbing as it is called, tee-type) system is considered to be classical. It is used in all standard apartment buildings and private houses with a small area of bathrooms. The system is very simple - from the central risers, through which hot and cold water is supplied to the apartment, is laid under one main pipe, from which every sanitary fixture in the apartment is powered.
For each device in the pipe smashes tee. Thus, the entire length of the pipes in a house or apartment is relatively small, so this option is considered the most inexpensive wiring The scope of work on installing bathroom fixtures for the bathroom with their own hands is also not very large. However, the benefits of the sequential scheme end there. The main disadvantage of this type of connection is that all devices are powered from one pipe, and when one device is working, the pressure in all the others drops. That is, when the washing machine pumps water, the pressure in the kitchen faucet will be very weak, and vice versa. Another disadvantage lies in the way of shutdown. If one sanitary device breaks down, then in order to repair it, you will have to completely shut off the water in the apartment. The collector system is used in those houses where there is a large load on the water supply system. In this case, all sanitary points are connected to the collector.
The collector is a large diameter distributor having a certain number of outlets. A separate tap is installed at each exit. Most often, the collector is hidden in a special cabinet or closed niche - for aesthetic reasons. Each sanitary device joins the collector separately, through a personal tap. With this method of connection will require a large number of pipes, and installation work will take a long time. Although with the connection of such a system will have to tinker, the advantage is obvious: the pressure in all plumbing devices will be stable in any mode of operation of the plumbing. In addition, each device, if necessary, can be disconnected or dismantled. At the same time, there is no need to shut off the water completely - it is enough to turn off the tap on the desired branch. The wiring device in the bathroom
In the assembly of the pipeline of polypropylene pipes has its tricks, which should pay close attention: Image Gallery
How to connect a regular sink?Focusing on it, mark the horizontal line on the surface of the wall. After that, you need to measure the width of the back wall of the washbasin and put this distance down from the mark. Before mounting brackets on the wall, you need to accurately calculate the distance between them. This is easy to do: turn over the sink, put the brackets on top so that they fall into special slots. Next, measure the distance between the brackets and transfer it to the wall. Now you can make holes, beat dowels, tighten the bolts. Next, you need to install a mixer on the sink, then fix it with bolts and washers, check the sink position on the level and fix it with nuts. We install a rubber gasket on the drain hole and mount the drain, connect it to the siphon. Using the adapter, we connect the siphon drain pipe to the sewer. Using flexible hoses, connect hot and cold water to the mixer. How to install a sink on a pedestal?In this case, it is very important to make the markup correctly. We put the pedestal, on top of it we set the sink so that the drain is exactly in the center of the stand. We check its location using the construction level.
The installation process of a sink with a pedestal is not very different from the installation of a conventional washbasin: we also install an element that masks the pipes under the sink After that, carefully mark on the adjacent wall of the place of fastening for the bowl. The entire structure can be temporarily disassembled to make holes in the wall. After that we beat dowels, we twist screws, we put on packing nuts. Now it remains to fasten the bowl of the sink to the wall. The main thing here is not to overdo it, since ceramics can crack if the nuts are clamped too tightly. Inside the pedestal, you need to install a siphon and connect it to the washbasin, and the drain pipe to the sewer. In order to visually present the installation process of a sink with a pedestal, we suggest that you familiarize yourself with the following selection of photos: Image Gallery Having installed the pedestal to the place of the intended connection and hoisting the sink on it, we check the horizontal position of the device with the building level В and carefully drill the drilled holes into the dowel, acting with a rubber hammer through the plate. We twist the brackets in them. We connect the sink to the outlet in the sewer system by connecting a siphon to its drain. Stage 2: Marking the fixing points of the plumbing fixture
The most popular model of the toilet - floor. If the floor in the bathroom is lined with ceramic tiles, under the toilet you need to put something soft - for example, a piece of linoleum or rubber. To connect the toilet to the sewer, you need to use a special cuff. One of its ends is connected to the drainage of the toilet, and the other to the sewer pipe. To the floor, the toilet is fastened with special studs that are inserted into the dowels fixed in pre-made holes.
The toilet, as a rule, is sold in an already assembled form. You just have to attach it to the floor and connect to the water supply and sewage. In some cases, the toilet is glued to the floor with epoxy glue. In this case, the toilet can not be used for about 12 hours, until the glue completely hardens. Conclusions and useful video on the topicWith tips on the device layout and self-installation of plumbing equipment can be found in the following videos. Video # 1. How to make the wiring of PP pipes:
Video # 2. Useful tips on welding PP pipe and plumbing installation:
In this publication, we have provided only general information on the replacement of plumbing and pipe installation - this topic is too extensive to be fully disclosed in one article. However, we hope that this material will help you in planning and carrying out repairs in the bathroom, choosing materials and replacing plumbing fixtures. Please write comments in the box below. We are interested in your stories about personal experience in self-installation of sanitary devices. We are waiting for messages with useful facts and questions on the points of interest. |


 However, more informative are the schemes where the projection of the designed communications and the symbols of all the proposed nodes are indicated. Depending on the need, two types of projections are used in the schemes - two-dimensional and three-dimensional (isometric).

 The specification of the proposed drawings is also important, in particular, data on the wells available on the construction site, as well as the topography of the area. In addition, the project includes all certified materials necessary for the work.
 Flushing devices are connected to the water supply. Wastewater is sent to the external sewer through siphons, which are simultaneously hydraulic gates - U-shaped pipes with water. A pipe with inspection holes is connected to each siphon in the event of a blockage.


Popular:
New
- Markup definition. Planar marking. Types of markup. Questions for self-test
- Pipe bending machines Various variations of pipe bending machine
- Safety during filing
- What should be the sharpening angle of the scriber
- Drawing on preparation of contours of future product
- Modern ways of cutting metal and its defects
- Kerner - so that the drill does not slip off!
- Objects of inanimate nature Examples of the influence of inanimate nature factors on plants
- Finishing joinery
- Block breakdown in AutoCAD - simple and effective teams from practitioners