Site sections
Editor's Choice:
- Expansion joints in buildings
- Chaber - what is it and its purpose
- Sharpening wood mills: manual work using grinding wheels and a grinding machine
- Belts and sandriks, crackers and volutes - secret codes of architecture on the example of the old Saratov Sandriki in architecture
- Surface grit - tooling work
- Maximum load on a balcony slab: how much can a balcony withstand in a panel house?
- Projects: symbols on drawings for water supply and sewage
- Marking and marking details How to mark the details with curved contours
- Tools for slotting Tools for slotting
- Tools for chiseling Slotting tools
Advertising
| Tetrahedral column scanword. Features of plastering tetrahedral columns with a dry mixture. Decorative design of columns and their architectural elements |
|
Columns are special elements of the building that take up the load from the overlying structures, but, unlike walls, have a limited plane and a varied cross section, therefore, the stucco of columns should be considered as a separate, very voluminous topic. It happens that they are missing from the building structure, but it happens that they enter it and are particularly visible on its facade, which requires particularly careful decoration. In parallel with their physical function to carry the load, the columns can be made specifically to bring a “zest” to the facade of the building, making decorative decoration of the columns, for example, with stucco decoration that will harmoniously combine with other elements of the facade, such as the crowning eaves, window drafts (platbands) and others. However, there are many options for plastering and decorating them, as well as the types of columns themselves. If we take into account the cross section of the columns, they are:
This list contains columns made of concrete and brick material, in addition, the article itself deals with the plaster of columns made of these materials, metal columns must be specially prepared (to fill the metal grid and make the first layer with a rip) or impose brick.
In the presence of capitals in such columns, work also proceeds easily: in fact, the capital consists of a baguette (cornice), which is drawn out on each side of the column. However, as practice shows, fewer people perceive such columns as the “highlight” of the facade or interior, because strict, sharp, rectangular forms are not for everyone’s liking.
Such columns can have the same cross section or tapering towards the top (columns with entasis) and their advantage lies in the best aesthetic vision of the facade and interior against them, as well as in the variety of types and methods of decoration for such columns. The practicality of such columns is also great: there are no sharp corners, which means that it is more difficult to touch, hurt, damage the finish, etc., and so on.
However, some operations are still simpler: each face is more easily erased than the entire plane of the round column; further finishing is also easier. There are decorating techniques, but much less than in the above described types of columns. In fact, the basis for plastering columns in a multifaceted way are round columns, because initially they are constructively only round (concrete) and rectangular / square (brick, concrete).
The edges of all columns going in a row must be the same width - this and all of the above is taken into account when staking. Guided by both the old and modern technological maps, there are practically no differences in the performance of work. The process of plastering tetrahedral columns (as well as other types of columns) includes several working operations, the list is as follows:
Stacking of tetrahedral columns can be divided into several stages: fixing the front, rear and side planes. The first step is to fix the front planes of the columns of the outermost row (corner columns) or the rear planes - without a difference. Hanging start with the extreme corners of the extreme columns, arranging the top brand of dowels. Then on these dowels cling the cord, pulling it along the entire row of columns, and determine the thickness of the layer by adjusting its distance by plugging the dowel or sliding the loop of the thread hooked on it. Then, the plumb lines are hung on the installed dowels and, thus, the lower marks are arranged, and the cord is also tensioned. Intermediate marks of fragments of tiles planted on the mortar or of the same dowels are installed over the tensioned cords.
The device guides for plastering Today you can observe in the work of masters without making marks: to determine the roughness of the straightness of a row of columns and the thickness of a layer, they simply pull the cords along the dowels in the corners of the columns of the outer row. After the optimum thickness of the layer is determined, and the tensioned thread shows this thickness, first install the outer rails along these dowels, then the rails of the columns intermediate along the cords - without any marks. So, after the front and rear planes are exposed, they (the front and rear planes) are plastered and only after that, the strips are removed and attached to the plastered surfaces in the level and angle of 90 degrees, and with the same distance between them. , as mentioned above, occurs in pairs: first, the front and rear planes are plastered, then the side planes. The mortar is applied cement-sand (about solutions and their proportion can be found in the article "") or better yet, cement-lime. When plastering concrete columns from the very beginning, even before fixing, they are stuffed with a metal grid, or when plastering they use modern ready-made dry construction mixtures. Columns of brick abundantly moisturize, the first layer - obbrysk, should be liquid. The mortar is applied in the same way as when plastering wall surfaces, starting at the top with rows from left to right (or right to left), using a scoop, scoop or trowel for the base layer - the “primer”.
It is especially important to carefully treat the grout of a circular surface, because the better it is done, the easier it is to produce a sandless coating then (in the case of painting or finishing with thin-layer decorative plaster). The technology used for plastering of round columns was, is and remains traditionally unchanged (with the exception of applying a plaster layer from modern mixtures), and when performing it, the following actions are also performed:
differs significantly from that in the case of rectangular ones, namely, that there are only four marks on the entire column: the top two on the front / back side from the top and two on the same side from the bottom. In the extreme columns in the upper points in the center of the frontal view, at a distance of 10 cm from their end, the dowels are hammered, along which the cord is tensioned and adjusted so that not one of the columns in the row touches it. After that, on the adjusted upper dowels, the plumb lines are released, on which the lower dowels are mounted and also tension the cords. The same is done on the second side of the column; the marks of intermediate columns are mounted on the cords. Staking of columns with entasis (gradual narrowing to the top of one-third of the column) takes place as follows: in the upper parts of the columns, long dowels or nails are hammered, and plumb lines are inserted in their caps, which are set at the bottom and middle (at a height of 1/3, from which begins the narrowing of the column) dowel-mark. From the top caps of the dowels, the distance to which the radius should be narrowed is measured. After that, the cords are tightened and everything is as usual.
Guiding device for pattern occurs on the exposed mark, not only in terms of relative to the vertical, but also relative to the central axial. In order to avoid any joints, a previously prepared template of a semicircle of the column is tried on with the guides exposed, stretching it along the entire body of the column. There may be an error, as a result of which, on one side, the template may not fit between the guides, and on the other hand, on the other hand, it may not reach them. This means that there is a discrepancy from the central axis of the column, in this case it is necessary to calculate which of the guides is correctly exposed and use the same template to set the second one. The device guides for columns with entasis is the installation of round rings made of wood or curved of metal - it does not matter. These rings consist of two halves and are mounted on the plaster, focusing on the brand. On these rings there will be a rake around the curve, which forms the formation of the entasis curve (gradual narrowing of the column to the top, starting from 1/3 of the height). Plastering columns with radius rods occurs in several techniques: plastering of one and the second half of the column, separated by guide rails and sealing of the strobes after dismantling the slats of the plastered column. It is important to perform the work without long interruptions so that the rubbed layer of soil comes out monolithic (solid). To do this, you must “throw” the solution with rows from left to right in the direction from top to bottom one half and stretch it several times with a pattern, then do the same with the second half. After both sides are stretched, it is necessary to dismantle the slats and marks, seal up the grooves formed from them with the same plastering solution and grout the entire soil layer of the column. If we are talking about plaster of columns with entasis, then the work goes a little differently: throw the solution around the entire column to the bottom, then draw it around with a previously prepared rack with entasis several times until a clear curve is formed. After that, the guide rings are removed, close the resulting grooves with a solution and grout the entire soil layer formed in the column.
When grouting each face of a column, it is important to pay attention to their corners, since they are the most visible parts of the entire column and all flaws and irregularities are clearly visible on them. In this case, the technology of plastering columns is similar to that of pulling round columns with the same radius along the entire length and has exactly the same set of processes:
Stacking columns it happens in the same way as the round ones: dowels are installed on the columns of the outer rows along the axial center with an indent of a few cm from the edge, tensioning the cords, adjusting the distance from the cap of dowels to the base of the column. On the dowels adjusted by a plumb line or using a level, the lower dowels are set. Also pull the cords and expose the intermediate slats. If the height of the columns is large, then between the upper and lower dowels of the columns of the outer rows they also expose the intermediate ones, also pulling the intermediate cords between them and, accordingly, the dowels of the remaining columns of the row. When installing stamps, it is very important to control them along the central axis, since the pattern consists of two equal parts, which also extend along the guides that are set along them.
Guiding device multifaceted columns performed by exhibited brands. At the same time, it is important to ensure their vertical along both vectors - relative to the column and relative to the axial center. For proper orientation with respect to the axial center, it is clear that there must be correctly placed marks, along which the guides are set so that the marks are in the middle of the rail axis. It is important to understand that the guide rail runs exactly in the center of the front face, respectively, the installation work must be carried out very carefully, carefully observing all tolerances of the SNiP. We describe these tolerances for those who still do not know: deviations along the plane and level should not exceed 2 mm by 2 m height, but not more than 5 mm for the whole, be that column at least 20 m. Plastering columns with polygonal rods happens on the exposed guides. In this case, the column is divided into two clamps, separated by guide rails, and plastered accordingly, also according to clamps. Each grab "zakidyvaetsya" solution rows from rack to rack from top to bottom. Then the template is immediately pulled several times until the full-fledged edges with thin, clearly visible corners are formed. The same is done with the second grab, immediately followed by the dismantling of guides and marks, filling the resulting gates with a solution and grouting the column methodically along the edges. Decorative design of columns and their architectural elements
So, besides plastering a four-sided column, drawing out a polygonal or round stem pattern, the column can contain such architectural, decorative and stucco effects:
Some of these types of decoration of columns is carried out on a damp, freshly plastered trunk; this must be taken into account and everything necessary must be prepared in advance in order to complete the work.
Two ways of forming flutes can be observed: the first, when a newly plastered and rubbed column is cut with a special metal-edged template (a modern way, so to speak, "alchemy"), and the second, a classic, when using a flute pattern when pulling the column itself. At the end of the flutes, smooth semicircles are formed by hand. In addition, flutes can be curved, with the help of a template guided by ropes attached to the column along the desired trajectory, which is supposed to be flute.
Rusting is a technique that is used to design the plaster layer under stone blocks, by means of forming cuts of various shapes and depths. Rustov (cut-outs) are many, and they consist of architectural frills and other elements. It is carried out by a pre-prepared template, which is used to cut rust under the ruler, and in the case of round columns, round rails or ropes are used instead of a ruler.
From a technological point of view, this solution can be implemented in two ways: wet and dry. The dry method is the mounting on the adhesive composition of the facade polyurethane product - there is nothing to talk about, but the wet method of moldings is a topic. They are drawn on the appropriate profile pattern on the surface, which is preferably not yet grabbed (this will provide better adhesion), otherwise it is good to use a more tenacious solution mixed with lime (cement-lime mortar). On the surface, contours are beaten off, guides against them are pulled along, and the corners are drawn by hand with a trowel or wooden ruler.
In their artistic and decorative design, they can be very diverse and vary by orders. At the same time, the easiest order in execution is prehistoric, when the capital does not contain artistic stucco, but only consists of a profile thrust, which is carried out round the same plaster mortar, which was used to draw the barrel of the column itself. The remaining orders require special artistic skills to carry them out, but you can take ready-made polyurethane stucco, which is very popular and widespread today.
The bases are made according to the template by circular thrust and do not have any stucco decorations and architectural ornaments. The only snag is that the base (as well as the capital) has a solid thickness, therefore stretched in several stages, in layers. As a rule, it looks like this: the first layer is applied and the pattern is drawn in order to remove excess solution in places where its layer is minimal, then after the first layer has set, this cycle is repeated the second and third times.
The solution that is used for this may have a diverse composition, for example, previously there was a very popular composition of white cement fine grinding and marble dust, this solution produced a luxurious look of the column, and it also had excellent resistance to atmospheric and mechanical loads. I hope that this article has benefited you, I also recommend the article “”, in which you can learn about another way of finishing the columns - facing by facing. When working, it is necessary to take into account: the rotation angle is 90 degrees with respect to each face, the straightness of the face and face faces and their vertical level, as well as (with itself) deviations along the plane in the vertical and horizontal directions. Fig. four. The edges of all columns going in a row must be the same width - this and all of the above is taken into account when staking. The process of plastering tetrahedral columns (as well as other types of columns) includes several working operations:
The fixing of the tetrahedral columns can be divided into several stages: the fixing of the front, rear and side planes. Hang the front planes of the columns of the outermost row (corner columns) or the rear planes - without a difference. Hanging start with the extreme corners of the extreme columns, arranging the top brand of dowels. These dowels cling to the cord, pulling it along the entire row of columns, and determine the thickness of the layer by adjusting its distance by plugging the dowel or sliding the loop of the thread hooked onto it. On the installed dowels, hang up the plumb lines and, thus, arrange the lower marks, on which they also tension the cord. Intermediate marks of fragments of tiles planted on the mortar or of the same dowels are installed over the tensioned cords.  Fig. four. When arranging guides for plastering: it is possible today to observe in the work of masters without making marks: to determine the roughness of the straightness of a row of columns and the layer thickness, they simply pull the cords over the dowels in the corners of the columns of the outer row. After the optimum thickness of the layer is determined, and the tensioned thread shows this thickness, first install the outer rails along these dowels, then the rails of the columns intermediate along the cords - without any marks. When the front and rear planes are exposed, they are plastered (front and rear planes) and only after that, the strips are removed and attached to the plastered surfaces in the level and angle of 90 degrees, as well as with the same distance between them. When plastering tetrahedral columns, as mentioned above, occurs in pairs: first, the front and rear planes are plastered, then the side planes. The mortar is applied cement-sand (about solutions and their proportion can be found in the article “Composition and proportions of mortar for plaster”) or, better, cement-lime. When plastering concrete columns from the very beginning, even before fixing, they are stuffed with a metal grid, or when plastering they use modern ready-made dry construction mixtures. Columns from bricks abundantly moisturize, the first layer - spray, should be liquid. The mortar is applied in the same way as when plastering the surfaces of the walls, starting from the top in rows from left to right (or from right to left), using a spraying bucket, a scoop or a trowel for the base layer - the “primer”.
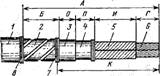
2. Defects, causes, elimination Defects The reasons Elimination Cracks Appear on the surface of the plaster from the fact that they use oily or poorly mixed solutions, in which many binder materials accumulate in places. Mix well grind the solution cracks. Peeling plaster The solution was applied on a dry surface, on a dry layer of previously applied plaster. Remove flaking plaster again. Swelling When plastering wet surfaces. Remove the solution, dry surface plastering again. Dutiki The solution was prepared on uncompressed lime, in which small particles of lime were not extinguished. Lime dough strain through a sieve with a hole of 0.6mm Bounce Plastering wet surfaces. Wet places must be dried and then plaster. 3 . Student Performance Criteria 5 "Excellent" The given task was executed qualitatively, accurately without disrupting the technological process and the sequence of operations in the preparation and processing of surfaces. When accepting the task by the master there should be no defects. Good knowledge of tools and their work. The workplace is clean, the tool is not scattered. The deviation from the vertical or horizontal no more than 5 mm on the whole element. Allowed no more than 2 surface irregularities with a depth or height of 3mm. The thickness of the plastering line is not more than 15mm. (With improved plaster) "OK" The given task was fulfilled with minor violations of the technological process; operations are not performed during the preparation and processing of surfaces in full. At the acceptance of the task by the master, small defects were found. The deviation from the vertical for the entire length of the element is 2mm. The student knows the working tool, but sometimes does not use it correctly. Works without gloves. Partial violation of safety and labor discipline. "Satisfy" Work done not neatly, dirty. The tool is scattered, the student ineptly uses it. Disrupts the process. Upon acceptance of the work performed, from 3 to 5 defects were found. The sequence of operations is not observed. Works student without workwear, violates labor discipline. Labor protection Safety before starting work Workers in the production of plastering work should be provided with special clothing, shoes, and other personal protective equipment. Before admission of newly employed workers to work, as well as their performance of work, workers must receive training, instruction, and an examination of occupational safety knowledge. By the nature and time of the briefing of workers is divided into introductory and primary. Dangerous areas should be fenced, and at night sufficiently illuminated. Switches and knife switches should be protected in closed and lockable drawers. To prevent accidents with workers, construction work, including plastering, should be carried out according to plan and schedule. Before starting work, plasters are required to familiarize themselves with their workplace and remove all unnecessary items. Before starting work it is recommended to inspect and inspect the instrument and fix all defects. Inspect and verify, together with the construction master, the condition of the scaffolding, scaffolding and cradles and systematically monitor them throughout the entire period of work. Violating safety regulations, he not only endangers himself, but also a number of working comrades. Safety at workHand rubbing can occur from improperly made tool handles. Handles must be free of sharp corners. Need to work in mittens or gloves. During operation, it is important to choose the correct working position. This not only reduces labor productivity, but also protects against various injuries. Safety at the end of workThe workplace must be clean, garbage is cleaned in a designated place. All tools after work should be washed, dried and cleaned into place. The object must be prepared for delivery. When plastering columns (Fig. 93), hand-carved on two opposite sides of the column, they reinforce well-planed rules along the plumb line, so that their edges protrude from the plane of the column to the thickness of the plaster (15-20 mm). Between the rules, layers of mortar are successively thrown — splashing, priming, covering, and leveling them with a scraper or a rule. After setting the solution, it is overwritten, and the rules are removed and outweighed to the other sides of the column. Plastering thus all four sides of the column, rub the usenko.
Fig. 93. Hanging a rule and plastering a four-sided column The plaster layer on smooth columns can be completely pulled by the template in two steps with the same rules. To do this, on two opposite sides of the column, right along the axis, we fasten a rule and place a template on them. First pull one side of the column, and then transfer the template to the opposite and also pull. After extrusion, the right is removed, and the furrows from them are sealed with a solution and rubbed over. Pulling flutes on four-sided columns. The flutes are called vertical grooves on the column, separated from each other by narrow belts. On smooth tetrahedral columns, flutes are pulled out with a simple pattern (Fig. 94).
Fig. 94. Pulling flutes on flat four-sided columns: The profile of the flutes is cut out on a board 4, which is forged with sheet steel, and a sled 3 is nailed on both sides of the board. On the two sides, right 1 is hung, a template is placed on them and a rake is nailed to the sled. When mounting on the already stretched sides, the distance between them increases by double the thickness of the plaster. Therefore, on the slide template fill an additional bar. Pull the flute in the usual manner. The top and bottom of the flute is trimmed by hand. The top of the flute should be strictly at the same level. The same requirements are imposed on the bottom of the flutes. For cutting the top of the flutes are used, except for the ruler and cutting, small piece of board or plywood. Throw out the solution on the unfinished places, level it and rub it in the shape of the column. On the applied solution, they beat off the line of the level of the top of the flutes and, using a template, a small one, draw their shape. Then, with the help of a ruler, a cut, and a small one, an excess solution is chosen and the profile of the flutes is obtained. To cut the lower parts of the flutes, throw a solution onto the column, level it, rub it over and beat off the line, the level of flute around the column. Then, with the help of a cut, an excess solution is chosen and the sides are cut with a ruler (fig. 95), cleaned with tamping trowel, and rubbed with a tampon.
Fig. 95. The design of the flute: On tapering columns, flutes are pulled out in a slightly different way. First, the column is hung; axes are determined on its faces. On both sides of the axis at equal distances below and above hang right. To draw the flutes, a swinging template is required (fig. 96). The profile board 1 of the template is made to the size of the widest part of the column with an allowance of 100 mm on each side for the device of the lugs.
Fig. 96 Swinging Pattern: The profile board is bound with sheet steel, holes are drilled in the ears. Sled 2 make a length of 300-400 mm from thin boards or from bars with a section of 50x50 mm. Through holes 100-150 mm long and 20-30 mm wide in the sides of the sled perpendicular to the existing holes are drilled in the middle of the slide for holes for an axis with a diameter of 5-7 mm. When assembling the template on the ears of the profile board, they put a sled on and fix them with large nails or thin bolts. In a properly assembled template, the sled should swing freely and change its position relative to the profile board by at least 30 °. For this purpose, the ears of the profile board are inserted into the hole of the sled not closely, but with a gap of 5-10 mm (sometimes more, depending on the taper of the column). Install the template on the right in the same way as when stretching even columns. Throw a solution between the rules, insert the template and begin to move it up, pressing the slide to the rules. As the column narrows, one side of the pattern moves forward; as a result, the profile board is warped, changing the width of the flutes and ribbons (Fig. 97). When pulling the flutes, it should be remembered that one side of the template should always go forward, otherwise flutes will turn out to be turned in different directions. Figure 97 Template position when flutes are pulled out. |
|||||||||||||||||||||||||||||||||||||||||||||||||||||||||||||||
 Columns of rectangular or square section
it is profitable and easy to plaster, because there are only four faces, each plastering on pre-set corner rails (according to traditional technologies), or on plastering corners.
Columns of rectangular or square section
it is profitable and easy to plaster, because there are only four faces, each plastering on pre-set corner rails (according to traditional technologies), or on plastering corners. Round Columns
the most difficult in plastering, the skill of plasterer must be at a high level, since here we are talking about drawing with the help of a pattern, and not just plastering along the guides.
Round Columns
the most difficult in plastering, the skill of plasterer must be at a high level, since here we are talking about drawing with the help of a pattern, and not just plastering along the guides. also heavy in execution, as plastered with the use of a template that pulls out half the faces of the column.
 When performing work, it is necessary to take into account: the rotation angle is 90 degrees with respect to each face, the straightness of the face and face faces and their level vertically and also (with itself) - deviations along the plane in the vertical and horizontal directions.
 In order to make a successful plastering of round columns, it is necessary to take into account such nuances: prepare the correct semi-radius of the pattern, control the level of the vertical along two vectors, straightness of all the columns in the row.
 In the work on the plastering of the columns in this way, it is necessary to calculate: that the width of each face is the same (when cutting the pattern), the straightness of the front and back faces of the row of columns, the level and the plane (with itself).
 The forms of the columns and the types of plastering they were discussed above, however, the design of the columns is not limited to this, since they can have a variety of architectural, so to speak "gadgets" - additional components and details that improve the aesthetic impressions of both the column and the general background exterior (facade) of the building.
 Making the columns with flutes
- it is the formation of semicircular longitudinal slits on their trunk, which are uniformly distributed over the entire area of the column.
Making the columns with flutes
- it is the formation of semicircular longitudinal slits on their trunk, which are uniformly distributed over the entire area of the column. Making columns by rustication
stem - the way of registration of the trunk, which replaces the design of the columns with flutes, that is, one with the second is not compatible.
Making columns by rustication
stem - the way of registration of the trunk, which replaces the design of the columns with flutes, that is, one with the second is not compatible. Column decoration with moldings
- This is one of the most popular ways to decorate tetrahedral columns. Represent the moldings thin strip, which form different figures, in this case, the rectangles on the edges of the column.
Column decoration with moldings
- This is one of the most popular ways to decorate tetrahedral columns. Represent the moldings thin strip, which form different figures, in this case, the rectangles on the edges of the column. Making the columns capitals
is also a classic version of the preparation, they represent an element that serves as the upper end of the column and is adjacent to the entablature (overlap, which the column supports).
Making the columns capitals
is also a classic version of the preparation, they represent an element that serves as the upper end of the column and is adjacent to the entablature (overlap, which the column supports). Making columns bases
along with the design of capitals, gives them an excellent aesthetic appearance and a diverse, intricate design.
Making columns bases
along with the design of capitals, gives them an excellent aesthetic appearance and a diverse, intricate design. today is no longer practiced, and very much in vain. The essence of the method consists in using a metal edging template (which is 2 mm more than the one with which the thrust was made, thus applying a layer clearly 2 mm thick) to apply a layer of decorative solution to the surface of the plastered column.


Popular:
New
- Markup definition. Planar marking. Types of markup. Questions for self-test
- Pipe bending machines Various variations of pipe bending machine
- Safety during filing
- What should be the sharpening angle of the scriber
- Drawing on preparation of contours of future product
- Modern ways of cutting metal and its defects
- Kerner - so that the drill does not slip off!
- Objects of inanimate nature Examples of the influence of inanimate nature factors on plants
- Finishing joinery
- Block breakdown in AutoCAD - simple and effective teams from practitioners