Site sections
Editor's Choice:
- Expansion joints in buildings
- Shaber - what is it and its purpose
- Sharpening wood mills: manual work using grinding wheels and a grinding machine
- Belts and sandriks, crackers and volutes - secret codes of architecture on the example of the old Saratov Sandriki in architecture
- Surface scaling - metalwork
- Maximum load on a balcony slab: how much can a balcony withstand in a panel house?
- Projects: legend on drawings for water supply and sewage
- Marking and marking parts How to mark parts with curved contours
- Slotting Tools Slotting Tools
- Mortising tools mortising tools
Advertising
| Cable cutting. Procurement and installation of instruments and automation systems. Grounding the cable sheath and armor |
|
Page 2 of 2 The installation of cable sleeves and terminations refers to hidden work, therefore, the scope of executive documentation includes a magazine for cutting cable sleeves. Fig. 13. End termination of PKV (a) and PKVE (b) type: The size of the cut of the cable end depends on the design of the coupling or termination, the voltage of the cable line and the cable section and is determined by the steps of the protective covers, shells and insulation (Fig. 2). All necessary dimensions are given in the technical documentation for the couplings. When cutting, do not take into account the length of the cable located under the sealing cap, as well as brought out through the cheek of the drum to the outside, since in these places the insulation is usually damaged. The end of the cable being cut is straightened and at a distance A (Fig. 7.14) from its end, a bandage of two or three turns of galvanized steel wire is applied over the protective cover. The beginning and end of the bandage are connected by twisting, which is bent to the bandage. At the place of winding the bandage, the resin tape is prewound.
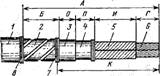
To remove the lead sheath at a distance of O (Fig. 7.14) from the armor section, make the first annular incision, and then, having retreated from it by a distance of I, make the second. For single-core cables and cables with separately leaded conductors, a second ring cut is not made. Size П is determined by the length of the step of the belt insulation necessary to increase the dielectric strength of the coupling near the edge of the metal sheath (15-20 mm for cable voltage up to 1 kV and 25 mm for cable 6-10 kV). Making incisions on steel corrugated shells is difficult, therefore, such shells are removed by making only a circular incision. Unlike other sheath designs, the steel corrugated sheath usually loosely crimps the cable core, which allows it to be removed by bending in different directions along the notch. The permissible bending radius of paper-insulated cable cores must be at least 10-12.5 times the size of the sector height or core diameter (12.5 multiplicity refers to cores with a cross-section of more than 120 mm 2). The bending radius of separately leaded cable cores with impregnated and dried paper insulation must be at least 25. Further, the insulation of the cores is removed in the section, the length of which is determined by the method of connecting or terminating the cores. The insulation at the cutting edge is pre-bandaged with two or three turns of harsh threads. Paper tapes are removed by unwinding them and tearing off the bandage. Connection and termination of conductive cable conductors.In electrical installations for connecting electrical circuit elements between individual conductive cores, conductive cores and contact fittings, as well as between contact fittings and the output of an electrical device, structural units are formed, called electrical contact connections. Contact connections are divided into non-separable and collapsible. , soldered and crimped connections, and for collapsible ones - bolt and screw. When installing cable networks, collapsible contact soy Inonii used only for connection of the cable to the electricity source or receiver. Cutting the ends of the cables is carried out before mounting the couplings and terminations. It consists in sequential stepwise removal of protective covers, armor, sheath, shield and cable insulation over a certain length. The dimensions of the cutting are determined according to the technical documentation depending on the cable design and the coupling (termination) mounted on it, the voltage of the cable and the cross section of its conductors. Technology for cutting cable ends, applying bandages and removing covers: Getting to the end of the cable, check the absence of moisture in the paper insulation and cores. If necessary, remove the existing wet insulation, the extra length of the ends, the areas under the sealing caps and cable end grips, as well as passing through the cheeks of the drums. Defective cable locations are cut off with NA sector shears. A - with zone paper insulation; b - with plastic insulation; 1 - outer cover; 2 - armor; 3 - shell; 4 - belt insulation; 5- core insulation; 6 - cable core; 7- bandage; A, B, I, O, P, GN W - cutting sizes The outer cable cover is unwound to the installed bandage and is not cut off, but left to protect the armor stage from corrosion after coupling installation.
To connect the cable cores to the contact terminals of electrical devices, they are terminated with lugs fixed to the cores by crimping, welding or soldering. The termination of single-wire cores can also be accomplished by forming a tip from the end of the wire. The connection of cable cores in couplings is performed in connecting and branch sleeves by crimping, welding or soldering.
The operations of connecting and branching by direct fusion with solder of the processed ends of the cores are shown in Fig. but. In the molds (sleeves) 2 cores 1 are introduced so that their joint is in the middle of the mold (for cores with ends cut off at an angle of 55 °, a gap between the ends is left of about 2 mm). Detachable forms are fastened with bandages or locks, and the gaps between the core and the mold are sealed with an asbestos cord 7. For more complete filling with solder, the molds are placed in a horizontal position, protective shields are put on the wires 5. When connecting the wires with a cross section of 120-240 mm 2, coolers are additionally installed. CUTTING CABLE WITH PAPER ISOLATION TO 10 kV Objective- teach how to cut the cable with paper insulation. Methodical instructions When preparing independently for practical work, it is necessary to study the purpose and types of cable joints, their designations and the procedure for cutting the power cable according to the pre-determined insulation condition. According to the results of self-training, a report is compiled, in which marking of couplings should be given, their most common types and answers to test questions. Protection of practical work is evaluated differentially and is taken into account when controlling knowledge in the exam. Brief theoretical information When installing cable lines, it becomes necessary to connect cables to each other (for which they use couplings and branch couplings) and to connect cables to various electrical devices and devices (for which end fittings and terminations are used). To perform couplings and terminations, step-by-step cable cutting is performed first. Before cutting the cable, paper insulation of the cable is tested by immersing the paper insulation tape adjacent to the sheath and to the core in paraffin heated to 150 ° C. A sign of moisture is crackling and foaming. In this case, sections with a length of 250-300 mm are cut off from the end of the cable and re-tested. The operation is carried out to obtain positive results. If moisture has penetrated deeply, then the cable is rejected. The technology of cable cutting depends on the purpose of the coupling or the termination, its material and the rated voltage at which it should be applied. The marking of couplings and terminations includes alphabetic and numeric characters, each of which has its own transcript. At the beginning of the designation put the letter that defines the purpose of the coupling (termination): C - coupling coupling; O - branching coupling; St - stop clutch; SP - coupling transition; KB - coupling (termination of the internal installation); KN - clutch end outdoor installation. After marking, defining the purpose, put the letter designating the material of the coupling: H - cast iron; С– lead; A is aluminum; E - epoxy compound; Р - rubber; Sl - self-adhesive tape; B - steel funnel, filled with bitumen composition. After the designation of the material letters are inserted that define the various characteristics of the couplings and terminations: TV - with heat shrinkable PVC tubes; H - with rubber rubber tubes; T - with three-layer tubes; З (in combination Р з) - with filling with insulating composition; Sl - with a reel from self-adhesive tapes; B - with a housing having a longitudinal connector in a vertical plane; C - molded in a removable form; O - oval; K– round shape. If before designation of execution of the coupling (seal) is the letter P, it means that the coupling is intended for cables with plastic insulation. The most common couplings and terminations for paper-insulated cables for voltages up to 10 kV are as follows: - connecting couplings - MF, FE, FE in (per 1 kV); SS, SE, FE in (6 and 10 kV); - end fittings and indoor couplings for dry rooms KVE tv, KVR (1 kV); KVE TV; KV t (6 and 10 kV); - end fittings and couplings for wet rooms –KVE TV, KVE t (per 1 kV); KVE TV; KV t (6 and 10 kV); - End fittings and couplings for wet and especially wet premises - KVE p (1 kV); KVE p (6 and 10 kV); - terminations and couplings for hot and dry premises - KVE tv, KV sl, KVE t (per 1 kV); KVE TV, KVE n, KVE t ,. KVE to, (6 and 10 kV). The order of work For the production of work on the desktop should be the following materials and tools: hacksaw; utility knife; pliers; folding meter; file; key to remove the corrugated shell; coarse thread; a set of ground wires; galvanized steel wire with a diameter of 1-1.5 mm; steel wire with a diameter of 2 mm. Operations on cable elements that are absent in the cable provided for cutting are not performed. If the removal of the bitumen cushion is carried out using solvents, the use of open fire is prohibited in the room. Cutting, depending on its purpose (for couplings or for terminations) should be carried out in accordance with fig. 7.1. The dimensions of the cable cutting are given in Table. 7.1 and 7.2. In tab. 7.2. The size Ж (length of the cut wires) is determined depending on the conditions of cable connection. This size should not be less than 150 mm at U \u003d 1 kV, 250 mm with U \u003d 6 kV and 400 mm with U \u003d 10 kV. Size D should be taken equal to 30 mm (it is determined by the chosen method of terminating the wires). In tab. 7.1. The size Γ is determined by the way the wires are connected (Ж \u003d И + Г). For couplings located inside buildings, B \u003d 0 and A \u003d B. The numerator contains numbers for armored cables, in the denominator - for cables with plastic insulation. Dimensions for cable cutting up to 10 kV are given in Table. 7.2. Fig. 7.1. Types of cuts: a - cutting of the end of a three-core cable with belt paper insulation (1 - outer cover, 2 - armor, 3 - lead or aluminum sheath, 4 - waist insulation, 5 - core insulation, 6 - cable cores, 7 - wire bandages) ; b - cutting of the end of a three-core cable with paper insulation for mounting the terminations (1 - armor, 2 - sheath, 3 - waist insulation, 4 - lived in factory insulation) Table 7.1 Sizes of paper insulation with paper insulation up to 10 kV at installation of connecting and branch couplings
Table 7.2 Cable cut up to 10 kV when mounting end sleeves and internal installation terminations The work should be performed in accordance with the technological card (Table 7.3) and fig. 7.1, a or b. Table 7.3 Cable routing paper insulated
Cutting the cable and mounting the coupling are reduced to a series of strictly sequential operations. Performing operations in strict sequence is necessary for proper installation and trouble-free operation of the coupling and cable. Deviation from the sequence of operations can lead to premature failure of the end coupling due to electrical breakdown of its insulation. Cutting the cable for any versions of terminations is performed by performing the same work, following in the same order. The general procedure for cutting the cable is the following: removal of the outer cover, armor, pillows under the armor, paper or PVC coated plastic, lead sheath and vein insulation. Depending on the type of coupling used for installation and on the method of removing the current-carrying core from it to connect to the current collector at a certain cable length, one after another, all cable construction elements are removed one by one, and they form a row along the entire cutting length steps. Consider the procedure for cutting the end of the cable brand ASBE-1H50 and mounting the end sleeve with an insulator KON-35. Getting to cutting the end of the cable, you must have a template that is made of a round metal rod with a diameter of 10 mm and a length of about 1 m. One end of the rod is clamped in the cable lug and attached to it in the top plate of the cable gland; After that, the free end of the rod is passed through the upper opening of the cable box and the plate is fixed to the box with two bolts. At the free end of the rod, extending beyond the boundaries of the assembled cable box, a first-hand risk is applied with a hacksaw or file that marks the lower border of the box. At the free end of the rod, two more risks are applied at intervals of 50 mm, after which the upper plate of the coupling with the metal rod is removed and a marking is made on the rod, as shown in Fig. 36. Then the finished template is applied to the previously flattened end of the cable and in accordance with the marking and fig. 30 the cable is cut. First, a first bandage of 3 mm wide steel wire knitting wire with a diameter of 1-1.5 mm is laid on the cable over the outer cover to prevent cable covers from unwinding when the latter is stepped. As a rule, the upper protective covers of the cable, laid in the production premises, are removed and the first bandage is superimposed on the armor. At a distance of 50 mm from the edge of the first band on the armor of the cable, a second wire band with a width of 3 "mm is installed. On the edge of the second band from the free end of the cable, the upper and lower armor strips are trimmed and removed. cable end. Remove the protective cover (pillow) from the lead cable sheath to the edge of the second band. The bituminous layer on lead is removed with a cloth dipped in gasoline. Carefully, without damaging the sheath of the cable, put the gland nut 13, the gasket of oil-resistant rubber 14, the coupling housing 10, put them down and temporarily fasten them to the cable (see Fig. 34 and 36). At a distance of 50 mm from the place where the end of the cable is cut, a ring cut of the lead sheath is made with a knife. Then, lead is removed before this incision and all insulation together with metallized mites up to the core, leaving only a 5-mm strip of metallized paper adjacent directly to the core, near the edge of the incision. Put the contact tip 1 on the core and fix it with bolts. Between the edge of the factory insulation and the tip there should be a gap of 15 mm, From the lower end of the tip, a distance of 455 mm is measured, and an annular cut of the lead sheath is made to half its thickness with a knife with a depth stop. From the annular notch and to the end of the lead sheath, two longitudinal notches are made at a distance of about 10 mm from each other. Then the incised strip is removed with pliers and the lead sheath is removed (fig. 37); the rest of the lead sheath is wiped with a cloth dipped in gasoline. Then remove the layer of outer metallic paper.
leaving a 5 mm wide strip of paper near the edge of the lead sheath. According to the markup produced on the template and Fig. 36 on the factory insulation to increase the electrical strength of cable cutting impose bandages of rolls of cable paper and cotton yarn impregnated with a mass of MP-1, and cut the insulation into a cone or ledges at a length of 40 mm, as shown in Fig. 36. Before winding, factory insulation is thoroughly degreased with acetone or aviation gasoline. Having retreated from the place where the lead sheath is cut off by 15 mm, a winding of 300 mm wide paper rolls is applied to the cable phase. Paper rolls are made from KV-12 cable paper, tied with cotton yarn or glued with dextrin, dried under vacuum, impregnated with masonry and rophenol composition and, together with cotton yarn reels, are packaged in 0.29-0.35 mm thick tin cans. Before they are sealed, the cans are filled with the same mass with which the rolls are soaked in such a way that it completely covers them. Sealed cans come from the factory, which are opened and heated to ~ 80 ° C in a double-bottomed oil bath before use. You can take warmed rolls and yarn only with clean, dry metal hooks. During winding, the vessel with cotton yarn rolls is tightly closed with a lid, while the masloka-nifol composition must overlap the upper roll in the can. The rewinding paper can only be used after checking its tapes (before warming the vessel) for the absence of moisture in them according to the method described above. Immediately before the start of the paper winding, two or three top layers of the tape are removed from the rolls. The coil winding is produced with tension, tightly, without air gaps and folds, with a tightening at each turn of the already wound layers of the roll and the final tightening at the end of the winding of each roll by ironing it with the hand in the direction of winding. For this purpose, you can also use dry cable or glass paper. The lower cone of the winding is formed directly by winding the roll, and the upper one is carefully cut with a knife. To avoid undercutting your own cable insulation, three or four layers of additional insulation are not cut off, but are cut off manually. In order to avoid unwinding of additional insulation, after winding each roll is tied with cotton yarn impregnated with MP-1. The yarn is taken from the same cans as the rolls. After winding and tightening, the two upper layers of cable paper are opened, and all paper insulation is washed with a hot mass MP-1 with a temperature of 120-130 ° C, which does not contain moisture. To create a more uniform electrical field on the cone of additional paper insulation adjacent to the lead sheath of the cable, a screen of tinned copper cord or of lead wire with a diameter of 2 mm is superimposed. To do this, four or five turns of the cord impose on the edge of the lead shell and soldered to the psi with a soldering iron. The last coils are wound tightly to each other on the surface of the metallized paper, factory insulation and tapered winding. The winding of the wire screen is completed with a ring with an internal diameter of 50 mm. The ring is made from a lead tube with an external diameter of 10 mm or is specially cast from lead. The outer diameter of the ring is 70 mm. Four paws made of wire (tin) are soldered to the ring. Before installing the ring, its surface is carefully leveled with a file and emery paper to eliminate the possibility of the formation of an uneven electric field. The ring is put on the cable and installed on the end of the screen winding to its last thread so that the legs of the ring lie on its surface. To attach the ring to the screen on its legs impose a second layer of copper cord 15 mm wide. The end of the cord is soldered with a soldering iron to the turns of the first layer. Then, the first layer of the screen is soldered all the way from the lead shell to the ring in a section about 10 mm wide and align all the irregularities of the solder with a file and an emery paper. To remove solder filings from the insulation and the screen surface, they are washed with MP-1 mass, heated to a temperature of 120-130 ° C. On the lead sheath, the risks of fixing the coupling housing are fixed with risks, after which the coupling is mounted on the supporting structure. Then, a gasket of oil-resistant rubber is inserted into the recess of the case and the cut end of the cable is carefully inserted into the hole of the reinforced porcelain insulator. The bolts securing the lower flange of the insulator to the coupling housing must be tightened evenly. Then thoroughly flush the internal cavity of the coupling housing and the entire cutting of the cable with the MP-1 steaming mass, previously opening the plug 11 to drain the mass. After flushing the housing cavity, the plug 11 and the packing nut 13 with pre-installed gaskets are screwed to failure. The gaskets immediately before use should be glued with epoxy glue. Glue composition: E-40 epoxy resin or E-4021 epoxy putty, to which 8.5% of hardener No. 1 is added (50% solution of gsomethylenediamine in ethyl alcohol). The hardener is thoroughly mixed with resin or putty. After the introduction of the hardener into the putty, the compound obtained is suitable for use at ambient temperature: from 8 to 15 ° C for 3 hours, from 20 to 25 ° C for 1.5 hours. The KON-35 porcelain insulator is covered over the entire surface with asbestos cardboard or fiberglass and heated with a blowtorch to a temperature of 60-70 ° C. Only after the insulator is heated, can the cable mass be poured into it, as otherwise hot cable mass may be released and even cracking porcelain insulator. The cable mass of MK-45, poured into the coupling, is heated to a temperature of 140-145 ° C. The composition of the mass of MK-45: AK-Yu motor oil according to GOST 1862-51 or cylinder oil 11 according to GOST 1841-51 and pine rosin of the highest and first grades according to GOST 707-41. Cable mass MK-45 is easy to make yourself. Take 80% rosin and 20% oil. First, rosin is loaded into the boiler, and after it is melted - mineral oil. All are thoroughly mixed with a wooden stirrer and cooked at a temperature of 130 ° C until foaming stops (5-6 h). The welded mass is poured from the boiler at: 140-150 ° C and must be filtered through a thick metal mesh, as otherwise mechanical impurities, always present in rosin, can reduce the breakdown voltage of the mass. Thus prepared mass is tested for breakdown. For this, the mass, like the transformer oil, is poured into a clean, dry discharging vessel with electrodes, where it slowly cools to 18–20 ° for 12 hours. After this, a test is carried out on the sample. If the mass can withstand a voltage of 35 kV for 1 min, then it is suitable for use. In order to prevent rosin from falling out of the composition during the cooling process or the operation of the cable box, it is necessary to ensure that the heating and cooling mode of the cable mass is strictly defined by the manufacturer. Should the fill weight of the coupling be heated? in a special saucepan with a lid and spout, which is equipped with electric heating. In the absence of electric heating, the pan is heated on a brazier with coals. A mesh should be inserted into the nozzle of the pan to prevent foreign particles from entering the coupling. The lid should close the pan tightly. When warming up in a coal fryer, it is necessary to ensure that there is a distance of 50-100 mm between the layer of coal in the frying pan and the bottom of the vessel. You can not warm up the vessel with the mass directly on the fire or blowtorch. When performing a heat-up operation, the fitters must wear long gloves and safety glasses, as hot mass burns are very painful and dangerous. Flinging and massing operations are also carried out in long gloves and goggles. Filling the coupling mass is carried out in three or four steps, depending on the ambient temperature and the magnitude of the mass shrinkage. After the final casting, the mass level should be 10-15 mm below the end of the insulator. On the upper end of the cast-iron flange 3 and in the groove of the plate 2 stack a gasket made of oil-resistant rubber, put on the plate of the coupling and evenly tighten the bolts. Two nuts are screwed onto the contact tip 1, placing a washer under them. The grounding conductor with a cross section of 25 or 35 mm 2 (IGG cable) is pressed on or welded with copper tinned tips. One tip is fixed under the grounding contact bolt on the prefabricated structure, and the other end is fixed under the coupling grounding bolt. After that, an electrical connection is made to the armor, lead sheath of the cable and the supporting structure. To do this, they clean and arm the cable armor at the point where the grounding conductor is connected, fix the conductor to the cable armor and lead sheath with a band of copper wire and solder it to the lead sheath and cable armor. When soldering the grounding conductor to the cable armor, bitumen can be released from the inner cover, which makes soldering difficult and unreliable, and local insulation overheating at the soldering point under lead can occur. For this reason, the soldering operation is performed as quickly as possible. The quality of installation of linear cable structures largely determines the efficiency of communication systems in which expensive active equipment is installed. How appropriate is the use of a specialized tool and what can be obtained as a result? Working with the cable has always required special attention. The cost of error when cutting the cable, cutting and terminating it (mounting the connectors or crossing it) is quite high - the cable can be damaged so that it will have to be re-installed. That is why during the development of the routes near the terminations of the cable line, it is necessary to provide places for placing a reserve. And during installation, you need not only to provide such a margin, but also to leave pieces at the ends of the cable, which is necessary for termination. When determining the length of these segments, it is necessary to calculate the technological reserves for cable cutting, as well as for the installation of a connector or the installation of a cross (depending on their type and manufacturer's recommendations). Since switching devices are placed in certain structures, a reserve is also needed for cable placement inside the socket strip, cross-connect cabinet, patch panel, etc., taking into account the appropriate methods of fastening and internal organizers. Since the exact location of such a construction with respect to the cable outlet is usually not known in advance, a margin is required to account for installation tolerance. In addition, the necessary insurance reserve should be provided in case of possible damage to the cable during the termination (usually it is a multiple of the amount of technological reserves). And the less experience the installer - the greater should be the safety margin. The likelihood of cable damage depends on the tool used. It can be said that the final quality of cable line termination depends not only on the accuracy and experience of the installer, but also on the degree of “professionalism” of the tool. The latter is determined by the level of specialization of the tool (accurate, high-quality and fast execution of individual operations requires the use of a special tool), as well as the durability of the working surfaces (when they are worn, the quality of operations decreases). Price factor In the catalogs of tools you can always find several types of tools designed to perform the same operations. Products similar in function are significantly different in price. In the lower price range is a tool with a short service life. Such a tool is usually used for minor repairs in the office or at home. Ergonomics, ease of operation and productivity are sacrificed for low cost. A tool of this class has a simplified design, and in its manufacture inexpensive materials are used (especially when implementing working bodies). In the upper price range, there is a high-performance automated tool, the acquisition of which will undoubtedly pay off if the scope of work is large enough. However, in the range of products with an average cost you can find an ergonomic and reliable tool designed for a long service life. Cable cutting The first thing you have to face is cutting the cable. A cut is considered to be of high quality if it does not violate the structure of the cable, does not deform (does not flatten) its external coating, does not create burrs on the conductors. Such a cut can only be done with a cable cutter. Specially shaped blades grip the cable and prevent it from being extruded when cutting. The profile of the blades and the angle of their sharpening depend on the size and type of cable. Special models are available for cutting twisted pair cables, coaxial, power, armored cables and cables with steel carriers. The latter require special attention in the selection of the tool, because when you try to use a product that is not designed to work with steel, the cable cutter will be disabled. For cutting copper and aluminum cable, you can use reinforced tools.
Specialized compact tool designed for cutting cables with up to 2,700 pairs It should be noted that cutting an optical cable, especially reinforced with a steel cable, and cables with a metal sheath (for example, in a corrugation) requires the use of appropriate tools. As a rule, such cable cutters have a separate interchangeable trim on the tip of one of the blades. When cutting self-supporting cables with lateral cable placement, the latter should be bitten with a special tool before work with the rest of the cable is started. Depending on the external diameter and cable cable design, the cable cutter can be simple (one-way) or with a ratchet (multi-way). Since cutting is performed with a few taps, the multi-way tool may have a stop shoe on one of the handles. For telephone cables with a large number of pairs (over 500) or electrical cables with large cross-section conductors, electrical and manual hydraulic driven cable cutters are used. Cable cutting The next operation - cutting the cable - is to remove all layers of insulation in the correct order and to the desired length. The more coatings, the harder it is to strip a cable. Difficulties add metal or polymer armor, hydrophobic filling, bearing elements (cables or fiber). Therefore, in order to properly perform the work, it is necessary to clearly represent the internal structure and sequence of cutting a particular cable. Since the layers are cut from the outside to the inside, the upper ones are removed at a greater length (herringbone). Failure to comply with this requirement may complicate the installation of the connector or reduce the quality of cable termination in it, which will cause problems during operation, as the cable will "hang" on some conductors. It is best to use the template recommended by the manufacturer of the cable or connectors for which the installation is made cutting.
Specialized strippers for removing outer shells from optical and copper-core communication cables, power and other cables can perform longitudinal, transverse and spiral cutting of coatings
The plow knife carries out longitudinal and cross cutting When choosing a tool for cutting it is necessary to consider how a particular product works with different cutting directions. If one option is possible with the transverse direction, then the cut along the cable can be straight longitudinal or helical. The choice depends on the presence and location of the metal armor, as well as the type of insulation. If rigid and dense polymer insulation is easy to cut in any direction, then soft and loose (loose type) is only in a straight line along the cable. Otherwise, it turns, and the knife damages the veins. Cross-cutting of such insulation is best done after a longitudinal cut is made and it is separated from the cable. Since the upper layers of the cable insulation are tight, most often when they are cut, there is damage to the cores. Guaranteed protection against such a nuisance is ensured by the use of knives with an adjustable cut depth, as well as the fine tuning of the knives for this type of insulation. And the only possible way of perfect tuning is preliminary practice on the length of cable to work with. From the above it is clear that for fast and high-quality cable cutting with several layers of insulation may require several identical, but pre-configured different knives. In cases when it is required to remove the insulation not at the end of the cable, but at an intermediate point, the cutting technology is different. Such situations require special attention, because if during processing of the cable ends the damaged part can be cut off and start over, then when cutting the middle part there is no such chance. Therefore, it is necessary to take into account that not every tool is suitable for such work.
Reinforced cable cutter to work with communication cable. Allows you to bite cable up to 57 mm thick in lead, plastic and rubber sheath
The so-called "driving" tool places the conductor in the mortise contact.
Universal crimping tool allows installation on the cable modular connectors RJ11, RJ22 and RJ45 Removal of external polymer insulation from thin (up to four pairs) cables of Categories 3, 5 or higher is carried out using a combined tool. But for cables with a larger diameter there is no combination tool. They are cut using special knives. The simplest of them is a manual plow knife with a protective platform at the tip of the blade, which prevents the cutting of the cable from undercutting. This is the only knife that provides high-quality cutting of cables with soft, free polymer insulation. However, this tool is quite versatile, as it can also be used for cutting cables with rigid polymer insulation. Its main advantage is the arbitrary direction of the cut. Another type of knives (with a swivel blade) is intended only for this type of external insulation. Despite the seeming difference, they are built in the same way - a cable grip (sometimes spring-loaded) and a blade with a depth adjustment screw, which can be rotated 900 for longitudinal and transverse cuts, and also for some knives, 450 for spiral cutting. A special problem is the cutting of cables (most often optical) in rigid polymer insulation with metal corrugation or wire armor. For the first type there are special types of knives mentioned above. Their main difference is the hardened design and the blade of high-quality steel.
Cutting Kevlar and other polymer fibers is carried out with special scissors.
Strippers are available for removing covers from cables or conductors of different diameters. The plow knife has a drive with a ratchet and an emphasis to adjust the depth of immersion of the blade. The knife with a swivel blade has two powerful handles and a cable grip fixed by a lever. This design allows you to cut the corrugation together with two layers of polymer insulation in one pass of the tool without the risk of damaging the cable cores. Wire stripping with wire armor is done in several passes. It is more convenient to remove the upper polymer insulation with a knife with a swivel blade, setting the cut depth so that the knife does not touch the armor wires. Then, with wire cutters for steel, the entire armor wire is alternately bitten. The remaining polymer insulation is removed in any convenient way. The topic of cable cutting in heavy armor would be incomplete without mentioning several tools. It is easiest to cut the lead sheath of cables with the help of two types of special knives: heavy or light (the latter are used with a hammer). The steel strip armor is removed with an electrician's scissors with serrated blades made of hardened steel to prevent material from being squeezed out during cutting. They are used for trimming Kevlar fibers, but more convenient and better this work is done with scissors with ceramic blades. Preparation lived The next operation is the preparation of cable cores for terminating, that is, for mounting connectors or directly connecting to the cross equipment. Modern methods, which are based on the technology of mortise contact, do not require stripping of the wires before installation. Despite this, in some cases it is impossible to do without stripping the insulation, for which a wide choice of tools is still offered. If the work is performed rarely, then for its execution it is possible to pick up a combined tool with nippers for cutting cores and several calibrated grooves for removing insulation that has squeezed various sections. Sometimes it is supplemented with pliers, a device for crimping contacts or nippers for screws of several sizes. You have to pay for universality - working with such a tool is not very convenient. In cases where you have to deal with one type of wire, it is more convenient to use an adjustable tool. Its blades are adjusted to the required diameter with the help of an adjusting screw or cam, which greatly simplifies the stripping process - no need to think about which groove the wire falls into. More expensive high-performance tools should be used to handle a large number of similar veins. It is very easy to use, since it is activated by pressing the handle, but it is designed to work only with the end of the core and is absolutely not suitable for removing insulation at an intermediate point. The length of the core from which insulation will be removed is adjustable. Simpler options are usually adjusted to the required diameter of the core and have a built-in knife for cutting wires. Professional models have a working body, designed for two or three specific sections of the core. One of the most common types of wiring used in the implementation of the implementation of various systems inside buildings is Category 5 four-pair cables. On their basis, not only SCS, but also telephone and intercom, security and fire alarm systems, voice alerts, etc. are created. Because the design of these cables is fairly unified; extremely convenient combined tools have been created to work with them; they cut the cable, remove (more precisely, the ring trimming) the top insulation and strip the individual wires. The reliability of the coaxial cable connections with connectors directly depends on the quality of its cutting. A cost-effective solution is to use the simplest devices to ensure a given depth of sheath cut for a certain type of cable, thanks to which cutting is carried out in several stages. Professional tool allows you to prepare a coax cable in one operation. It is enough to place the cable in a cassette, make one complete turn around it and remove the clipped part of the insulation and the screen. To obtain the desired profile of the stripped cable, the required number of interchangeable blades is installed in the cassette, each of which is adjusted to the desired cutting depth. It should be noted that large amounts of work on cutting coaxial cables can be performed by an automatic tool with electric drive. Use inset contact After cutting the cable, proceed to terminate it. The most common operation is to install the cable at the cross. As already noted, technologies such as soldering and screwed connections are no longer found in cross equipment. For connection of conductors or installation on cable connectors in low-current circuits, the plug-in contact method is widely used. The meaning of this technology is simple - the contact has a knife-like shape, so that during installation it cuts through the insulation and cuts into the conductor conductor metal, as a result of which there is no need to remove the insulation. This not only significantly increases labor productivity, but also improves all the characteristics of the connection, since the point of contact is protected. For all cross-connect systems, the core is pressed into the contact section, but due to differences in the contact and body configurations, a punch down tool is required for each type, with which the wire is pressed into the contact skin section and, if necessary, cut off . Economical and professional versions of this tool are very different. The most important point is the presence in the professional version of the spring impact mechanism, which ensures the uniformity of the force of pressing the wire into the skirting contact and the impact at the end. The blow guarantees reliable plunging of the core into the skirting contact and in some types of skirtings it is used for trimming the remainder of the core. In more progressive cross systems, trimming of surplus is done with built-in scissors. Despite the fact that tools without a percussion mechanism are only suitable for small amounts of work (for example, to make changes to already mounted systems), they are quite inexpensive and therefore continue to be popular. At the same time, the professional tool of the budget level necessarily has a percussion mechanism. This is quite enough for high-quality and productive work. A limitation of the capabilities of such a tool is to work with switching modules (for example, skirting) of only one type. Universal tools ensure compatibility with various mortise contacts (66,110, KRONE, BIX, etc.) due to replaceable working bodies. Additional replaceable working body is stored in the handle of the tool or a separate case. The handle is also equipped with devices for extracting wires from the plinth contacts and removing the plinths from the mounting brackets. It should be noted that a wide range of other tools can also be installed in the universal holder, in addition to interchangeable bodies for working with a cross, such as a screwdriver, an awl, center punch, and an adapter for 1/4 "” hexagon interchangeable nozzles (screwdrivers and socket wrenches). The high productivity of work during the termination of the cable terminations of the SCS to the contacts of the type 110 can be achieved with the help of a group manual or electric tool, since it provides simultaneous processing of all eight conductors. When working on the cross can not do without the probe with a hook, the use of which allows you to simplify the search for the desired jumper. With such a probe, you can gently push the wires, extract the necessary ones and check the quality of the seal. Splicing cables No less common operation - splicing cables. It makes no sense to dwell on the antediluvian technology (which, unfortunately, is still used), when the connection of the wires of local telephone networks is carried out by twisting them. The method is, of course, cheap, but the quality of the connection is appropriate. Modern technology of connecting cables based on the technology of mortise contact. Used in this group (for 10, 20, 25 pairs) or individual connectors provide splicing of two cables or tap (connect the cable to the existing). The latter type of connection, in particular, is very convenient when upgrading networks, when it is necessary to switch from old equipment to new in a short time (the cable section that has become unnecessary can be removed after installation). Crimping individual connectors is a very simple tool that resembles ordinary pliers. The design of the tool for processing group connectors is much more complicated, as they are designed to work on splicing cables in a limited amount of cable wells. Such connectors are used not only for low-voltage circuits, but also for power supply circuits. Designed for the organization of a tap to connect the sockets to the distribution feeder (for example, in the cable channels of the SCS), they are most often pressed by ordinary pliers. Article provided by the training center "A-KOM Academy" |


Popular:
New
- Markup definition. Planar marking. Types of markup. Questions for self-test
- Pipe bending machines Various variations of pipe bending machine
- Safety during filing
- What should be the sharpening angle of the scriber
- Drawing on preparation of contours of future product
- Modern ways of cutting metal and its defects
- Kerner - so that the drill does not slip off!
- Objects of inanimate nature Examples of the influence of inanimate nature factors on plants
- Finishing joinery
- Block breakdown in AutoCAD - simple and effective teams from practitioners