Site sections
Editor's Choice:
- Expansion joints in buildings
- Chaber - what is it and its purpose
- Sharpening wood cutters: manual work, using grinding wheels and a grinding machine
- Belts and sandriks, crackers and volutes - secret codes of architecture on the example of the old Saratov Sandriks in architecture
- Surface grit - tooling work
- Maximum load on the balcony slab: how much can a balcony withstand in a panel house?
- Projects: symbols on drawings for water supply and sewage
- Marking and marking details How to mark the details with curved contours
- Tools for slotting Tools for slotting
- Tools for chiseling Slotting tools
Advertising
| Steel tool for engraving, cutter. Special engraving tool Steel tool for engraving cutter 7 letters |
|
Drawing on various objects of a drawing by a method of removal of substance from its surface, is known to mankind for many millennia. With the advent of new materials, it became necessary to master the methods of work that allow engraving on objects that are much harder than wood and stone. New technologies allow you to fully automate the process of engraving when applying a picture on a metal surface, but for a home wizard the most suitable option is to master the manual method of applying a pattern. Engraving on metal with your own hands is possible at home, with the availability of tools and suitable premises for this type of work. For hand engraving at home, you will need the following tools and materials:
The shtihel is a rod up to 120 mm long. One end of this tool is cut at an angle and sharpened, the other is installed in a wooden or plastic handle.
The shtihel can be of different shapes, as well as differ in the width of the working surface. In the absence of this tool, you can make it yourself in the presence of materials suitable for this purpose. Independent production of shtihelyaFor the manufacture of shtihelya need to use tool steel. Excellent for this purpose metal, which is used in springs and ball bearings. It is possible for the manufacture of the cutting surface, apply old files and files, as well as various cutters that need to be cut into thin strips. The ideal material for the manufacture of shtihelya for engraving is steel grade P18. From the old circles for circular saws, you can make a large number of blanks for the production of chisheli at home. Further, the working part of the workpiece is sharpened at an angle, which allows making a notch of a certain width on the metal surface.
The shtihelya handle is made of hardwood, and should be of such width that it is convenient for the master to hold the tool in his hand. The recommended length of this part of the shtihelya is usually 50 mm. The handle in the form of a mushroom is the most suitable for the manufacture of this tool, but you can experiment and make several different options, and in the process of work choose the most suitable option. Preparation of the workpieceFirst of all, you should select a blank on which the picture will be displayed. The selected product must be free of rust and chips. To prepare the surface will require:
Initially, the workpiece is polished using emery paper. Then finish polishing is made using GOI paste.
You should also perform, before finishing polishing with this tool, the following actions:
After such preparation, uniform circular movements are polished blanks. After finishing the polishing measures, the metal object must be rinsed in kerosene and dried at room temperature. The process of applying engraving on metalIf the engraving of a metal surface is carried out for the first time, then before proceeding with the application of the main pattern, it is recommended to practice on an unnecessary piece of metal. The ideal option for such workouts is the use of a copper plate. A piece of copper should be securely fastened on a wooden board with the help of screws with wide caps. When the workpiece is fixed, the board is laid on the table, if necessary, additional lighting is included, the cutting tool is clamped in the right hand, and an even notch is made on the metal surface.
To prevent the hand from slipping off when making a flat line, the thumbs of the left and right hands should be joined on the surface of the metal plate and touch the plate at the drawing point. The index finger of the right hand, at this time, rests on the tool cutter, and fully controls the process of drawing lines. It is recommended at the beginning of training to make several straight parallel bands on the workpiece. When flat areas will turn out well, you can go to the implementation of the semicircular lines. When the hand is already a little full, you can begin to engrave the pattern on the workpiece. To carry out this work, the metal object must also be securely fixed. For this purpose, you should make a device similar to the above-described mechanism for locking the screws. For engraving simple shapes, initials and other simple images, you can proceed immediately after fixing a metal object. If it is necessary to perform a complex drawing, it is recommended to first transfer the image to the workpiece. Transferring a complex image to metalThe original method of transferring the image to a metal base is carried out in the following sequence:
After correctly performing the described actions on the product there will be a drawing on which it will be possible to perform an engraving. Other Engraving TechniquesIn addition to the manual method of engraving at home, the following methods for embossing the change of the metal surface can be carried out:
ConclusionHow to engrave on metal and what method to master to perform this type of work, everyone must decide for himself. To begin with, it is recommended to purchase a professional tool for manual work. After working for some time with a hand tool, you can proceed to the development of equipment that will significantly speed up the process of engraving. Delivery of orders is realized through courier service and by self. We work in cash and bank transfer. PickupOur address: Moscow st. Marxist 34 building 4 Delivery by courier in Moscow and outside the Moscow Ring RoadWithin 1-2 days the order is formed, then it is transmitted to the courier service. The delivery of the order itself is carried out within 1-2 days from the moment the order is received in the courier service. And before you deliver the ordered goods, the courier will contact you by phone to agree on the date and time of delivery. Delivery is made daily from 9.00 to 21.00, but if necessary, you can choose the time individually, so please call and ask!
List of cities and areas in which delivery is carried out:
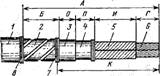
Shipping companyDelivery of heavy and bulky goods (for example, machine tools, jigsaws, etc.) weighing more than 9 kg, as well as consignments of goods is carried out with the help of transport companies that have representative offices in Moscow (“Auto Trading”, “Business lines”, etc. .). Moreover, delivery through the transport company is made only for 100% prepayment to our current account. An invoice or receipt for payment is sent to you by e-mail. The cost of the order will be the cost of the ordered goods + 250 rubles. (courier services for the delivery of cargo to the transport company and sending the order). Services of the transport company are paid by you upon receipt of the order, their cost can be found on the website of the corresponding transport company. If you have any questions, we will be happy to answer them and find the right solution to any problems! Engraving work [Techniques, techniques, products] Podolsky Yuri Fedorovich Special engraving tool When processing surfaces in an engraved part that has a large area, the most time-consuming operation is the selection of excess metal between drawings, letters or numbers. Especially a lot of effort requires defensive work, when the metal has to be removed to a great depth. To facilitate this work, apply special chaffer different shapes and sizes. In fig. five, but depicted such a zubiltse. His profile must comply with the sample form. For example, when sampling a flat platform, a zubiltsa type of flakshtihel is used, when a semicircular groove is sampled, such as boltstikhlya, etc. Sharpening and straightening the toothpick are no different from sharpening and straightening. In fig. five, b The scheme of work with such a tool is shown when removing metal from an engraved workpiece. Details: the tooth is sent with the left hand, and the right side is struck on the back of the head with short hammer blows. The thickness of the cut chips regulate the inclination of the teeth on the surface of the engraved product. Sechki (Fig. 5, at) - This is a special hammer picks, which are used for the same work as shtiheli. The difference lies in the fact that the shtiheli is cut, applying only the force of the hand, and the chop is operated, striking the back of the head with a hammer blow, which also significantly speeds up the process of removing large volumes of metal. With the help of cut sections, not only engraving works are performed, but also a selection of complex shapes is made in the molds and dies, and the special files are notched. Hammer engravers are made of U8 bar tool steel with a diameter of 8–10 mm and a length of 120–130 mm. On the workpiece at a distance of 20–40 mm from the end, the sides of the cutting part are machined, and a knurling on the tail part is made on a lathe. Then the chippings are thermally treated to a hardness of HRC 52–54, then sharpened slightly, creating the desired shape. The length of the cutting edges of the sections should not exceed 8-10 millimeters. Punches and matiki applied at the final stage of engraving works. With the help of punches in the metal knock out the simplest elements of the pattern in the form of petals, Christmas trees and all sorts of curls. The engraver is cut by the engraver by metallographic cutters on the working part of the punch. Before engraving, the metal of the punch is released, and upon its completion it is quenched again. After the engraving of various seals and stamps of the field between the lines, letters and other symbols, they are usually uneven with shtihel blows. Beautiful appearance of the products give a priming chisel or matiki. The matiques are chisels with a grooved notch of the working part, intended for the textured treatment of a metal surface, for example, a background (Fig. 5, d). The material for their manufacture are the bars of square five-millimeter steel V8. The nape of these tools is made flat (under the blow of a hammer), and the working part is lightly tapered on all four sides. Crossing recessed lines are engraved on the end of this cone. The relief texture on the working end of the mat can be obtained in another way. The end of the rod set on the notch of the file and blow the hammer on the shock of the receive embossed print. After machining, the matics are quenched. In the manufacture of digital or alphabetic punches and stamps engravers use another type of tool - zeki. Zeki of various shapes are used for internal metal extraction in letters and numbers. A convict is made of U8 bar square steel with a cross section of 5 to 8 mm and a length of 60–70 mm. Using the engraving, the working parts of the convict shape give the shape of the inner contour of the recess (for example, the letter O), and cut the side edges at the working end (Fig. 5 g). The prisoners cut the impact part, and sawed the edges. After machining, the working end of the convict is heat treated. Fig. five. Special engraving tool: but - Zubiltsa (pick); b - work as a pick; at - chaffing; g - a convict for the letter O; d - matiki; e - spatial square grinding in for finishing punches. In addition to various incisors, a variety of tools can be used in the engraving. stamps. Stamp - a tool for processing materials by pressure during plastic deformation (punching) of the workpiece. The main elements of the stamp are the punch and the matrix. Punch - a stamp with a relief image of letters, signs, etc. for extruding an image when making dies for type-setting machines and other products. In order not to engrave a large number of numbers, letters and other signs ranging in size from 1.5 to 10 mm, stamps, tables or nameplates are stuffed with various punches, the sets of which the engravers usually make themselves. Larger numbers and letters are stamped on the press with special stamps. The angle of sharpening the punch should be exactly 90 ° relative to its axis, therefore, when manufacturing the punch to control the perpendicularity of the working surface to the axis of the punch, use the space angle (Fig. 5, e). The blank of the future punch is pressed tightly with the hand to the inner corner of the square, put on the finishing bar and pressing it to the surface, make straight-line movements until the uniform shine appears on the working surface of the punch over the entire area. Finishing complex concave surfaces produce corrugatedrepresenting files and files with different bending radii, profiles and notches of different frequencies. Before you give the file a conceived shape, it is heated on a red-hot fire, then allowed to cool slowly and wrap its working part with insulation. This is necessary in order not to damage the notch during bending. The file shaft is clamped in a vice and bend the working part with round pliers. You can use any other method of bending, for example in the block. But in all cases, you need to proceed with caution. Finished grooves are hardened in the same way as whip blades. Scraper it is used for finishing metal surfaces as well as for removing accidental cuts and scratches on the engraved surface. The most running are trihedral and tetrahedral scrapers. If the factory-made scraper cannot be purchased, it can be made from a three-sided or four-sided file, cutting off a notch from it. FlatbedIt is a float or polishing pad, intended for polishing certain metal sections, especially after being treated with a scraper. The working part of this tool carefully rubbed the surface, smoothing traces of the cutter. The working part of the scraper must be carefully polished. Convenient reliable spherical shells can be made from balls from rolling bearings. The ball is welded to a steel shank rod, which is then placed on a wooden handle. Steel Engraving Tool, CutterThe first letter "sh" The second letter "t" The third letter "and" The last beech letter "b" The answer to the question "Steel engraving tool, cutter", 7 letters: Alternative questions in crosswords for the word SchichelTool carver Tool engraver Engraving tool Hand tool for engraving in the form of a thin steel rod Hand tool, used in engraving Steel tool, used in engraving and woodcutting Definition of the word shtihel in dictionariesGreat Soviet Encyclopedia
Meaning of word in dictionary of Big Soviet Encyclopedia
New explanatory-word-formation dictionary of the Russian language, T. F. Efremova.
Word Meaning in the Dictionary of the New Explanatory-Word-Formative Dictionary of the Russian Language, T. F. Efremova.
Wikipedia
Word Meaning In Wikipedia Dictionary
Examples of the use of the word shtihel in the literature.And his shtihel he ran along the smooth, shiny copper surface leaving behind a bright trail. At that time, Kiselev could not have imagined what a winding line the engraving would hold shtihel in the mighty hand of Ivan. It should be noted that in contrast to the stroke carried out shtihelThe etched line has the same thickness everywhere and does not have a spike. Gentle dots on the face and naked body are applied directly to the board with curves dotted. shtihel or needle. We talked about this and that, I played with a hint shtihel, glanced around the exposed stones, which had already been polished, polished and waited only when they were inscribed on them. |


Popular:
New
- Markup definition. Planar marking. Types of markup. Questions for self-test
- Pipe bending machines Various variations of pipe bending machine
- Safety during filing
- What should be the sharpening angle of the scriber
- Drawing on preparation of contours of future product
- Modern ways of cutting metal and its defects
- Kerner - so that the drill does not slip off!
- Objects of inanimate nature Examples of the influence of inanimate nature factors on plants
- Finishing joinery
- Block breakdown in AutoCAD - simple and effective teams from practitioners