Site sections
Editor's Choice:
- Expansion joints in buildings
- Shaber - what is it and its purpose
- Sharpening wood mills: manual work using grinding wheels and a grinding machine
- Belts and sandriks, crackers and volutes - secret codes of architecture on the example of the old Saratov Sandriki in architecture
- Surface scaling - metalwork
- Maximum load on a balcony slab: how much can a balcony withstand in a panel house?
- Projects: legend on drawings for water supply and sewage
- Marking and marking parts How to mark parts with curved contours
- Slotting Tools Slotting Tools
- Mortising tools mortising tools
Advertising
| Workflow bending metal safety equipment. Open lesson "editing, bending." Bending pipes. Pipe bender |
|
· Be careful with workpieces, since sheet metal and wire have sharp edges; · Work only with a working tool (correctly installed hammers: the handles of the hammers should be crackless with fasteners firmly fixed on them; not have spalls on the hammers); · The hammer head must have a smooth, polished, slightly convex surface; · · Hold the workpiece on the stove or anvil firmly; · Securely fasten workpieces; · When editing strips or bars should touch at least at two points; · Hold the hand that holds the workpiece, as far as possible from the point of impact with a hammer or mallet; · Do not stand behind a friend when he is working; CONCLUSION And finally, "the one who is in no hurry anywhere" is in time. It is this saying that you should adhere to when you're editing metal. Before starting work, you need to clarify the purpose of this work itself, then select all the necessary tools and devices that will be useful to you in the process. All your tools should be kept in perfect order, and most importantly - in good condition. Order Above All! The student must know: purpose and methods of performing metal dressing; giving the metal the desired shape; tools and fixtures; technical equipment; organization and rules of the workplace; basics of industrial sanitation. The student must be able to: in the correct sequence, edit strip, square, sheet, round and angle steel; properly organize the workplace; eliminate defects that occur when dressing metal. Test questions: 1. What is metal editing intended for? 3. Why is it recommended to use gaskets when editing soft materials and thin sheets? 4. In what sequence do steel bars and strips rule? 5. What tools and devices are used when dressing metal? 6. In what cases is it necessary to apply the stretch dressing method? 7. How many points should the correct plate touch when editing strip metal? Theme of the program: “Metal processing”.The theme of the lesson is “Metal bending”. Type of lesson: the study of labor techniques and operations. Lesson Learning Objectives: Developing - to develop independence by finding faults in the drawings, to develop skills in the efficiency of thinking, to find ways to improve their work. Develop skills of productive labor, understand practical situations and independently implement the solutions found. Educational - to form in students a desire for the constant development of professional abilities and skills, a desire for self-control. To form independence and self-confidence. Develop interest in the profession. To foster in students a careful attitude to the bench tool. Material and technical equipment of the lesson: metal billet, marking tool, bench hammers, vise, round-nose pliers, piece of pipe, measuring instruments, product standards, poster "Bending of metal", instructional and technological maps, evaluation criteria table. Venue: locksmith workshop. During the classes Safety measures for manual bending: 4. Fastening the material of the introductory briefing: III. Student exercise and ongoing instruction 4. Independent work of students under the guidance of a master of vocational education. IV. Final briefing (10 min.) 6. Homework: according to the textbook, repeat: For mechanization of work during editing, various correct machines are used. The simplest device for the mechanization of dressing is a hand press (Fig. 7.6), with the help of which dressing of rolled profile and bar material is carried out. For mechanization of work during bending use bending machines. Some of them are presented in the figures. Bending rolls (Fig. 7.8). Press brakes (Fig. 7.10, a, b, c) are used to perform a wide variety of work - from bending edges to bending profiles in one or more planes. Dimensional locksmithing Sizing processing refers to the processing of a workpiece (part) to give it the given shapes, sizes and roughness of the treated surfaces. As a result of processing, a finished product is obtained, which can be used independently (for example: a hammer, chisel, square, etc.) or a part suitable for installation in an assembled product (for example: handles and levers of various designs). Dimensional locksmithing operations include filing, hole machining (drilling, countersinking, countersinking, caking, reaming) and cutting of external and internal threads. Theme 8 The student must: know: Purpose of files and their varieties; Techniques for filing various surfaces of parts; Devices used in the process of filing; Safety rules for filing; be able to: Use the tool when sawing surfaces as intended; Select the tool according to the surface to be machined. surface. Workplace equipment: workbench, bench vise, a set of files of various cross-sectional profiles, lengths and notches, a set of files, rulers with two-sided bevels, flat angles 90 0 and 120 0, vernier calipers with 0.1 and 0.05 mm divisions, sponges invoices; metal brushes, sweeping brush. Filing they call a plumbing operation to remove a layer of metal from the surface of a workpiece (allowance) using a cutting tool - a file, the purpose of which is to give the workpiece specified shapes and sizes, as well as ensuring a given surface roughness. Sawing is done after cutting and cutting metal with a hacksaw, as well as during assembly work to fit the parts in place. Files process flat, curved, shaped complex surface profiles, grooves, grooves, holes of any shape, surfaces located at any angles. Depending on the required surface roughness, sawing is performed with files with various notches. The more notches on a certain file length, the smaller the tooth. Sawing is divided into preliminary (draft) and final (finishing and finishing). Sawing allowances are provided in the range of 0.5–0.025 mm. The error in the dimensions of the part may be 0.2-0.05 mm. The file is a cutting tool in the form of steel
The main parts and elements of the file are shown in Fig. 8.1. The teeth of the file can be formed by notching (Fig. 8.2, a), milling (Fig. 8.2, b), pulling (Fig. 8.2, c) and in other ways. The most common way to form teeth is to cut them on special sawing machines with a chisel. Each tooth file has a rear angle α, an angle of sharpening β, a front angle γ. For processing steel, cast iron and other solid materials, double-notched files are used. Files are classified according to the number of notches per 10 mm of file length into 6 classes and are intended for certain works. Table 7 For rough rough filing (roughness R z = 160-80, accuracy 0.2-0.3 mm), files of class 0 and 1 (dracheva) are used when it is necessary to remove a large layer of metal up to 1 mm. To perform finishing (roughness R z = 40-20, accuracy 0.05-0.1 mm), files of 2-3 classes (personal) are used, the layer to be removed does not exceed 0.3 mm. For fitting, finishing and finishing work (surface roughness Ra 2.5-1.25, accuracy 0.02-0.05 mm), files of class 4 and 5 (velvet) are used, the removable metal layer is not more than 0.05 mm. According to the cross-sectional shape, files are divided into flat (Fig. 8.4), square, trihedral, round, semicircular, rhombic, hacksaw, etc. Files - small files (80, 120 and 160 mm long) of various cross-sectional shapes (Fig. 8.5). Depending on the number of notches, the files are divided into five types No. 1,2,3,4,5 with the number of notches 22-112 per 10 mm of length. They are used for sawing and sawing small surfaces inaccessible for processing with metalwork files; holes, corners, slots, grooves, radii, short sections of shaped profiles, patterns (patterns) and where low surface roughness is required. Needles are most widely used in tool workshops when performing patterns, engraving and jewelry. When machining, other types of files are also used: with a special holder, tared, diamond, rasps, rotating boron files, etc. The position of the case of the working file is considered convenient and correct if you stand in front of the vise straight and stable (Fig. 8.6, a) or half-turn at an angle of 45 0 to the axis of the vise. The feet should be at an angle of 40-60 0, the distance between the heels of the legs more than 200-300 mm. (Fig. 8.6). | |||||
 to protect the hands from shock and vibration of the metal, it is imperative to work in mittens, since burrs and sharp edges of the workpieces can injure your hands;
The smallest deviations from the surface plane are achieved by filing with a cross-stroke. Sawing always begins with a file with a notch No. 1 or No. 2, removing the main metal layer without reaching the marking risks of 0.8 - 1 mm, after which a file with a notch No. 3 and 4 finally removes the remaining metal layer at risk, maintaining the specified size according to the drawing . The control of the sawn surface is carried out with calibration rules, calipers, squares and calibration plates.
Deviation from flatness and straightness is checked with a straightedge. Deviation from parallelism is checked with a caliper, and planes located at right angles with a square or universal goniometer (Fig. 8.10, 8.11.).
Sawing of plane-parallel planes of the workpiece begins with the widest surface, which is taken as the main measuring base. This surface is finally filed, observing all the rules for filing and checking flat surfaces. Then the caliper pre-check the thickness and parallelism of the sides of the workpiece, measurements are made in 3-4 places. Having determined the allowance to be removed in various places of the second wide machined surface, it is filed. Control deviations from straightness, flatness and parallelism are carried out periodically. Deviation from the parallelism of the sides during filing is controlled by a caliper. (Fig. 8.12).
On the finished surface, longitudinal strokes should be induced. Deviation from parallelism, straightness and flatness of the machined sides and their thickness should be within the tolerances indicated on the drawing.
Sawing of mating surfaces is the most common type of filing, as it is intended for planes located at an angle of 90 0 to each other or at another angle required by the drawing. The external corners are treated with flat files, the internal corners, depending on their size, can be processed with flat (with one rib without a notch), trihedral, square hacksaw and rhombic files. Processing of the workpiece begins with the base, longest or widest plane.
This surface (or rib) is finally filed, observing all the rules for filing and checking flat surfaces. Then the angle pre-check the angle between the machined (base) and unprocessed surfaces. The protruding places on the untreated surface are filed with a cross-stroke, periodically checking the angle with a square, and the deviation from straightness and flatness with a ruler. If when checking with a ruler and a square, there is a uniform gap between the surface being tested and the ruler, the angle being checked and the edge of the square, then work to ensure the accuracy of processing is considered to be completed, after which uniform longitudinal strokes must be applied to the treated surface. The sequence of filing surfaces located at an internal angle is the same as the surfaces located at an external angle. Pay special attention to the thoroughness of processing the junctions of the internal planes of the angle, using a rhombic or trihedral file for this.
When securing the workpiece in a vise, it is imperative to use overhead jaws to protect the already machined base surface from damage. The file size is chosen so that it is longer than the filed surface by at least 150 mm. If the parameter of surface roughness is not indicated on the drawing of the workpiece, sawing is done only with a file with a notch No. 1 or No. 2. If you want to get a surface with a lower roughness, then sawing is finished with a file with a notch No. 3 or No. 4.
West Kazakhstan Regional Department of Education
Zapodno - Kazakhstan Industrial College
“Considered” I affirm: “E / m of linear telecommunication and
wired broadcasting "______________ M. T. Sisengalieva
Protocol No. __ of __________
Head of CCP
__________________ A.T. Halliulina
Open lesson development
Theme:
"Bending, editing"
Prepared by: master s / o M. Sembaeva
2016 academic year
2016 I approve: Art. master
41 group ________ A. G. Nurguzhin.
Lesson topic:
The purpose of the lesson:
Educational goal:
Lesson features:
Editing, bending metal.
a) Educational:
consolidation of knowledge on work planning for the manufactured product (scoop), the formation of skills to assemble the scoop.
b) Developing:
to reveal the importance of the studied techniques for the successful mastery of the profession;
Promote the active use of theoretical knowledge in the implementation of practical work;
To promote the development of skills and habits of self-control of the process and the result of labor;
The constant desire to improve in their skills;
Constant stimulation of students' independence in work.
To inculcate a work culture, technological discipline, accuracy, production ethics, compliance with rules of conduct, TB rules, organization of work and the workplace.
1) Visibility: Posters, natural samples, from thin sheet metal, multimedia presentation.
2) Tool kit: side cutters, pliers, pliers lengths, mounting knife, penset,
3) Equipment and materials: Bench vice, marking tools, scrippers,metal brush, square,Hammer with a round polished brisk, Sheet material, mittens, overalls (cotton jacket),hacksaws.
During the classes.
I . Organizational part: 5 minutes.
1. Greeting students and checking attendance.
2. Checking work clothes and readiness for occupation.
II . Introductory briefing - 40 min
Post topics and purpose of the lesson.
1. Repetition of material passed, tests
2. General concepts.
3. Types of steel and its application.
4. Steel marking.
New material explanation
1. Purpose of editing and bending
2. Tools
2 . Edit
Editing (straightening) - leveling the surface of a sheet metal billet in a cold or heated state. Work is performed on a steel or cast-iron plate (Fig. 7). In this case, a hammer with a round polished brisk hammer, metal or wooden, is used. The curvature of the part is checked with a ruler for the presence of a gap. Before editing the bar, mark the boundaries of the bend with chalk and put it with a bulge up. In mass production, special machines with rotating steel rolls are used to straighten sheets, and screw presses are used to straighten bars.

Fig. 7. Editing sheet steel (a). Striking scheme (b)
Bending
Bending of sheet or strip material is done either manually, with the help of a supporting vice and mandrels, or on bending presses. At a right angle, bending the parts according to the marking with a bending allowance of 0.8 material thickness. A decrease in the bend radius below the allowable limit leads to a break. Sleeves and collars bend in mandrels of a necessary form. In mass production, strip and bar parts bend on roller machines. The pipes are bent manually or by means of a mechanism, with or without a filler, in a cold or hot condition. The choice of method depends on the pipe diameter, wall thickness, material and angle of the bend (Fig. 8). Pipes with a diameter of more than 100 mm bend in a hot condition with a filler (fine dry sand). The ends of the pipes are closed with plugs and drilled holes in them for the release of gases. Heating is carried out with a gas torch or blowtorch. Pipes with a diameter of up to 15 mm are bent with pins inserted into the holes of a steel plate, which is clamped in a vice. For thicker pipes, pipe benders installed on a special workbench are used. The pipe is inserted between the two rollers in the support. Bend the pipe, turning the lever with the rollers (fig. 8).
Fig. eight It is flexible pipes: 1 - a pipe, 2 - a stop, 3 - a template, 4 - a mobile bracket, 5 - a roller, 6 - a substantiation, 7 - the lever
Presentation of program material.
Bending - locksmith operation, with which the workpiece is given the required shape.
1) Bending in a vice can be carried out:
"using a mallet;
"using a hammer and a wooden block.

The teacher demonstrates the techniques of bending in a vice, drawing attention to the fixing of the workpiece (the risk is located at the level of the nibs).
2. The bending of blanks is also carried out using mandrels of various shapes.

In addition, bending is done with the help of devices (in mass production).

Bending thick wire is produced in a vice with the use of metal bars with a hammer.
Performing bending, you must comply with the following safety rules:
"work only with a serviceable tool;
"securely hold the workpiece in a vice;
"do not put mandrels and tools on the edge of the workbench;
"do not hold the left hand close to the bend.

III . Current instruction: 4 hours 30 min.
In the process of carrying out practical work, I ask you to pay attention to the need for careful execution of operations, to follow the safety instructions when editing and bending.
When bypassing jobs pay attention:
verification of workplace preparation for work;
verification of compliance with the rules of TB;
on clean and order workplace;
assist everyone as needed;
checking the correct preparation of tools for work;
checking the correctness of the operation on the workpiece;
checking the correctness of the operation of editing and bending;
Quality control of the work performed;
Cleaning jobs.
IV Final briefing: 30 minutes.
summarizing the lessons of industrial training.
mark discipline in the process of conducting a lesson.
mark and show the best work of students.
point out errors while doing the exercises.
analysis of the use of working time, labor receptions.
ratings announcements with comments.
Homework, cleaning the workplace.
Master p / o ____________ M. S. Sembaeva
06/30/2016 hotline 8:30 yes
41 top қ "Editing, bending" takyrybynda ashyқ saba қtkіzіledі.
кткізілетін Orny: Baylans Sheberkhanasy.
ө / o sheberi: M.S. Sembaeva.
Annex 1
Test on the topic: metal editing.
1. What form should preferably have a hammer head used to straighten the metal?
a) Square.
b) Round.
2. What hammers are ruled by steel sheets, rods, billets?
a) Steel hammer.
c) One or the other, at the discretion of the locksmith.
3. What hammers are ruled by parts with a finished surface?
a) Steel hammer.
b) A hammer made of soft materials.
c) Wooden hammer.
4. How do you edit a very thin sheet material?
a) A hammer made of soft materials.
b) Using metal or wooden smoothing bars.
c) Small-sized steel hammer.
5. How to correct the deformed welded structures?
a) Striking with a hammer from the bulge side.
b) Striking with a hammer from the side of the troughs.
c) Striking with a hammer from both sides.
6. In what sequence will you edit the metal in the presence of a bulge in the middle of the workpiece?
a) Inflicting frequent blows with a hammer from the edge of the sheet in the direction of the bulge.
b) Striking frequent blows with a hammer from the bulge towards the edges of the sheet.
c) Striking bulges and moving to the edge.
7. What hammer should be used when editing thin sheet material?
a) Wooden.
b) Brass.
c) Lead
d) Iron.
Reference answers: 1- b; 2- a; 3- b, c; 4- b; 5 B; 6- a; 7- a, b, c.
Test on the subject: metal bending.
Each question has one or more correct answers. Choose the right one.
1. In what sequence is bending of the strip metal at an angle of 90 0 ?
a) First, with a hammer at the bottom, at the jaws of the vice, and then at the top of the workpiece.
b) First, strike the upper part of the workpiece, and then below, at the jaws at an angle of 90 0
c) Depending on the thickness of the metal strip.
2. What kind of hammer it is advisable to perform the first method for bending iron strip?
a) Metallic.
b) Wooden.
c) It does not matter.
3. Which mandrel is used for bending staples to obtain smooth corners?
a) Oval shape.
b) Cylindrical shape.
c) Combined form.
4. How to bend parts such as staples from wire with a diameter of 3 mm?
a) In a vice on a frame.
b) Pliers.
c) Manually.
5. What device is used for bending pipes with a diameter of 12 to 20 mm?
a) Manual machine.
b) Multi-pipe bender.
c) Manual lever pipe bender.
Reference answers: 1- b; 2- b; 3- b; 4- a; 5a.
Master of Industrial Training: M.S. Sembaeva
Safety Instructions
General safety requirements
Individuals who are at least 16 years old and who have received appropriate training and instructions on labor protection are allowed to work independently on manual metal processing. Students must follow the rules of conduct, training schedule, established work and rest schedules.
In the case of manual metal processing, the following hazardous production factors may be affected:
Injury of hands when working with a defective tool;
Injury with metal fragments during its cutting.
Safety requirements before starting work:
Wear protective clothing, ventilate the premises of the training workshop;
Check the serviceability of the instrument and put it in its place;
When cutting metal wear goggles and check the presence of the safety net on the workbench;
Check the condition of the vice; the sponges of the vice must be firmly fixed;
Remove from the workplace all unnecessary.
Safety requirements during operation:
Firmly secure the workpiece in a vice. Vise lever
Work to perform only serviceable tool.
To avoid injury, make sure that: the surface of the hammer heads, the sledge hammer is convex, not knocked down. The tool, having pointed ends-shanks (files, etc.), was equipped with wooden, tight-fitting handles of the established form, without chips and cracks, with metal rings. Impact cutting tools (chisels, beards, center pins, glues, etc.) had a non-knocked surface. The chisel had a length of at least 150 mm, and the part that had been drawn was 60-70 mm;
When working with files, fingers were on the surface of the file;
When chopping metal, a protective metal mesh was installed with cells no more than 3 mm or an individual screen;
To avoid injury, do not check the quality of the sawed surface with your fingers;
Cut the sheet metal blank while cutting with scissors with a hand in the mitten;
To use the metalwork tool only for their intended purpose;
Do not use keys that are larger than the nut, do not lengthen the key handle by overlapping the grip of two keys.
In the case of manual metal processing, the following overalls and personal protective equipment should be used: cotton gown, beret, mittens, goggles. In the event of an accident, the injured or eyewitness of the accident must immediately inform the master, who informs the administration of the institution about this. In case of equipment malfunction, stop the work and inform the teacher, the master, about it. Students must follow the order of work, the rules of personal safety, keep the workplace clean. Trainees who have committed a failure to comply with or violate an instruction on labor protection are brought to justice, and with all trainees an unscheduled labor protection instruction is given.
Fig. 1. double bench bench
Metal workbenchescan be of different designs, single and double, permanent and mobile. They can be made of wood or metal; They also make combined workbenches - from wood and metal. The plumbing workbench is always made of solid wood. At the bottom of the table (under the stove) is a drawer for the tool. Depending on the design of the table on the right (or left) side of the drawer there is a cabinet with shelves.
Safety requirements in emergency situations:
When a working tool fails, stop working and inform the teacher (teacher, master) about it;
When you receive an injury, inform the teacher (master, teacher) about this, who will provide first aid to the victim, if necessary send him to the nearest medical institution and inform the administration of the institution about it;
In the event of a fire, immediately evacuate students from the premises of the training workshop, report the fire to the institution's administration and to the nearest fire department, and start extinguishing the fire using primary fire extinguishing agents.
Safety requirements at the end of the work:
Put in order the tool and the workplace. Do not blow off chips and sawdust with your mouth and do not brush your hand, but use a brush and a magnet for this purpose;
To carry out wet cleaning and ventilate the premises of the training workshop.
Remove clothing and wash hands thoroughly with soap.
Measurements
TO universal measuring instruments -for dimensional control, used in plumbing, include a foldable metal ruler or metal tape measure, universal caliper, normal caliper for external measurements, normal caliper for measuring diameter, simple depth caliper, universal goniometer, angle bracket 90 °, and calipers.
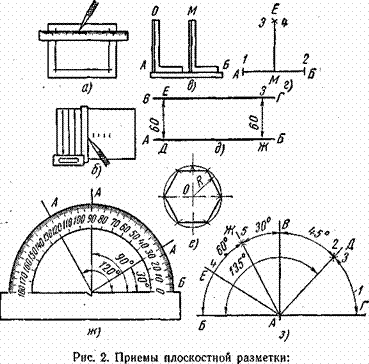
Fig. 2. Universal measuring tools: a - measuring metal ruler; b - vernier caliper; in - calipers normal; g - nutromer normal d - rod depth gauge; e - universal protractor; well - square flat 90 "
TO simple special tools - used in the plumbing business include: rectangular ruler; threaded pattern; cork national team one-sided; double-sided traffic jam; the bracket is limit one-sided and the bracket is limit bilateral.
Fig. 3. Simple special tools for size control: a - a corner ruler with a double-sided bevel; b - rectangular line; in - template carving; g - probe; e - one-sided traffic jam; e - double-sided limit cap team; W - limit unilateral bracket; h - limit double-sided bracket
Universal CaliperIs a measuring instrument that serves for internal and external measurements of length, diameter and depth. It consists of a guide rod, made integral with a sponge, having two bearing surfaces (lower for the outer and upper for internal measurements), a slide that is integral with the lower movable sponge for external measurements and the upper movable sponge for internal measurements, clamping frame and retractable depth gauge. On the guide rod marked millimeter division.
Markup
Markup -called the operation of drawing lines and points on the workpiece intended for processing. Lines and points mark the boundaries of processing.
There are two types of markup: flat and spatial. The markup is called flat,when lines and points are plotted on a plane, spatial -when marking lines and points are applied to the geometric body of any configuration.
Spatial marking can be performed on a marking plate using a marking box, prisms and angles. For spatial marking, prisms are used to rotate the marked blank.
For flat and spatial markings, a drawing of a part and a blank for it, a marking plate, marking tools and universal marking tools, measuring tools and auxiliary materials are required.
TO marking toolinclude: scriber, marker, marking compass, center pins, caliper with a conical mandrel, hammer, center compass, rectangle, marker with prism.
TO marking toolsinclude: marking plate, marking box, marking squares and bars, stand, gauge with scriber, gauge with movable scale, device for centering, dividing head and universal marking gripper, rotary magnetic plate, dual clamps, adjustable wedges, prisms, screw supports.
Measuring tools for markupare: a ruler with tick marks, a gage, a gauge with a movable scale, a caliper, a square, a goniometer, a caliper, a level, a control ruler for surfaces, a probe, and reference tiles.
TO markup materialsinclude: chalk, white paint (a mixture of chalk diluted in water with linseed oil and the addition of a composition that prevents drying of the oil), red paint (a mixture of shellac with alcohol and dye), lubricant, detergent and etching materials, wooden bars and slats, a small tin dishes for paints and brush. Simple marking and measuring tools used in the plumbing work are: hammer, scriber, marker, center punch, square, compass, marking plate, graduated ruler, calipers and calipers.
Planar or spatial mapping of parts carried out on the basis of the drawing.
Before marking, the blank must undergo mandatory training, which includes the following operations: cleaning the part from dirt and corrosion (do not take place on the marking plate); degreasing the part (not to produce on a marking plate); inspection of the part in order to detect defects (cracks, holes, curvatures); check of overall dimensions, and also allowances for processing; determination of marking base; white painted surfaces to mark and apply lines and points on them; definition of the axis of symmetry.
If a hole is taken for the marking base, then a wooden plug should be inserted into it.
Markup base- This is a specific point, an axis of symmetry or a plane, from which, as a rule, all dimensions on a part are measured.
Nervecalled the operation of applying shallow dots on the surface of the part. They define the axial lines and centers of the holes needed for processing, certain straight or curved lines on the product. Pinging is done with the purpose of marking the details of persistent and visible signs that define the base, the boundaries of the treatment or the place of drilling. The shuffling operation is performed using a scriber, center punch and hammer.
Markup using a templateused in the manufacture of a significant number of identical parts. A template made of tin with a thickness of 0.5–2 mm (sometimes stiffened with a corner or wooden lath) is superimposed on the flat surface of the part and outlined with a contour around the contour. The accuracy of the applied contour on the part depends on the degree of accuracy of the pattern, the symmetry of the scriber tip, and also on the method of moving the scriber tip (the tip should move perpendicular to the surface of the part). The pattern is a mirror image of the configuration of parts, lines, and points that should be applied to the surface of the part.
The accuracy of marking (the accuracy of transferring dimensions from drawing to part) depends on the degree of accuracy of the marking plate, auxiliary devices (squares and marking boxes), measuring tools, tools used for transferring dimensions, the degree of accuracy of the marking method, as well as the skill of the marker. The marking accuracy is usually from 0.5 to 0.08 mm; when using reference tiles - from 0.05 to 0.02 mm.
When marking you should be careful with pointed scoops. To protect the hands of the worker before marking starts, it is necessary to wear a cork, wooden or plastic case on the tip of the scriber.
To install heavy parts on the marking plate, use hoists, hoists or cranes.
Oil or other liquids spilled on the floor or marker plate may cause an accident.
Puller- it is a fitting tool for removing gear shafts, couplings, pulleys, bearings, levers, etc. A bearing puller consists of two or three tacks (cheeks) and a yoke connecting the shoulders of the tacks, sleeves with internal thread, as well as hexagonal or square head screws or knob.
Chopping metal
A chisel (Fig. 9) is a tool made of carbon steel U7A or U8A with a rectangular or rounded profile, one end of which has the shape of a wedge. Chisel dimensions: length 100–200 mm, thickness 8–20 mm, width 12–30 mm. A chisel is used to chop or remove a metal layer when machining accuracy is not required. They can also produce cutting, cutting and cutting material.
Fig. 4. Chisel
Depending on the type of material being cut or cut, the chisel angle is: 60 ° for steel, 70 ° for iron and bronze, 45 ° for copper and brass, 35 ° for zinc and aluminum.
The material being cut (tin, strip iron, steel tape, profile, rod) should be placed on a steel plate or an anvil so that it fits its entire surface to the surface of the plate or anvil. The material from which you want to cut off the workpiece can be secured in a vice. If the metal is longer than a plate or anvil, its overhanging end should rest on the appropriate supports.
A sheet or piece of tin with the contour of the element marked on it is placed on a steel plate for cutting tin. The tip of the chisel is placed at a distance of 1-2 mm from the marked line. Hitting a hammer on a chisel, cut the tin. Moving the chisel along the contour and at the same time striking it with a hammer, they cut down the shaped element along the contour and separate it from the sheet of tin.
The cutting of an element from a thick sheet material is carried out first on one side of the sheet, then it is turned over to the other side and cut out completely (moving the chisel along the resulting trace from the tip of the chisel). The cut element along the contour is handled with a hand file.
Curved or crumpled tin before marking should be trimmed on the stove with a rubber or wooden hammer. Before laying the sheet on the slab when straightening, marking and felling should be thoroughly cleaned and wiped the slab. Tin should fit to the plate with its entire surface. Do not use a blunt or chipped chisel and a chipped or riveted hammer.
The chisel is used to cut the material in cases when it is difficult or impossible to use scissors or a saw because of the complexity of the part configuration required, when the necessary scissors are missing, when the material being cut is too hard.
When cutting viscous materials in order to protect the chisel from jamming, the cutting part of the chisel should be lubricated with oil or soap and water, which reduces friction and makes it possible to obtain a smooth cut surface.
Circumcision- This is the removal of the edge of the material with a chisel, as well as the removal of sagging and sprues on the surface of the castings.
Kreuzmeisel- it is the metalwork tool, similar to a chisel, but having a narrow or shaped cutting part. It serves to cut rectangular or shaped grooves. There are several types of kreysmeysel: rectangular, semicircular and special (Fig. 10).
Fig. 5. Crevice bones: a - rectangular; b - semicircular, groove
For cutting use a chisel, for cutting - a klyutsmey-sel.
For mechanical cutting use a hand-held pneumatic hammer with a chisel inserted into it.
Pneumatic hammerdriven by compressed air. Pneumatic hammers are also used for riveting and construction work. They are used both in enclosed spaces and in open areas during assembly and construction works.
The heads of chisels and crossbuttons have bevelled, rounded from the end face polished surfaces. In case of blunting or damage to the tip, the chisel cutting part should be sharpened to the appropriate angle. After work, the tool must be cleaned of dirt and wiped with a cleaning material dipped in oil.
If the safety requirements are not observed during cutting, cutting and cutting, the mechanic most often gets injured hands or faces from fragments of the materials or tools being processed. Work with a chisel or crossbridge should be in protective glasses and mittens. Workplace fitter working with a chisel, must be protected by a protective grid.
Manual and mechanical straightening and bending of metal
For dressing shaped, sheet and strip metal using various kinds of hammers, plates, anvils, rolls for straightening tin, hand screw presses, hydraulic presses, roller devices and winches.
The bending of the metal, depending on its thickness, configuration, or diameter, is carried out with a hammer using metal tongs or forged tongs on a straightening plate, in a vice or in molds or on an anvil. You can also bend the metal in various bending devices, bending machines, stamps on bending presses and other equipment.
A hammer is a percussion instrument consisting of a metal head, a handle and a wedge of fig. eleven.
Fig. 6. Bench hammer:
a - metal head; b - handle; in - a wedge
The hammer is widely used in various plumbing operations; This is one of the main tools when performing plumbing work.
Flexiblecall the operation of giving the metal a certain configuration without changing its cross section and metal cutting. Bending can be carried out in a vice or on the anvil. Bending metal and giving it a certain shape can facilitate the use of templates, core forms, bending dies and accessories. Bending a large number of metal bars to give them a certain shape. It is possible only in specially designed and manufactured for this purpose stamps and bending equipment.
Fig. 7. Bending device for pipes.
When editing and bending metal, it is necessary to check the technical condition of the tools used, correctly and accurately fix the material on the plate, in a vice or other device. The sleeves of clothing on the wrists should be fastened, and gloves should be worn.
Related information.
Popular:
New
- Markup definition. Planar marking. Types of markup. Questions for self-test
- Pipe bending machines Various variations of pipe bending machine
- Safety during filing
- What should be the sharpening angle of the scriber
- Drawing on preparation of contours of future product
- Modern ways of cutting metal and its defects
- Kerner - so that the drill does not slip off!
- Objects of inanimate nature Examples of the influence of inanimate nature factors on plants
- Finishing joinery
- Block breakdown in AutoCAD - simple and effective teams from practitioners