|
Plumbing markup
TO category:
Markup
Plumbing markup
Marking refers to the process of transferring the shape and dimensions of the part or part of it from the drawing to the workpiece. The main purpose of the markup is to designate on the blank the place and boundaries of processing. The machining points are indicated by the centers of the holes obtained by subsequent drilling or bending lines. The boundaries of processing separate the material that must be removed from the material that remains and forms the part. In addition, the markup is used in order to verify the dimensions of the workpiece and its suitability for the manufacture of this part, as well as to control the correctness of the installation of the workpiece on the machine.
Workpiece processing can be done without marking, using conductors, stops and other devices. However, the cost of manufacturing such devices pays off only in the production of serial and mass parts.
The markup (which is essentially close to technical drawing) is performed, using special tools and devices, on the surfaces of the workpieces. Marking risks, i.e., lines deposited on the surface of the workpiece, indicate the boundaries of processing, and their intersections - the position of the centers of the holes or the position of the centers of the arcs of circles of the mating surfaces. By marking risks produce all subsequent processing of the workpiece.
The markup can be mechanized and manual. Mechanized markings performed on coordinate boring machines or other devices that provide accurate movement of the workpiece relative to the marking tool, are used for large, complex and expensive workpieces. Manual marking is performed by toolmakers.
Distinguish between surface and spatial markup. Surface markings are performed on one surface of the workpiece, without linking its individual points and lines with points and lines lying on the other surface of this workpiece. The following methods are used: geometric constructions; by pattern or by sample details; using fixtures; on the machine. The most common type of surface marking is planar, used in the manufacture of flat gauges, conductor plates, stamp parts, etc.
Spatial marking is performed by linking the dimensions between points and lines lying on different surfaces of the workpiece. The following methods are used: for one installation; with rotation and installation of the workpiece in several positions; combined. Spatial marking is used in the manufacture of parts of complex shape.
Tools and devices for marking. According to its purpose, the marking tool is divided into the following types:
1) for making scratches and applying dimples (scribers, reismas, compasses, center pins);
2) to measure and control linear and angular values (metal bars, calipers, squares, micrometers, precision squares, goniometers, etc.);
3) combined, allowing to make measurements and carry out risks (marking calipers, caliper, etc.).
Scriber used to apply scratches on the surface of the workpiece. Steel scribes are used for marking raw or pre-machined surfaces of the workpieces, brass scriber for marking out brushed and polished surfaces, soft pointed pencils are used for marking accurate and finished surfaces of non-ferrous alloy blanks.
Marking compasses on the device and purpose correspond to the drawing and are used for drawing circles and dividing them into parts, transferring linear dimensions, etc.

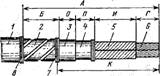
Fig. 1. Marking tool: a - scriber, b - compass, v - center punch, g - square
Steel legs scrolls and compasses are made of steel U7 and Y8 (working ends harden to 52-56 HRC3) and from hard alloys VK.6 and VK8. The working ends of scriber and compasses are sharply sharpened. The thinner and harder the edges of these tools, the thinner the risks are and the more accurate the part will be made.
A punch (Fig. 1, c) serves to apply recesses (cores) on the marking risks. This is necessary so that in the course of processing the marking risks, even when erased, are noticeable. Kerner is a steel round core made of alloyed (7HF, 8HF) or carbon (U7A, U8A) steel. Its working part is hardened and sharpened at an angle of 609. The center punch, which is hit with a hammer, is rounded or chamfered and also hardened.
Reismas, used in spatial marking for horizontal markings on the marking surface and for checking the position of the workpiece on the marking plate, is made in the form of a stand on which you can move along the height and fix the scriber in the required position. In the simplest design reismase scriber to the desired height set on a vertical scale ruler or with end measures. In toolmaking, shtangenreismas are mainly used, and sometimes (if necessary) special-designed flights (for example, a multi-pointed flight-plane, having several dashes on a stand, independently set in height to a given size). Combined reysmases are also used, i.e., ordinary reismases equipped additionally with various devices and tools (for example, reismas with a center-finder).
The square is used for drawing lines, building corners and checking them.
Marking calipers are used to measure the dimensions of the outer and inner surfaces and to carry out marking marks. It differs from conventional calipers by the presence of hard-alloy, sharp-tip tips on its jaws.
The devices used for marking and serving for installation, adjustment and fixation of blanks include adjustable wedges, prisms, linings, jacks, cartridges, collets, rectangular magnetic plates, rotary tables, sinus tables, dividing heads and many others.
Auxiliary materials are used to prepare the workpiece surfaces for marking. Dust, dirt, rust, scale and oil of the workpiece are cleaned with steel brushes, files, abrasive cloth, wiping tips, napkins, brushes, etc. by layer. Paint should stick well to the surface, dry quickly and remove well. Untreated or coarsely treated surfaces of steel and cast iron blanks are painted with chalk dissolved in water with the addition of wood glue and turpentine (or linseed oil and sikkativa). Pre-treated surfaces are coated with copper sulfate solution. The processed surfaces of the big sizes and aluminum alloys are covered with a special marking varnish. For this purpose, you can use a solution of shellac in alcohol, stained with magenta. Coloring small surfaces is done by cross-brush movements. Large surfaces are spray painted. The painted surface is dried.
Sequence of work when marking. The marking includes three stages: preparation of blanks for marking; proper markup and quality control markup.
Preparation of the workpiece under the markup is performed as follows:
1. Carefully study and check the drawing details.
2. Pre-inspect the workpiece, identify defects (cracks, scratches, shells), control its size (they should be sufficient to manufacture parts of the required quality, but not superfluous).
3. Clean the workpiece from dirt, oil, corrosion; paint and dry those surfaces of the workpiece on which the marking will be made.
4. Select the base surfaces from which they will be postponed dimensions, and make their preparation. If the base is selected, the edge of the workpiece - it is pre-aligned, if two mutually perpendicular surfaces - they are processed at a right angle. Baselines are already applied during the markup process. The location of the bases must ensure that the part fits into the contour of the workpiece with the smallest and uniform allowance.
The markup itself is performed in the sequence determined by the markup method. When marking on the template, the latter is installed on the workpiece, correctly oriented it relative to the bases, and secured. The template should fit snugly around the workpiece along the entire contour. Then scroll the outline of the template on the workpiece and detach the template.
The markup by the method of geometric constructions is carried out as follows. At first all horizontal are carried out (relative to the base), and then all vertical marking risks; then all rounds, circles are performed and they are joined by straight or inclined lines.
When marking, the rack of the reismas is taken by the base and moved along the marking plate relative to the surface of the workpiece, while avoiding a skew. The scrim of reismas touches the vertical surface of the workpiece and leaves it horizontal at risk. Scriber should be at an acute angle to the direction of movement, and the pressure on it should be small and uniform. Risks are held parallel to the working surface of the marking plate. In order for the risks to be strictly linear and horizontal, the support surfaces of the reismas and the marking plate must be processed with great precision. The markup quality is improved if a flat scriber is used in the flightmaker.
Quality control of marking and core is the final stage of marking. Core centers should be located exactly on the marking risks, cores should not be too deep and differ from each other in size. On direct risks, cores are punched at distances of 10-20 mm, on curvilinear ones - 5-10 mm. The distances between the cores perform the same. With an increase in the size of the workpiece, the distance between the cores also increases. The points of conjugation and the intersection of marking marks are necessarily kern. The marking risks on the processed surfaces of precision products are not kern.
Marriage in the markup can lead to significant material losses. Its most frequent causes are: wrong choice of bases and their poor preparation; errors when reading a drawing, when postponing dimensions and in calculations; wrong choice of marking tools, devices, their malfunction; wrong methods and methods of markup.
The widespread use of mechanized marking tools and devices improves the quality and performance of the markup. Therefore, mechanical, electrical and pneumatic cores, calipers and calipers with electronic indication, mechanized devices for installation, alignment and fixing of blanks should be widely used. Significantly speeds up the work and reduces the number of errors the application for the calculation of calculators. It should create more versatile and easy-to-use marking tools and fixtures. Where it is economically justified, use coordinate machines, coordinate measuring machines for marking, or eliminate marking altogether by machining blanks on CNC machines.
When processing metal or forgings, some of their surfaces are left in black, while others remove a layer of metal of a certain thickness, so that the treated surfaces have the shape and dimensions shown on the drawing. Therefore, prior to machining, it is necessary to mark up the parts.
Markupcall the operation of transferring the necessary contour dimensions from the drawing to the plane of the material or workpiece in order to produce the necessary metalworking processes for the final manufacture of products. Distinguish planar and spatial markup.
Planar Markup- this is the application of contour dimensions on the plane of the material from which the part will be made. For example, the layout of the cut air ducts of sheet material, marking flanges, gaskets.
Spatial Markup - this is the application of contour lines on the plane of the workpieces mated at different angles. For example, drawing the required contours on the bulk workpiece details, made with excessive allowances.
In order for the contour lines applied to the marked surfaces of the workpiece to be clearly visible, these surfaces must be pre-painted.
Untreated or coarsely machined planes of cast parts are cleaned from dirt, residues of foundry soil, sand, scale, cut off burrs and tides, and then painted with chalk, quickly drying paint or varnished.
For coloring, crushed chalk is dissolved in water (per 1 liter of water 125gr of chalk) to the thickness of milk, boil, and then add a little flaxseed oil so that the chalk does not crumble, and desiccant, accelerating the drying of the paint.
A solution of copper sulphate (three teaspoons of vitriol on one glass of water) or lumpy copper sulphate is painted over cleanly treated planes. Liquid solutions are applied to the surface of the workpiece with a brush in a thin layer. A piece of vitriol rub moistened with water surface of the workpiece. The markup is made after the paint has dried.
In the production of blanks in advance provide allowance for processing.
Allowance- this is an increase in the size of the workpiece compared with contour lines (risks) applied exactly according to the drawing.
The allowance should be the smallest in order to save material, reduce the time spent on processing the part and increase worker productivity. Marking is necessary to ensure the correct dimensions of the workpiece and allowances.
Planar Markup
Marking works in plumbing are an auxiliary technological operation consisting in transferring contour constructions in the dimensions of the drawing to the workpiece.
Markup- this is an operation to apply on the surface of the workpiece lines (scratches) defining the contours of the manufactured part, which is part of some technological operations.
Planar markupused in the processing of sheet material and rolled products, as well as parts to which marking risks are applied in the same plane.
Planar marking consists in drawing contour lines on a material or workpiece: parallel and perpendicular, circles, arcs, angles, various geometric shapes according to specified dimensions or contours according to templates. Contour lines are applied in the form of continuous scratches.
In order to preserve traces of scratches until the end of the treatment, small dimples are placed on the risks with the help of a center punch; they are located close to one another, or near the marking risk are placed on the control risk. Risks must be subtle and clear.
Spatial Markup- is the application of scratches on the surfaces of the workpiece, interconnected by mutual arrangement.
Planar marking is done on the workpiece scriber. Accuracy when marking up to 0.5 mm. Scribing risks scriber held once.
The depth of the core cavity is 0.5 mm. When performing a practical task the scriber and marking compass can be kept on the plumbing bench.
At the end of the work, it is necessary to remove dust and scale from the marking plate using a broom brush. When performing practical tasks, it is necessary to press the ruler to the workpiece with three fingers of the left hand so that there is no gap between it and the workpiece. When threading long scratches (more than 150mm), the distance between the grooves should be 25..30mm. For short scratches (less than 150mm), the distance between the grooves should be 10..15mm. Before setting the compass to the size of the arc radius, the center of the future arc must be pinched. To set the compass to size, you need to install one leg of the compass point on the tenth division of the ruler, and the second - endowment, exceeding the specified by 10 mm. Angles, less than 90º, are measured by a goniometer using a square. For planar marking, parallel risks are applied using a ruler and a square. When marking on a plate of a circle of a given diameter, it is necessary to set the compass to a size greater than the radius of the circle by 8. 10mm.
The following tools are used for marking, measuring and checking the correctness of the product manufacturing: ruler, square, compass, caliper, caliper, caliper, scale and curved ruler, protractor, scoop, center punch, marking plate. As devices that accelerate the marking process, use templates, patterns, stencils.
Scribershould be convenient for drawing clear lines on the marking surface and, at the same time, do not spoil the working planes of the ruler, the square. Material scribes selected depending on the properties of the marked surfaces. For example, a brass scriber leaves a clearly visible mark on the surface of the steel. When marking parts from softer materials, it is advisable to use a pencil. Before marking on the plane it is better to apply a thin layer of water-based paint.
Kernersused for drawing the centers of circles and holes on the marked surfaces. Cores are made of solid steel. The length of the center punch is from 90 to 150mm and the diameter is from 8 to 13mm.
As a percussion instrument when performing core grooves use a hammer hammer, which should have a small weight. Depending on how deep the core cavity should be, they use hammers weighing from 50 to 200 g.
Protractorsteel with a protractor is used to mark and check the angles in the manufacture of the mating pipe assemblies, fittings and other parts of the air ducts.
Compass markingit is used for drawing circles, arcs and various geometric constructions, as well as for transferring dimensions from a ruler to a marking workpiece or vice versa. Distinguish compasses rack, reysmusovye, calipers, caliper, calipers.
Marking platesset on special stands and drawers with drawers for storing marking tools and accessories. Small marking plates are placed on the tables. The working surfaces of the marking plate should not have significant deviations from the plane.
Different geometric figures are applied on the plane with the same marking tool: a ruler, a square, compass and a protractor. To speed up and simplify the planar marking of identical products apply templates from sheet steel.
A template is applied to the workpiece or material and it is pressed tightly so that it does not budge during marking. Along the contour of the template, the scriber draws lines indicating the contours of the workpiece.
Large parts mark on the plate, and small - in a vise. If the product is hollow, for example, a flange, then a wooden cork is pushed into the hole and a metal plate is fixed in the center of the cork, on which a center for the compass foot is marked with a center punch.
The flange is marked as follows. The surface of the workpiece is painted with chalk, mark the center and compass spend circles: the outer contour, the contour of the hole and the axial line along the centers of the holes for the bolts. Often, the flanges are marked on the template, and the holes are drilled on the conductor without marking. |
Before cutting a part from a sheet, it is necessary to mark its contours in strict accordance with the dimensions indicated in the drawing.
There are the following types of markup:
1. Marking on the template in the manufacture or assembly of a large number of homogeneous parts.
2. Marking with a marking tool. This type of markup, in turn, can be divided into:
- marking with a ruler and compass;
- marking with the help of an outline for folding and flanging the edge, as well as for trimming the edge;
- marking with naming centers before drilling holes;
- markup using gauge.
The markup for assembling components and installing them on an airplane is carried out using a marking tool as well as using templates.
Markup Tool
Steel ruler, steel meter, scriber, pencil (simple), square, outline, compasses, center punch, hammer, templates, protractor, surface gauge, prisms, protractor, plumb.
Partition contour marking by pattern
1. To impose a template on a sheet so that when cutting from it details it turned out as little as possible waste.
2. Mark the part by circling the outline of the template with a sharp scriber (Fig. 13).
Part marking with a marking tool
a) Marking with a ruler and compass
Mark a part with rectilinear contours, tracing parallel lines
1) draw with a steel ruler a vertical line a, parallel to the edge of the sheet;
2) draw with the help of a square line b at a right angle to the line a;
3) apply strokes to draw contour lines parallel to sides a and b, setting aside dimensions in full size according to the drawing (fig. 15 and 16);


4) draw lines on the planned strokes (fig. 17 and 18);


rice 17-pic. 18.
5) apply strokes in the same way for internal lines (fig. 19) parallel to sides a and b.


Mark the part with straight and curved contours
1) draw an axial vertical line;
2) set aside from the centerline to the right and left along half the length of the lower straight line;
Not all machine parts have contours outlined by straight lines, many of the details are flat surfaces bounded by curved contours from the sides. In fig. 156 parts with curvilinear contours are shown: a wrench (fig. 156, a), a clamp (fig. 156, b), a cam to a turning machine (fig. 156, c), an engine connecting rod (fig. 156, d). The contours of these parts consist of straight line segments, conjugated with curves or with arcs of circles of different diameter, and can be obtained by milling on a conventional vertical milling machine or a special copy milling machine.

Curved contours can be milled on a vertical milling machine:
a) by marking the combination of manual feeds;
b) by marking with a round rotary table;
c) by copy.
Curvilinear contour milling by combining manual feeds
Milling by combining manual feeds is that the pre-marked workpiece (mounted either on the table of the milling machine, either in a vice, or in the fixture) is treated with an end mill, moving the table with manual feed at the same time in the longitudinal and transverse directions so that the mill removes the metal layer in according to the marked curvilinear contour.

To clarify this method of processing a curvilinear contour, consider the example of milling the contour of the plank shown in Fig. 157.
Choice cutters. Select the end mill, the diameter of which would allow to get rounding R = 18 mmrequired by the part contour of the drawing. We take the end mill of high-speed steel P18 diameter 36 mm with normal teeth and tapered shank according to GOST 8237-57; This cutter has 6 teeth.
preparation for work. The bar is installed directly on the table of a vertical milling machine, securing it with tacks and bolts, as shown in fig. 158. A parallel lining is used to ensure that the milling cutter does not touch the working surface of the machine table during processing.
During installation, it is necessary to ensure that chips or dirt do not fall between the contacting surfaces of the machine table, the lining and the workpiece.
Setting the machine to cutting mode. Adjust the machine to the specified cutting speed 40 m / min. Radiation diagram (see Fig. 54) cutting speed 40 m / min with cutter diameter D = 36 mm corresponds to the number of turns between n 11 = 315 and n 12 = 400 rpm. Take the nearest fewer revolutions. n 11 = 315 and set the limb of the gearbox to this level. The cutting speed by the formula (1):
Contour milling. Milling will be carried out with manual feed, following the markings, for which milling should start from the site where there is the least allowance, or cut the mill gradually over several passes to avoid breakage of the cutter (Fig. 159).

Milling is carried out with simultaneous feed in the longitudinal and transverse directions, respectively, of the marking line. Milling the contour cleanly in one pass is not possible, therefore, first, curvilinear contour is milled in rough, and then cleaned along the marking line, including rounding off at the wide part of the plank.
milling central groove width 18 mm and length 50 mm produced by the method of milling a closed groove (see. Fig. 131).
Milling with round rotary table
Curved contours, having the shape of a circular arc in combination with or without straight segments, are machined on a round rotary rotating table, which is a normal accessory of a vertical milling machine.
Rotary round table with manual feed. In fig. 160 shows a round turntable for manual feed. Plate 1
rotary table is attached to the table of the machine with bolts inserted into the grooves of the table. When rotating the handwheel 4
mounted on a roller 3
rotates the turning part of the table 2
. On the side surface of the table are applied graduation marks for counting the rotation of the table to the desired angle. The blanks for processing are fixed on the turntable in any way: in a vice, directly by means of tacks, in special devices.

When rotating the handwheel 4
the workpiece mounted and fixed on the round rotary table will rotate around the vertical axis of the table. In addition, each point of the surface of the workpiece will move around a circle of radius equal to the distance of this point from the axis of the table. The further the point of the surface from the axis of the table is, the larger the circle it will describe when the table is rotated.
If you bring the workpiece to a rotating mill with any point and continue to rotate the table, then the mill will process an arc of a circle with a radius equal to the distance from the center to this point of the workpiece.
Thus, when machining on a round rotary table, the arc contour is formed without combining two feeds as a result of a circular feed of the rotary table, and the accuracy of the contour here depends not on the ability to combine two feeds, but on the correct installation of the workpiece on the table.
With the help of a round rotary table, it is possible to mill both external contours and internal grooves.
Contour pattern processing. Consider an example of manufacturing parts by milling, which combines the processing of the outer contour with the processing of the internal circular grooves.
Suppose you want to process the contour pattern shown in Fig. 161.

The blank has the shape of a rectangle of size 210x260 mm12 thick mm. In the workpiece pre-drilled central hole with a diameter of 30 mm (for mounting it on a round table) and four auxiliary holes with a diameter of 32 mm (for milling). The blank is pre-marked.
Milling will be conducted on a vertical milling machine.
Since external and internal contours are to be machined, milling must be done in two installations.
1. After securing the workpiece on a round table with bolts through any two holes in it, we mill the outer contour according to the marking, using the rotary motion of the round table (Fig. 162, a).

2. After securing the workpiece on the round table with sticks, we mill the internal circular grooves along the marking using the rotary motion of the round table (Fig. 162, b).
Choice cutters. Since the processing of the outer contour and inner grooves is desirable to produce without changing the cutter, then choose an end mill from high-speed steel R18 (according to GOST 8237-57) with a diameter of 32 mm (according to the width of the circular groove) with a normal tooth (z = 5) and a tapered shank.
Installation of a round rotary table. To install a round table, you must:
1 Put the round table on the edge, wipe the base and set on the machine table. When installing, insert clamping bolts with nuts and washers into the grooves of the machine table on both sides and fasten the round table with bolts.
2 Insert a centering pin with a diameter of 30 into the center hole of the round table. mm.
To secure the workpiece, we use the centering pin and bolts for the first installation (Fig. 162, a) and the centering pin and clamps for the second installation (Fig. 162.6).
Setting the machine for milling mode. For this operation, the cutting speed υ = 31.5 m / minthat with the diameter of the cutter D = 32 mm on the ray diagram (see fig. 54) corresponds to 315 rpm. The milling cutter is set to 0.08 mm / tooththat when n = 315 rpm and the number of teeth of the cutter, z = 5, gives a minute feed of 0.08X5x315 = 126 mm / min.
Set the speed dial to 315 rpm and feedbox limb 125 mm / min.
Outer contour milling. The fixing of the workpiece is clear from fig. 162, a.
Having fixed the end mill into the machine spindle, turn on the machine and bring the workpiece to the mill in the place where there is the least allowance (Fig. 162, a).
The rotating cutter is cut by manual feed into the workpiece up to the marking line and, turning on the mechanical longitudinal feed, the straight line is milled 1-2
(fig. 161). With manual rotation of the round table milled curved section 2-3
. After this, a straight-line section is milled with a mechanical longitudinal feed. 3-4
and, finally, again with a manual rotation of a round table, a curved section is milled 4-1
.
Circular milling. Preparation for milling circular grooves set as shown in Fig. 162, b.
The rotation of the handle of the vertical, longitudinal and transverse feeds down the cutter (see. Fig. 162, b) and inserted into the hole 5
(see fig. 161). Then it is necessary to raise the table, lock the table console and smoothly with a manual circular feed of a round table, slowly rotating the handwheel, milling the inner groove 5-6
. At the end of the passage, lower the table to its original position and withdraw the cutter from the groove.
By rotating the handles of circular and vertical feed, the cutter is inserted into the hole and the internal groove is cut in the same way with circular feed. 7-5
.
Round rotary table with mechanical feed. In fig. 163 given a more perfect design of a round table, a circular motion which is produced mechanically from the drive of the machine. If the square end of the roller 6
put on the handwheel, you can rotate the table manually, as shown in Fig. 160 tables with manual feed. The mechanical rotation of the table is obtained by connecting the spindle of the longitudinal feed of the machine table through a gear system with a swivel roller 3-4
associated with a worm gear located in the body of a circular machine. Switching on the mechanical feed of the table is made by the handle 5. Automatic shutdown of the mechanical feed is performed by the cam 2
which can be moved along the groove for installation 1
round table and fasten in position with two bolts.

Work on a round table with a mechanical feed is made like a disassembled processing example on a round table with a manual feed, but the miller does not need to manually rotate the handwheel. Circular mechanical feed is also expressed in mm / min. It is determined on the basis of the expanded length of the processing circle and the number of revolutions of the round table per minute.
Example 7 Determine the circular feed when machining the outer contour of the workpiece shown in fig. 161, on a rotary table with mechanical feed, if it is known that the table makes 0.25 rpm.
The outer contour of the detail in fig. 161 outlined by circular arcs D = 250 mmtherefore, the path length of the cutter on this circle is π D = 3.14 x 250 = 785.4 mm. At one revolution of the table per minute, the speed of circular feed is equal to 785.4 mm / minand at 0.25 rpmas specified by the processing conditions, the circular feed rate will be: 785.4-0.25 = 197.35 mm / min.
Copy Milling
For the manufacture of parts with a curved contour, curved grooves and other complex shapes, you can mill the workpiece, as we saw, either by combining two feeds, or using a rotary round table; in these cases, preliminary marking is required.
In the manufacture of large batches of the same parts with curvilinear contours, use copying devices or use special copying and milling machines.
The principle of operation of copying devices for milling is based on the use of longitudinal, transverse and circular feeds of the machine table to communicate curvilinear motion to the workpiece, which exactly corresponds to the contour of the finished part. To automatically obtain the desired contour apply copiers, ie, templates that replace the markup.
Copier Milling - Pattern. For milling the contour of the large connecting rod of the engine (Fig. 164, b) copier 1
impose on the part 2
and securely fasten with it. Acting with a circular feed rotary handwheel and longitudinal and transverse feed handles, the miller ensures that the neck of the end mill 3
all the time pressed against the surface of the copier 1
.

The end mill for copy processing is shown in Figure 164, a.
In fig. 165 is a diagram of a coping device for milling the contour of a large engine connecting rod, similar to that shown in fig. 164, but with the use, in addition to the copier, another roller and cargo.

On the table 7
the machine is installed copying device 5
having a round rotary table with manual feed; there is a copier on the table 6
. Under load 1
copier 6
always pressed to the roller 2
. The running screws for the longitudinal and transverse feeds of the machine table are also released, and when the round rotary table is rotated, the device together with the fixed workpiece 4
will "follow" under the action of the load copier 6
and cutter 3
will process the workpiece 4
on a given contour.
Adaptation possesses in comparison with shown on fig. 164 by the advantage that the milling machine is freed from the need to continuously create a contact of a finger and a copier, which is carried out automatically under the influence of the load. In order to further automate the copy-milling operations on the contour, special contour copy-milling machines are used. Chapter XXIII discusses the basic principles of automatic contour reproduction and describes copy milling machines for these works.
Layout - the initial operation of the processing of parts of the body. Sheets and profiles are put on the markup, parts of which will be cut out on mechanical equipment, portable machines for thermal cutting or manual cutting torches. The markup can be performed manually using photo-projection, sketch or template methods, on program-marking machines with software control and using other methods.
The photoprojection method is used to mark sheet metal parts. With this method, negatives from large-scale drawing templates are delivered to the plot of shop marking from the plazas. * The life-size marking of the contours of the parts on the material is carried out according to the image from the negatives using special projection equipment.
The actual markup process is as follows. On the marking table serves a sheet of metal. If the sheet lies flat on the table (there are gaps between the sheet and the table top), then it is pressed to the table with clamps. They turn on the projection equipment into which the corresponding negative is inserted in advance, and adjust it. Since the lines and signs of the scale drawing are drawn in black ink, then on the negative and its projection, these lines and signs are light. Light lines and signs on the surface of the marking sheet fix (kern) the contours of the parts and their marking.
Sketch markup method is used mainly for marking parts from the rolled steel. The use of this method for sheet metal parts is allowed only in cases of marking waste, the absence of photoprojection equipment and marking and marking machines.
Part marking with the help of sketches is reduced to the fact that the plotter builds on the sheet or profile full-size contours of the parts shown in the sketches. The contours of the parts are obtained by performing simple geometric constructions using conventional measuring and marking tools. To mark the most complex parts, sketches are attached to slats or templates that are specifically mentioned in sketches. Both sketches and slats, as well as templates come to the plot of shop floor marking from the plaza.
Patterns are subject to parts that have curved edges, the construction of which geometrically presents considerable difficulties, as well as parts from bent profiles.
Mark up the details on the templates as follows. A template is laid on the sheet to be marked. After that, the scriber draws the outline of the part along the edges of the template. Then draw all the cutouts on the template. Next, remove the template and mark the details. After that, break, weld, and all other lines necessary for processing and assembling the parts are pierced or drawn (by removed serifs).
Fig. 11.5. Measuring instrument: a - steel tape measure; b - folding meter; in - calipers; g - micrometer.
As a measuring tool when performing marking work used (Fig. 11.5):
- tape measures with a metal tape up to 20 m long, metal rulers up to 3 m long, folding meters for measuring lengths;
- caliper and calipers to measure the internal and external diameters, as well as the thickness of the material with an accuracy of 0.1 mm;
- protractors, protractors for measuring and building angles;
- micrometers for measuring the thickness of the material with an accuracy of 0.01 mm.

Fig. 11.6. Marking tool: a - compass; b - vernier caliper; in - squares; g - center punch marking; d - control center punch; e - thread; Well - surface gage.
As a marking tool used (Fig. 11.6):
- compasses and calipers for drawing circles and building perpendiculars;
- squares for perpendiculars;
- cores for drawing points on the metal;
- threads for drawing direct chalk lines;
- gauges for parallel lines on the shelves of profile steel, etc .;
- scriber for drawing lines.
All dimensions applied to parts that do not have allowances must correspond to the plastics or drawing ones.
Below are the values of permissible deviations of the actual dimensions of the marked parts from the nominal (in millimeters):
From overall dimensions for sheet metal parts:
with a length (width) up to 3 m .............. ± 0.5
with a length (width) of more than 3 m ............ ± 1.0
From overall dimensions for profile parts:
with length up to 3 m .................. ± 1.0
with a length of more than 3 m ................. ± 2.0
From the size of the cutouts for a set, etc. ........... 1.0
Diagonal difference ................... 2.0
From straightness or other edge shape:
with a length of edges or chord (with curvilinear edges) up to 3 m. .................. ± 0.5
with the length of the edge or chord more than 3 m ........ ± 1.0
When marking the width of the chalk line should not be more than 0.7 mm. The width and depth of the line drawn by the scriber should not exceed 0.3 mm.
When marking some parts on their edges leave allowances. The allowance is called the part of the metal that is removed from the workpiece to obtain parts in drawing or plastnymi sizes. The allowances are intended to compensate for the possible deviations from the dimensions that occur during the machining of parts, assembly and welding of assemblies and sections. The values of allowances assigned from the conditions of manufacturing parts, usually taken in the range of 5-50 mm.
To preserve traces of the markup until the end of processing and assembly of parts and restore the markup (if necessary), all marking lines are blinded.
Light alloy body parts are marked with a simple soft pencil. It is allowed to punch only the centers of the holes, the installation sites of the set (subject to the mandatory further overlapping of the parts to be welded), and also the contour lines removed during subsequent processing.
For each item to be marked necessarily put a stamp.
The appearance of automatic thermal cutting of parts allowed us to exclude the operation of marking these sheets, but the marking of parts remained. In order to automate the process of marking parts on production lines of thermal cutting of parts, program-controlled marking machines have been created. At present, a laser marking machine has been created.
* Details of the template drawings have been said in chap. ten.