Site sections
Editor's Choice:
- Expansion joints in buildings
- Chaber - what is it and its purpose
- Sharpening wood cutters: manual work, using grinding wheels and a grinding machine
- Belts and sandriks, crackers and volutes - secret codes of architecture on the example of the old Saratov Sandriks in architecture
- Surface grit - tooling work
- Maximum load on the balcony slab: how much can a balcony withstand in a panel house?
- Projects: symbols on drawings for water supply and sewage
- Marking and marking details How to mark the details with curved contours
- Tools for slotting Tools for slotting
- Tools for chiseling Slotting tools
Advertising
| Drawing on preparation of contours of future product. Planar marking. Editing blanks from sheet metal and wire. Markup |
|
«MARKING PLANTS FROM TONKOLISTIC METAL AND WIRES " Purpose: introduce students to the layout of sheet metal blanks and wire; to inculcate the skills of rational use of materials; promote the development of technical thinking. Type of lesson: combined (development of new knowledge, generalization and systematization of the studied). Teaching methods: oral survey, story, demonstration of visual aids, practical work. During the classes: I. Organizational and preparatory part. Greeting teachers, monitoring attendance, checking students' readiness for a lesson, communicating topics and lesson objectives. Ii. Theoretical part. 1. Repetition of the material covered.
2. Presentation of the new material. The teacher accompanies his explanation by showing markup techniques. Teacher's story plan:
1. Marking the wire blanks. In order to make any product, you need to precisely set the boundaries of processing, apply to the surface of the workpiece the contours of the future product in the form of lines and points with respect to the drawing dimensions. This locksmith operation is called markup. The marking of the wire (determining the places of bending or cutting) is performed with the help of a ruler and a pencil. If, for example, you need to bend the wire pa 50 mm from its edge, then the ruler is applied to the piece of wire so that the zero mark of the ruler coincides with the beginning of the piece of wire. Then on the ruler find the mark of 50 mm and opposite it, pa wire, make a dash. This will be the place of the fold. When marking the places of the bend of the wire for the manufacture of any product from it, it is taken into account that a wire segment equal to slightly more than half of its thickness is additionally spent on each bend of the wire at a right angle. For example, if a piece of aluminum wire is 200 mm long and 3 mm thick bend in the middle at a right angle, and then measure the wire before bending and after it and add up these dimensions, it turns out that the length of a piece of wire is diminished. It will be about 198 mm., I.e., 2 mm shorter than before flexion. When making wire from a round ring, it is important to know how to determine the length of the wire to make it a ring of a given size. The size the wire ring is usually determined by the size of its diameter. Magnitude diameter less than the circumference 3.14 times. Therefore, to determine the length of the wire for the manufacture of a round wire ring, you need size multiply the diameter of this ring by 3.14. 2. Marking the preform from thin sheet metal. The marking of the sheet metal blank is performed to determine cutting or bending of sheet metal and the processing limits of workpieces in the manufacture of products. Markup points- cores - are small indentations. Lines applied when marking, calledrisks . Risks are major and minor. The main risks are the boundaries of processing. From auxiliary risok lay off the size for the main risks. Risks and cores are applied to the workpiece with the help of special marking tools: scriber, marking compasses, center pins, as well as measuring lines, fittings and marking hammers. Scriber is a sharply sharpened steel rod and serves to applying scratches. Scriberts are wire, chiseled and bent the end. Marking compass serves for drawing lines of circles and arcs on a metal surface. Unlike regular compass both legs marking have pointed ends. Using the center punch when marking out small indentations, or cores. These grooves are necessary to designate centers of circles and arcs, as well as to more clearly indicate the marking risks that can erase during operation. During marking metal gauges are used to measure the sizes of preparation and carrying out marking razok. Squares also serve to make markup risks. The square allows to execute lines strictly at right angle. The control of the already made corners of the workpiece is also checked with an angle. Marking hammer strike the center punch when nosing the centers of the holes and marking marks. Before marking it is required to clean the workpiece from dust and dirt. You need to mark the workpiece so that as little as possible of the metal goes to waste. There are two types of markup: by template and by drawing (sketch). Template - it is a device in the form of a plate with the outlines of the part, which is made. The template is applied to the sheet of metal from which the product is made. It is rational to carry out markup on a pattern in cases where you need to mark a large number of parts. Position the template so that it fits all on the sheet. For economical use of the material, they try to find such a position of the template on the sheet so that during the subsequent cutting of the blank from the sheet there is as little waste and scrap as possible. Then the template tightly pressed to the sheet. To do this, you can use a clamp, a rather heavy object, or simply press it with your hand. Without moving the template, scroll around its outlines, tightly pressing its tip to the edge of the template. Then, using a center punch and a marking hammer, small indentations (cores) are made along the marking marks. For pecking the riser, the tip of the center punch is placed exactly at risk with a slight inclination from itself. Before striking the striker, the punch is transferred to the vertical position. Nerve hammers are used small, weighing 100-150 g. The distance between the cores can be 5-10 mm or more. It depends on the length of the risks: the greater the length, the greater the distance can be. The markup in the drawing is to transfer the points and lines of the drawing from paper to sheet metal. In order to perform it, you need to know how parts and products from thin-sheet metal are graphically depicted. If the part does not have the bends of the sheet from which it is made, such as, for example, an eyelet, then the image is given only in one form - in front. The thickness of the part is indicated by an inscription of the type “Thicknesses. 0.5 ”or with the help of the extension line with a shelf, where an inscription like“ S 0.5 ”is given. Often the sheet metal product is made by bending its individual parts. Such is, for example, a box for fasteners. In this case, the layout of the workpiece are on the drawing scan of this product, showing the shape and dimensions of the part before the bending operation. Folds are indicated by a two-dot dash line. The construction of the reamer drawing of a rectangular product should begin with the image of the base of the rectangle. After that, draw the other sides adjacent to the base along the fold lines. A scan of a cylindrical product is a rectangle, one side of which is equal to the circumference of its base, and the other side is the height of the product. Starting to markup, the sheet of metal is carefully inspected, checking for rust, irregularities and curvature. If necessary, it is cleaned and straightened. Determine the possibility of manufacturing from the sheet details of the required sizes. To do this, compare the largest (overall) dimensions of the part with the dimensions of the sheet. It is necessary that the dimensions of the sheet were slightly larger than the dimensions of the part. In order for marking lines to be seen more clearly, the metal surface is often coated with chalk paint or other solutions. Then determine the base for marking - lines or surfaces, from which lay the dimensions for the application of other marking marks. In other words, the markup itself starts from the markup bases. The markup is usually conducted from the flattest edge of the sheet or from auxiliary risks in the middle of the workpiece. When applying straight lines, a ruler or a square is pressed tightly against the workpiece with the fingers of the left hand so that there is no gap. The scriber is taken with his right hand, like a pencil, and, without interrupting the movement, is carried out at the risk of the required length. Carrying out the risks, the scriber tightly pressed to the ruler or gon, rejecting it at a small angle. The magnitude of this inclination cannot be changed while conducting risks, otherwise the risk will turn out to be a curve. If the part has holes and radius rounding, then first mark and center the centers of these holes or rounding arcs. Then a solution of compasses, equal to the radius of the circle or rounding, conduct curves contour risks. To this end, the point of one (fixed) leg of the compass is placed in the core of the core and, pressing both of the leg of the compass slightly to the surface of the workpiece, the other (movable) leg performs an arc of a given length. At the same time, the compass is tilted slightly in the direction of movement. In factories, the marking of parts is performed by mechanic-markers. The templates are made by the most highly skilled mechanics - toolmakers. The practical part. Practical work "Marking blanks from sheet metal and wire." 1. Organization of the workplace. Students perform tasks each in their workplace. To do the work you will need: a workbench, a vice, a steel plate, a hammer, a mallet, a wooden block, pliers, a board with hammered nails, a metal rod, planks, billets of sheet metal and wire. 2. Introductory briefing. using developed routing, markup sheet metal and wire blanks; Safety rules. It is necessary to comply with the general safety rules of work, work only serviceable tool. The scriber and compass marking should be kept only on the workbench, do not put in dressing gown pockets. After applying scriber on their sharply sharpened ends should be worn. safety plugs. In order not to injure your hands, you need to give a scribe to a friend a pen from yourself, and to put on a workplace - the handle to itself. 3. Current briefing. Independent performance by students of the task. Ongoing observations of the teacher, monitoring compliance with safety regulations, answering emerging questions in the process of work, checking the correctness of the assignments. Possible mistakes: the discrepancy between the dimensions of the marked blank and the dimensions in the drawing or sample of the manufactured part; The reasons: inaccuracy of the measuring instrument, non-compliance with the marking techniques or carelessness of the worker; inaccurate risk holding; taking risks several times in the same place. 4. Final briefing. Evaluation of student performance, selection of the best works; analysis of admitted errors and analysis of their causes; clarification of application possibilities acquired knowledge and skills in socially useful work. The final part. 1. Installation for the next lesson. In the next lesson, you will continue to get acquainted with the technology of processing wire and sheet metal. 2. Homework Objective: development and acquisition of practical skills in metalworking markup, as well as familiarization with the tool used. Markup - this is small-scale production. Marking refers to the operation of applying to the surface of the workpiece lines (scratches), which, according to the drawing, define the contours of the part or place to be machined. Marking lines can be contour, control or auxiliary. Contour risks define the contour of the future part and show the boundaries of processing. Control risks are carried out parallel to the contour “into the body” of the part. They serve to verify the processing. The secondary risks outline the axes of symmetry, the centers of curvature radii, etc. The marking of blanks creates the conditions for the removal of metal allowance from the blanks to the specified boundaries, for obtaining details of a certain shape, required dimensions and for maximum economy of materials. Apply the markup mainly in individual and small-scale production. In mass production and mass production, there is usually no need for marking due to the use of special tools - conductors, stops, stops, templates, etc. The markup is divided into linear (one-dimensional), planar (two-dimensional) and spatial, or three-dimensional (three-dimensional). Linear marking is used when cutting shaped steel, preparing blanks for products from wire, rod, steel strip, etc., i.e. then, when the boundaries, such as cutting or bending, indicate only one size - length. Planar marking is usually used in the processing of parts made from sheet metal. In this case, the risks are applied only on one plane. The planar markings also include the marking of individual planes of parts of complex shape, if this does not take into account the relative position of the marked planes. Spatial markup is the most complex of all types of markup. Its peculiarity lies in the fact that not only the individual surfaces of the workpiece are located in different planes and at different angles to each other, but also the arrangement of these surfaces is mutually linked. When performing the marking of these types of applied various measuring and marking tools. Scrippers, center pins, marking compasses, surface gauges are referred to as special marking tools. In addition to these tools, when marking use hammers, marking plates and various accessories: linings, jacks, etc. Scriber (7) are used for drawing lines (scratches) on the marked surface of the workpiece. Scribes of three types are widely used in practice: round (7, a), with a bent end (7, b) and with an inserted needle (7, c). Scrippers are usually made of tool steel U10 or U12. Center pins (8) are used to apply recesses (cores) on previously marked lines. This is done so that the lines are clearly visible and not erased during the processing of parts. Make kerners Of tool carbon steel. The working (tip) and impact parts are heat treated. Kerners are divided into ordinary, special, mechanical (spring) and electrical. The common punch () is a steel bar with a length of 100-160 mm and a diameter of 8-12 mm. Its impact part (face) has a spherical surface. The edge of the center punch sharpens the grinding wheel at an angle of 60 °. With more accurate markings, the angle of tapering of the center punch can be 30-45 °, and for marking the centers of future holes -75 °. The special center pins include a center punch compasses (rice, 8, b) and a center punch (center finder) (8, c). A center punch compass is convenient for wrapping arcs of small diameter, and a punch bell is for marking the centering holes of workpieces to be further processed, for example, turning. Mechanical (spring) punch (8, g) is used for accurate marking of thin and important parts. Its principle of operation is based on compression and instant release of the spring. Electric center punch (8, d) consists of body 6, springs 2 and 5, drummer, coil 4 and center punch itself /. When pressing the workpiece mounted on the risk of the tip of the punch, the electrical circuit closes, and the current, passing through the coil, creates a magnetic field; the drummer retracts into the coil and strikes the center punch. During the transfer of the center punch to another point, the spring 2 opens the circuit, and the spring 5 returns the drummer to its original position. Special, mechanical and electrical coreners greatly facilitate the work and increase its productivity. Marking (locksmith) compasses (9) are used to mark the circles and arcs, divide the circles and segments into parts and other geometric constructions when marking the blank. They are also used to transfer dimensions from the measuring line to the workpiece. According to the device, they are similar to drawing circular gauges. Marking compasses are mainly of two types: simple (9, a) and spring (9, b). The legs of the spring compasses are compressed under the action of the spring, and are unclenched with the help of a screw and a nut. The legs of the compass can be solid or with inserted needles (9, c). One of the main tools for performing spatial markup is the surface gauge. It serves to apply parallel vertical and horizontal scratches and to check the installation of parts on a marking plate. The surface gage (10) is a scriber 5, mounted on a rack 2 with the help of a clamp 3 and a screw 4. The clamp is moved on a rack and fixed in any position. Scriber passes through the screw hole and can be installed with any inclination. The screw is secured with a wing nut. Rack gauge mounted on a massive stand 1. Planar and especially spatial markings of the blanks are produced on the marking plates. The marking plate is a cast iron casting, the horizontal working surface and the side faces of which are very precisely machined. On the working surface of large plates make longitudinal and transverse grooves with a depth of 2-3 mm and a width of 1-2 mm, which form squares with sides of 200 or 250 mm. This makes it easier to install various fixtures on the plate. In addition to the considered markup on the drawing, apply the markup on the template. A template is a device by which parts are manufactured or checked after processing. Pattern marking is used in the manufacture of large batches of identical parts. It is expedient because time consuming and time consuming marking on the drawing is performed only once during the manufacture of the template. All subsequent markup operations blanks are to copy the outlines of the template. In addition, the fabricated templates can be used to control the part after processing the workpiece. Templates are made of sheet material with a thickness of 1.5-3 mm. When marking the pattern is imposed on the marked surface of the workpiece and on its contour is carried out by the scriber risks. Then cores are applied on the risks. With the help of a pattern, the centers of future holes can also be marked. The use of templates greatly speeds up and simplifies the layout of workpieces. Marking contributes to obtaining parts with accurate, relevant to the drawing size and shape, and consequently, more economical use of wood. In manual production, markup is made as necessary throughout the entire process of manufacturing the product, starting with cutting. Marking is an important and time-consuming operation, and therefore requires great care. In mass production, with a large number of parts being machined, it is not possible to pre-mark them, for example, before making spikes, sampling nests, marking, etc., therefore, parts are processed without marking. The tools are special tools: needles, for applying scratches on a marked surface using a ruler, a square or a template. Risk -line, applied to the product when marking it for processing by drilling, gouging, milling or ink line made of steel or brass. Apply 3 types of scriber: Round scriber - a steel core 150-200 mm long and 4-5 mm in diameter and pointed angle of 15 degrees, and the other end is bent in a ring of 25-30mm. Punch- metalworking tools, used for drawing grooves on the marking lines.
Compasses- used for marking circles and arcs of geometric structures.
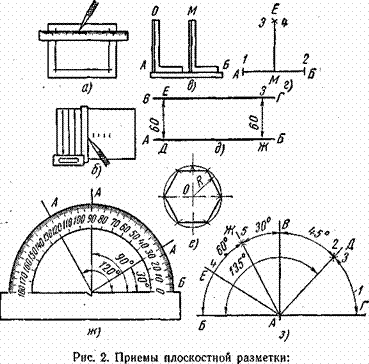
Markup When marking on the surface of thin sheet metal is applied marking lines (risks) using marking tools and accessories. The figure shows the tools for marking sheet metal blanks - scriber (sharp-sharpened steel rod), marking compass. Markup can be done using pattern - flat part of the sample. The template is pressed against the surface of the workpiece (for this purpose, you can use a clamp) and cut the contours of the template with a scriber, tightly pressing the tip of the scriber to the edge of the template.
The marking of rectangular parts according to the drawing (sketch) begins with the definition of the base edge of the workpiece and the application of the base risks. The flattest edge of the workpiece is selected as the base for marking. From it, the markup is carried out: the baseline risk is taken along the ruler (Fig. but), on the square is carried out the second risk at an angle of 90 ° (Fig. 6 ), lay on the ruler size A (Fig. at), on the square is carried out the third risk (Fig. g) lay down size B (Fig. d) and on the square hold the fourth risk (Fig. e).
The edge of the scriber should be tightly pressed to the ruler, and she herself is tilted in the direction of movement. Risk must be applied once. The tip of the scriber is pressed to the ruler or template, but not set vertically (see the figure on the right). The figure below shows the markup with kerner and marking compass. A light blow of the hammer on the center punch on the workpiece is applied ( screwed) centers of arcs and circles. In these centers install the leg marking compass. When marking the compass slightly tilted in the direction of movement, and the effort is applied to the leg, which is located in the center of the circle. Before marking it is necessary to clean the workpiece from dust, dirt, corrosion, and check the serviceability of marking tools. In the production of manual marking used in the manufacture of templates, models, product samples. In the tool shops marking is performed on special boring machines. The markup companies are busy locksmiths. Patterns are made of highly skilled tool makers. Metal Markup TO category: Markup Metal Markup Marking refers to the operation of applying to the workpiece (forging, casting, rolling, etc.) a trickle (lines) for its subsequent processing. Risks can be contour, control and auxiliary. Contour risks separate the stock metal from the metal of the finished part. In order for contour risks to be better distinguished and preserved during transportation and processing of the workpiece, they are pinched, that is, small conical depressions (cores) are applied along the scratches. During subsequent processing, the seam allowance is removed so that the details remain half the width of the contour risks and half of each core hole (core). Contour risks are also used for installation and alignment of blanks on the machine. Auxiliary risks are used to count the dimensions when marking and installing the workpiece on the machine. Control risks are applied near the contour at a distance of 5-10 mm. Being parallel (or concentric) contour, these risks make it possible at any time to check both the correctness of the installation and the correctness of processing (if the contour risk has disappeared for some reason). Thus, the marking consists in drawing on the blank the lines necessary for machining the part. Before marking, those places of workpieces on which risks will be applied are painted so that risks and cores are easily searched. For coloring most often used chalk with an admixture of glue, diluted in water. The treated surfaces of steel and cast iron blanks are sometimes coated with a solution of copper sulphate in water; this leads (as a result of the reaction of copper sulfate with iron) to the formation on the surface of the workpiece a thin layer of copper, on which marking risks are applied. The markup is divided into planar and three-dimensional. Planar marking is made on the sheet material on one side (in one plane); in bulk marking risks are applied to two (or more) surfaces of the workpiece. In modern engineering they try to abandon marking as much as possible, since it requires highly skilled labor, and the accuracy of processing it is low. However, this is possible only with mass and large-scale production, where the marking can be completely or largely eliminated through the use of special machines and devices that ensure the correct positioning (installation) of the workpiece and guaranteeing the dimensions of the parts within the specified tolerances. With a single and small-scale production the cost of manufacturing devices does not pay off, so the processing of parts produced by marking. The lack of accuracy of the parts machined according to the markings forces us to individually fit them during assembly. For marking the workpiece is installed on the marking plates. The upper (working) plane of the slab on which workpieces and marking tools are mounted, and its side faces are precisely machined (planed). Often, narrow and shallow mutually perpendicular grooves are prostrate along the upper plane of the slab so that squares with sides ranging from 200 to 500 mm are formed. These grooves in many cases facilitate the installation on the plate blanks and fixtures. The dimensions of the plates vary widely from 750 X 750 to 4000 X X 6000 mm; larger slabs (for marking very large workpieces) are made up of several slabs and are set on a foundation. Scalers, gauges, squares, compasses, center pins, etc. are used as tools for marking. The scale bar is used to read the dimensions; it is fixed on the square so that its end (zero stroke) touches the working surface of the plate. The surface gage is used for applying scratches on the workpiece parallel to the working plane of the marking plate. When working with a surface gauge, the base is moved along the plate, and the needle installed on the scale ruler is sized at height, causing risks. A hand needle or scriber is used to draw lines along a ruler, a square or a template.
Fig. 1. Scale bar attached to the square
Fig. 2. Marking gauge
Fig. 3. Hand needle (scriber)
Fig. 4. Malka The square is used for applying scriber vertical scratches and to check the vertical position of any plane of the workpiece, as well as to build right angles. Malka and the protractor are used for applying our scratches and controlling the installation of the workpiece on a marking plate. Installation ruler Mulka at the desired angle is made on the protractor or protractor. After installation, the ruler is fixed by turning the lamb. The marking compass serves for drawing risks of circles and arcs, as well as for postponing dimensions taken along the scale bar. In some cases, calipers are also used to mark the circles and arcs. The square center-detector is used to apply diametrical scratches at the ends of the shafts and, accordingly, to find the centers at the ends. The square center-viewer consists of a square and a ruler attached to it, the working edge of which divides the angle of the square in half. For marking, the square is applied to the workpiece and is applied at risk along the ruler. To find the center of the workpiece put the second risk after turning the angle at a certain angle.
Fig. 5. Marking compass
Fig. 6. Square Center Detector Fig. 7. Kerner A punch is used to apply cores on risks or to bore the centers of the holes. Markup is an operation.on drawing on the surface of the workpiece lines (risok), defining the contours of the manufactured parts, which is part of some technological operations. Despite the high costs of highly skilled manual labor, the markup is used quite widely, including in enterprises of mass production. Usually marking work they are not controlled, therefore the errors made during their execution are detected in most cases in the finished parts. To correct such errors is difficult and sometimes impossible. Depending on the peculiarities of the technological process, planar and spatial markings are distinguished. Planar markings are used in the processing of sheet material and rolled products, as well as parts to which marking risks are applied in the same plane. Spatial Markup - is the application of scratches on the surfaces of the workpiece, interconnected by mutual arrangement. Depending on the method of applying the contour to the surface of the workpiece, various tools are used, many of which are used for both spatial and planar marking. Some differences exist only in the set of markers, which is much wider with spatial markup. Tools, tools and materials used in markingScriber They are the simplest tool for applying the contour of the part to the surface of the workpiece and are a rod with a pointed end of the working part. Scrippers are made of tool carbon steels of grades U10A and U12A in two versions: one-sided (Fig. 2.1, a, b) and bilateral (Fig. 2.1, c, d). Scriberts are made of 10 ... 120 mm long. The working part of the scriber is hardened at a length of 20 ... 30 mm to a hardness of HRC 58 ... 60 and sharpened at an angle of 15 ... 20 °. Risks are applied to the surface of a part by a scriber using a scale bar, a template or a sample. Reismas used to apply scratches on the vertical plane of the workpiece (Fig. 2.2). It is a scriber 2, mounted on a vertical rack mounted on a massive base. If it is necessary to apply scratches with higher accuracy, use a tool with a scale - X-ray gage (see. Fig. 1.13, d). To set the reismas to a given size, you can use blocks of end gauges of length, and if you do not need a very high marking accuracy, then use the vertical scale bar 1 (see. Fig. 2.2). Marking compassesused for drawing arcs of circles and dividing segments and angles into equal parts (Fig. 2.3). Markers compasses are made in two versions: simple (Fig. 2.3, a), allowing to fix the position of the legs after their installation on the size, and spring (Fig. 2.3, b), used for more accurate installation of the size. For marking the contours of the parts in question, use a marking caliper (see. Fig. 1.13, b). In order for the marking risks to be clearly visible on the marked surface, pinholes are inserted on them - cores, which are applied with a special tool - center punch.
Kerners(fig. 2.4) is made of tool steel U7A. The hardness over the length of the working part (15 ... 30 mm) should be HRC 52 ... 57. In some cases, special design center pins are used. So, for example, for the application of core cavities when dividing a circle into equal parts, it is advisable to use a center punch, proposed by Yu. V. Kozlovsky (Fig. 2.5), which can significantly increase productivity and accuracy when applied. Inside the housing 1 of the center punch is located the spring 13 and the firing pin 2. To the body, using the spring 5 and screws 12 and 14, fasten the legs 6 to 11, which, thanks to the nut 7, can simultaneously move, providing adjustment to the specified size. Replaceable needles 9 and 10 are attached to the legs with nuts 8. When adjusting the center punch, the position of the striker with impact head 3 is fixed by a threaded sleeve 4. The markup using this punch is carried out in the following sequence: The tip of the needles 9 and 10 is set in the risk of a circle previously drawn on the blank; Strike the shock head 3, making the core of the first point; The center of the center pivot is turned around one of the needles until the second needle coincides with the marked circle, again they strike the impact head 3. The operation is repeated until the whole circle is divided into equal parts. At the same time, the accuracy of the marking increases, since, due to the use of needles, the setting of the center punch on a given size can be carried out using a block of end gauges. If necessary, the centering of the center holes on the ends of the shafts is convenient to use a special device for centering - the bell (Fig. 2.6, o). This device allows you to apply the Kern grooves on the centers of the end surfaces of the shafts without prior marking. For these purposes, you can use the square-center detector (Fig. 2.6, b, c), consisting of the square 1 with a ruler 2 attached to it, the edge of which divides the right angle in half. To determine the center, the tool is placed on the end of the part so that the inside shelves of the square touch its cylindrical surface and draw a line along the ruler with a scriber. Then the centerfinder turns at an arbitrary angle and carries out a second risk. The intersection of the lines put on the end of the part will determine the position of its center. Quite often, a centering protractor (Fig. 2.6, d) is used to find centers at the ends of cylindrical parts, which consists of a ruler 2 fastened to a square 3. Protractor 4 can be moved along ruler 2 and fixed in the desired position using a locking screw 1. The protractor is placed on the end surface of the shaft so that the side shelves of the square are touching the cylindrical surface of the shaft. The ruler then passes through the center of the shaft end. Establishing a protractor in two positions at the intersection of scratches, determine the center of the shaft end. If you want to make a hole located at a certain distance from the center of the shaft and at a certain angle, use a protractor, moving it relative to the ruler by a specified amount and turning it at the required angle. At the point of intersection of the ruler and the base of the protractor, they pin the center of the future hole that is offset from the shaft axis. Simplify the process of punching allows the use of an automatic mechanical center punch (Fig. 2.7), consisting of a body assembled from three parts: 3, 5, 6. In the body there are two springs 7 and 11, a rod 2 with a center punch 1, a drummer 8 with a displacing cracker 10 and flat spring 4. Punching is carried out by pressing the billet with the tip of the punch, while the inner end of the rod 2 rests against the cracker, as a result of which the drummer moves upward and compresses the spring 7. Resting against the rib of the shoulder 9, the cracker moves to the side and its edge moves off the rod 2. In this the moment the impactor under the action of the force of the compressed spring causes a strong blow to the end of the rod with the center punch, after which the spring 11 restores the normal position of the center punch. The use of such a punch does not require the use of a special percussion instrument - a hammer, which greatly simplifies the work of applying core pits.
For the mechanization of marking work An electric center punch (Fig. 2.8) can be used, which consists of body 8, springs 4 and 7, drummer 6, coil 5 with winding of varnished wire, rod 2 with center punch 3 and electrical wiring. When you press the center punch tip installed on the marking risk, the electrical circuit 9 closes and the current passes through the coil, creating a magnetic field. The drummer instantly retracts into the coil and strikes the rod with the center punch. During the transfer of the center punch to another point, the spring 4 opens the circuit, and the spring 7 returns the drummer to its original position.
For accurate coreing apply special center pins (Fig. 2.9). Kerner pictured in fig. 2.9, a, is a stand 3 with a center punch 2. The grooves of the scratches are lubricated with oil before them, the center pins with the legs 5 fixed in the stand /, the parts are placed on the intersecting risks so that the two legs located on one straight line are at the same risk, and the third leg is at risk, perpendicular to the first. Then the center punch exactly falls at the point of intersection. Screw 4 protects the punch from turning and falling out of the housing. Another design of the center punch of the same purpose is shown in Fig. 2.9 b. This punch differs from the previous construction in that the punch on the core is made by a special load 6, which, upon impact, rests on the piping shoulder. As a percussion instrument when performing core grooves use a hammer hammer, which should have a small weight. Depending on how deep the core cavity should be, they use hammers weighing from 50 to 200 g. When performing spatial markings, it is necessary to use a number of devices that would allow to place the marked part in a certain position and turn it over (invert) during the marking process. For these purposes, with spatial marking, marking plates, prisms, squares, marking boxes, marking wedges, and jacks are used. Marking plates (fig. 2.10) is cast from gray cast iron, their working surfaces should be precisely processed. On the upper plane of the large marking plates, longitudinal and transverse grooves of small depth are planed, dividing the surface of the plate into square sections. Install marking plates on special stands and pedestals (Fig. 2.10, a) with drawers for storing marking tools and fixtures. The marking plates of a small size are placed on the tables (Fig. 2.10, b).
The working surfaces of the marking plate should not have significant deviations from the plane. The magnitude of these deviations depends on the size of the plate and is given in the relevant references. Prisms marking (fig. 2.11) are made with one and two prismatic grooves. By accuracy, prisms of normal and increased accuracy are distinguished. The prisms of normal accuracy are made of steel grades CG and X or carbon tool steel grade U12. The hardness of the working surfaces of the prisms should not be less than HRC 56. Prisms with increased accuracy are made of gray cast iron of СЧ15-23 brand. When marking stepped shafts, prisms with a screw support (Fig. 2.12) and prisms with movable cheeks, or adjustable prisms (Fig. 2.13) are used.
Squares with a shelf (Fig. 2.14) used for both planar and spatial markup. In planar markings, the squares are used to hold scratches parallel to one of the sides of the workpiece (if this side is previously processed), and to apply scratches in a vertical plane. In the second case, the shelf of the marking square is installed on the marking plate. In the spatial marking, the square is used to align the position of the parts in the marking device in the vertical plane. In this case also use a marking square with a shelf. Marking boxes (Fig. 2.15) is used to install on them when marking the workpieces of complex shape. They represent a hollow parallelepiped with holes made on its surfaces for securing blanks. For large sizes marking boxes in order to increase the rigidity of the structure in their inner cavity perform partitions. Marking wedges (fig. 2.16) is used if it is necessary to adjust the position of the marked workpiece along the height in insignificant limits.
Jacks(Fig. 2.17) is used in the same way as the adjustable wedges for adjusting and aligning the position of the marked workpiece in height, if the part has a sufficiently large mass. The support of the jack, on which the marked blank is placed, can be spherical (Fig. 2.17, a) or prismatic (Fig.2.17, b). In order for marking risks to be clearly visible on the surface of the marked blank, this surface should be painted, i.e. covered with a composition whose color contrasts with the color of the material of the marked blank. For coloring the marked surfaces use special formulations. Materials for painting surfaces are selected depending on the material of the workpiece, which is subject to marking, and on the state of the marked surface. For dyeing the marked surfaces use: a solution of chalk in water with the addition of wood glue, providing reliable adhesion of the coloring composition with the surface of the marked workpiece, and desiccant, contributing to the rapid drying of this composition; copper sulphate, which is copper sulphate and, as a result of chemical reactions taking place, ensures the formation of a thin and durable layer of copper on the surface of the workpiece; quick-drying paints and enamels.
The choice of the coloring composition for application to the surface of the workpiece depends on the material of the workpiece and the condition of the marking surface. Untreated surfaces of billets made by casting or forging are painted with dry chalk or a solution of chalk in water. Machined surfaces (pre-filing, planing, milling, etc.) are painted over the surfaces of the blanks with copper sulphate solution. Copper sulphate can be used only in cases where the workpieces are made of ferrous metal, since there is no chemical reaction between non-ferrous metals and copper sulphate with copper deposition on the surface of the workpiece. Billets of copper, aluminum and titanium alloys with pre-treated surfaces are painted using quick-drying varnishes and paints. |


Popular:
New
- Markup definition. Planar marking. Types of markup. Questions for self-test
- Pipe bending machines Various variations of pipe bending machine
- Safety during filing
- What should be the sharpening angle of the scriber
- Drawing on preparation of contours of future product
- Modern ways of cutting metal and its defects
- Kerner - so that the drill does not slip off!
- Objects of inanimate nature Examples of the influence of inanimate nature factors on plants
- Finishing joinery
- Block breakdown in AutoCAD - simple and effective teams from practitioners