Site sections
Editor's Choice:
- Expansion joints in buildings
- Shaber - what is it and its purpose
- Sharpening wood mills: manual work using grinding wheels and a grinding machine
- Belts and sandriks, crackers and volutes - secret codes of architecture on the example of the old Saratov Sandriki in architecture
- Surface scaling - metalwork
- Maximum load on a balcony slab: how much can a balcony withstand in a panel house?
- Projects: legend on drawings for water supply and sewage
- Marking and marking parts How to mark parts with curved contours
- Slotting Tools Slotting Tools
- Mortising tools mortising tools
Advertising
| Equipment for finishing carpentry building products. Finishing of joinery. Pre-heat drying |
|
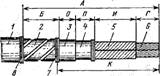
The book contains reference materials related to the manufacture and installation of carpentry-building products and the production of household furniture. Information is given on wood and other materials used, on machines, tools and fixtures, technology and organization of production, safety measures, as well as some regulatory data. The reference book is intended for joiners and technical personnel working in the furniture and construction industries. Foreword Section I. Joinery and furniture Chapter I. Joinery Chapter II Furniture Section II. Materials Chapter III. Wood Basics Chapter IV Timber Chapter V. Wood Drying Chapter VI. Glues Chapter VII. Supporting materials and fittings Chapter VIII. Finishing materials and compounds Section III. Machines, tools and accessories for wood processing Chapter IX. Wood cutting Chapter X. Woodworking Cutting Tools Chapter xi. Woodworking machinery Chapter XII. Mechanized and hand tools Eyes XIII. Machines and equipment for sharpening and setting up cutting tools Chapter XIV. Machines and devices for gluing, assembling and finishing Chapter XV. Machine setup and maintenance Section IV. Technology of carpentry Chapter XVI. Construction of joinery Chapter XVII. Mechanized furniture manufacturing Chapter XVIII. Product Finishing Chapter XIX. Production and installation of joinery Section V. Organization of carpentry Chapter XX. Organization of production Chapter XXI. Labor Organization and Technical Regulation Chapter XXII. Technical and economic indicators and documentation for carpentry and furniture production Literature To finish the surface of the shield parts (panels, doors), a lacquering machine LM-3 is used (Fig. 196). On this machine, nitrocellulose and polyester varnishes and enamels based on these varnishes are applied to shields. The lacquering machine is a bed on which a conveyor for feeding boards, varnish-feeding plants and vertically adjustable heads, and a control panel for the machine are located.
Test questions. 1. Tell us about the purpose of the lines included in the OK-250s kit. 2. What are the purpose and how do the installations for processing logs for the walls of chopped houses work? 3. How is the lacquering machine LM-3 arranged? On topic § 78. Equipment for the finishing of joinery and construction products:
Production of window blocks with separate bindings.For the production of elements of window blocks, the use of lines for cutting lumber, processing of bars, surface cleaning and processing along the perimeter of the edges of window sashes is provided. The OK507 line is designed for cutting unedged lumber into blanks for bars of sash window blocks. By a receiving roller conveyor, a stack of lumber is fed to an inclined elevator that rotates at an angle of 45 °. From above, the boards alternately descend onto the conveyor chains, and then onto the roller conveyor, and after releasing a number of boards, the gaskets slide off onto the conveyor belt, which feeds them to the drive, after tilting the elevator. Two-chain inclined conveyor pads are taken out of the drive into a special conveyor. The board, which fell on the roller conveyor, is transferred to the circular saw, on which preliminary transverse cutting is performed with a cut of defects. When cutting, it is necessary first of all to get the longest blanks, since short ones are obtained along the way. The piece of board obtained after cutting is dumped onto the transverse conveyor belt, from where it enters the receiving table of the machine. The bars obtained as a result of cutting fall onto a transport device from which the bars of the leaves are selected by the workers for trimming on the machines, and the unmeasured bars and waste (slats) are fed to the unit for dividing the waste into segments. On the line it is possible to process boards up to 6,500 mm long, 60–400 mm wide, 50–63 mm thick and workpieces 310–2140 mm long, 47–70 mm wide and 50–63 mm thick. Line productivity 21 m / min. In the process of manufacturing window parts, the moisture content of sawn timber is systematically checked with an EVA-5M small-sized electronic moisture meter (Fig. 107). After cutting, the workpieces are subjected to profile processing by milling on the OK508 line (Fig. 108). On this line it is possible to process bars 380–2220 mm long, 40–42 mm wide, 38–61 mm thick. The line capacity is 900 pcs / h with a bar length of up to 1.4 m and 450 pcs / h - more than 1.4 m. The worker from the control panel puts the workpieces on the feeder belts, with which they are fed close to the ruler on the front table of the planer-milling machine. The studs are barreled and the leaves are assembled on the OK509 line, which includes two tenoning machines, an assembly, mortising and gluing machines, a lifting table, etc. The assembled flaps along the outer perimeter are processed on the OK511-2 line, which consists of machines for processing longitudinal and transverse edges. Sashes with a length of 695–2310 mm, a width of 342–1280 mm, and a thickness of 38–61 mm can be processed on the line. Line capacity 135 shutters per hour. In those enterprises where there are no lines, lumber is cut in length to a predetermined size on circular saws CPA-40, and in width - on circular saws TsDKA-3. With transverse cutting, an allowance for further trimming is added to the specified size. The bar parts are processed as follows: the layers and edges of warped bars are centered on a planer; window frames are milled on a four-sided longitudinally milling machine. Knots are closed after processing the parts, taking into account the fact that after milling defective spots are better visible. At some enterprises, the knots are closed before processing - as a result, the part turns out to be cleaner, since the plugs are cleaned during the processing of parts on a longitudinally milling machine. Fig. 107. Small-sized electronic hydrometer EVA-5M: 1 - electronic measuring device; 2 - three-needle converter  Fig. 108.Scheme of the OK508 line for profile processing of sash bars: 1 - line control panel; 2 - jointing and milling machine; 3 - feeder Horizontal bars of the leaves are usually prepared in multiples of length or obtained after processing the rejected vertical bars of the wings. If there is a four-sided longitudinal milling machine with five knife shafts at the enterprise, the binding strands, ebbs, bows can be made in multiple sizes in width, so that two bars can be processed on the machine at the same time and, after setting up a planing saw on the fifth horizontal shaft, cut them. Slatters, ebbs and glass layouts are poked to the size of the "mustache" on a circular saw or on a special machine for shrinking. To avoid the formation of chips or cracks in the strips (when fastening with screws), it is necessary to pre-select holes with re-counting, and the diameter of the holes should be less than the diameter of the screw by the size of the thread.  Fig. 109. A device for the simultaneous drilling of two holes for the pins: 1 - frame frame; 2 - trolley; 3, 4 - brackets; 5 - guide glasses; 6 - lever; 7 - electric drilling machines; 8 - supporting traverse; 9 - stock; 10 - channel On the bars of window boxes, lumber is cut on a line or on positioning machines, after which they are processed there. The processed bars of sashes, window leaves and boxes undergo selective control and go to the buffer warehouse, where they are fully equipped in size and purpose. They assemble window sashes, windows, transoms, boxes in assembly machines (hires) on glue, installing wooden or metal pins made of soft metal in the corners of the mates flush with the plane. The holes for the pins are selected with an electric drill or a special attachment (Fig. 109) at once in two or four corners of the wings. The adaptation consists of a metal frame mounted on a sash assembly machine. Channel bars are attached to the frame racks, along which the trolley with brackets located on it moves. A lever is pivotally attached to the brackets with which the trolley moves forward and backward. Guide brackets are attached to the brackets, through which the curtains pass, pivotally connected to the lever. A traverse with electric drilling machines fixed on it is located on the rods. Depending on the distance between the drilled holes, electric drills can move along the traverse. The operator (worker) with the lever sets the electric drill in the required position above the leaf, then lowers the lever, and the working electric drill selects the holes. After that, the dowels are installed on the glue in the sashes, transoms, window leaves, boxes and laid on a place for holding necessary for setting the glue. Before attaching the boxes, transoms and sashes are processed around the perimeter to obtain the correct geometric dimensions. At the same time, the flaps and transoms fold to form the quarters necessary for the narthex. To assemble the valves up to 1925 mm long, up to 740 mm wide and up to 60 mm thick, the VGO-2 hydraulic assembly machine is used, on which they are assembled. Doors and window frames up to 2360 mm long, up to 1610 mm wide and up to 180 mm thick are assembled on the VGK-2 assembly machine. Assembly of transoms and window leaves up to 460 mm long, up to 1290 mm wide and up to 55 mm thick is carried out on the VGF machine. For the assembly of large-sized window sashes, a VHS machine is used, on which sashes can be assembled in lengths up to 2115 mm, widths up to 1660 mm, thicknesses up to 55 mm. In addition, window and door frames can be assembled on the VGK-3 machine, where boxes are assembled up to 2755 mm long, up to 2966 mm wide, and up to 174 mm thick. Template for folding window covers (Fig. 110, but) is a wooden frame assembled from milled bars. The position of the flaps in the template is fixed by the stops, and the stable position by the clamps. Template for processing door leafs on both sides (Fig. 110, b) is also a frame assembled from bars on a glued spike connection. Template for processing window sashes and window leaves (Fig. 110, at) consists of a frame fastened for greater strength in the corners with metal squares. The position of the sash in the template is fixed with stops. Fastened in the sash template, vents with a clip. Perimeter processing in this template is done on a milling machine.  Fig. 110. Templates: but- for folding window covers; b- for processing along the perimeter of door leafs from two sides; at- for processing window sashes and window leaves around the perimeter (the right and left sashes are placed in the template); 1 - square stiffness template; 2 - axis of rotation of the clamp; 3 - clip; 4 - stops; 5 - frame When processing, they create a profile, a mirror profile of the sash bars and the neck, therefore, when put in place, the window leaves exactly the profile of the sash and neck bars; no additional work is required to fit the window to the sash. Sag from the planes of the wings, window leaves is removed on a wide surface gage or three-cylinder grinding machine. The groove for the tide is selected on the milling machine, monitoring the cleanliness of the processing. For stitching in the sashes and bars of boxes on a machine with a vibrating head, nests of a rectangular shape are selected. The dimensions of the nests should correspond to the dimensions of the loops. Window leaves in the sash are hung on the desktop after processing along the perimeter and selecting the nests for the hinges. Low tide on the window is not set, since in the lower bar of the window the tide is integral with the bar. Ebb and fillers in the outer and inner sashes are placed in the workplace before hanging the window leaves in the sash or after that. The mortise tide is installed on the glue of increased water resistance and is fixed with screws or studs; the slat covering the gap formed by the vestibule of the leaflets is fixed to the leaflet with glue and screws. Production of paired window blocks.Twin window frames are mainly made from specification lumber. The technological process provides that cutting of lumber is done on the OK507 semi-automatic line. In the absence of a line, lumber is cut in length on circular saws for transverse cutting CPA-40, and in width - on circular saws with caterpillar feed TsDK4-3. For the production of parts, window blocks, it is recommended to use lumber waste, splicing them along the length of the gear joints. Parts can also be glued in width and thickness in the cold way in assembly machines or on a semi-automatic line. The surfaces to be bonded are pre-milled. Glued workpieces along the seam on the lines DV504. The glued bars of the boxes are subjected to profile processing on the OK503 line, consisting of a feeder, a planer, a rake separator, a four-sided longitudinal milling machine. On it it is possible to process bars 750–2210 mm long, 54–143 mm wide and 44–74 mm thick; line productivity - 460 pcs / h. The profile processing of the sash bars is carried out on the OK508 line, the studs are cut in the box bars, the nests are processed on the OK505 line, and the studs and eyelets in the sash bars are cut and assembled on the OK509 line. On one tenoning machine, eyelets in the bars are cut, on the other - spikes. After cutting, glue is applied to the spikes with an applicator, after which the flaps enter the assembly machine. On a mortising machine in vertical bars, nests for middle bars are selected. The assembled sashes on the lifting table are assembled in a stack package, and in the mechanized warehouse they are kept until the glue is completely set. On the line it is possible to manufacture products with a length of 690–2150 mm, a width of 300–1300 mm, and a thickness of 43–55 mm; line productivity 125 pcs / h. In those enterprises where there is no line, window sashes are assembled in assembly machines. In the process of assembling bindings on machines, it is necessary to ensure that the leaves do not have skews, and there are no leaks in the joints. The accuracy of the assembly is checked with a template from corner to corner. Then, the assembled flaps are processed along the outer perimeter (contour) on the OK213P2.02 unit, which consists of two machines for longitudinal and transverse processing of edges. Edges are machined by milling heads. Each machine has a base unit, a clamp for fixing the wings and two movable calipers. In addition, a mechanism for moving the leaves is mounted on the machine for longitudinal processing. The units are adjusted to the size of the sash being processed according to a predetermined program, which significantly reduces the setup time of the machines. The machine tools of the unit are closed by noise-absorbing cabins. On the unit, sashes can be processed with a length of 345–1 395 mm, a width of 295–1070 mm, and a thickness of 32–42 mm. Power of electric motors - 44 kW; productivity - 180 shutters per hour. After processing the flaps along the outer perimeter on a three-cylinder grinding or wide-lumen thicknessing machine, the outer planes of the flap are cleaned and ground, after which it is placed in the template and the upper horizontal bar and two vertical ones are processed on the perimeter from three sides. After processing around the perimeter, in the inner casements, nests for the mortise hinges are selected, and in the outer and inner ones - nests for the mortise wrap and holes for the handle-wrap, in the bars of the box (impost) - a groove for the locking strip, and in the leaves and windows of the socket for the screw screed. To hammer the nests, install loops and locks (wrap-handles) in them and fix them with pins, use the OK213R2.10 aggregate. Mortising heads are located on it for the selection of nests, and for the installation of devices (hinges, locks) - high-performance automated units. All work on the processing of sockets and installation of devices are carried out automatically. The unit is equipped with a software device to adjust to the desired width of the leaf to be processed. The feed speed is stepless. On the unit, sashes can be processed 365–1395 mm long, 310–1070 mm wide, 42–52 mm thick. The feed speed of the rod conveyor is 6–30 m / min, the feed speed of the heads in the sample of nests is 0.3–0.7 m / min. Four grooving, two drilling heads and four heads for installing devices are installed on the unit. The unit is served by two workers. In enterprises where there are no lines, box blanks are processed as follows: bars with warping and irregularities are processed on a planer, and then on four sides with profile selection on a four-sided longitudinal milling machine. In the horizontal bars of the boxes for two- and tricuspid bindings on a centrifugal or horizontal drilling-grooving machine, nests for the spikes of the vertical impost, as well as grooves in the impost for setting the lock wrapping bar, are selected. Spikes and eyes are cut on tenoning machines. In the vertical bars of the box, nests for hinges are selected, after which half-loops are placed at the workplace. The defects (knots) in the bars are buried on the machine. In the lower horizontal bar of the box to drain the water cut the grooves. Window boxes assemble in assembly machines VGK-2, VGK-3. When assembling the boxes on the glue, the spike connection is fixed with pins mounted on the glue. Bolts are placed in all corners of the box, as well as at the joints of the impost with horizontal bars, flush with the plane of the box. When assembling the box it is necessary to ensure that there are no distortions from corner to corner; the assembly is checked with a ruler and a template. Box studs should be tight without gaps. When assembling the window unit, the doors are hung, the vents on the hinges are in the box, the doors are adjusted to the box, eliminating defects and inaccuracies. After assembly, the window unit is painted and then glazed. Technical conditions for the manufacture of window units.Elements of window units must have a regular geometric shape. Sagging is unacceptable on the front surfaces and on the ends of the connections of the valves, transoms, air vents, valves and louvers. It is impossible to use wood of different breeds in a casement, box, etc. Sealing of defects and defects in processing by plugs and strips should be made on glue, and the plugs and strips should be free of defects, one of the rocks with the part and installed tightly without gaps, flush with the surface. On the front surfaces of the parts of windows and balcony doors under a transparent finish coating are not allowed defects and defects in wood processing. Opaque coating should be done with oil or synthetic paints and enamels. 2. Making door blocks The technological process of manufacturing door blocks with panel blades consists of the following basic operations: making frames and filler, preparing facing material, gluing door panels, processing panels around the perimeter, setting linings and layouts, making the door frame, installing (inserting) doors into the box with hanging on the loop. Door shields are made by filling a pre-assembled frame with slats, honeycombs assembled from pieces of hard fibreboard, plywood, paper honeycombs or broken strips of hard fibreboard. For doors 40 mm thick, frames are made from bars with a section of 40–60 × 32 mm, which are cut lengthwise from 40 mm thick sawn timber, 9 ± 3% moisture on a circular saw for a cross, and in width - on a circular saw for longitudinal cutting. Connect them to the spike or metal clips butt. The connection of the bars on the thorns increases the strength of the frame, but increases the consumption of wood and the complexity of manufacturing the frame due to the introduction of an extra operation (slaughtering of thorns). Clips put in order to frame while filling it with a middle and bookmarks in the press does not spread. For the manufacture of glazed doors using two frames: outer and inner. The cross sections of the inner frame bars should be the same as the cross sections of the outer frame bars. The resulting blanks are processed in size by thickness on the thicknessing or quadrilateral longitudinal milling machines. The bars of the framework should not have rot, curvature, falling out, rotten, rotten and tobacco knots. The filler is made from small-sized sawn timber and industrial waste (for solid and rarefied middles), plywood wastes and hard fibreboard 4 mm thick (for cellular filling). The moisture content of wood waste produced by cutting sawn wood for joinery is approximately 15%. Before filling the center, they must be dried to a moisture content of 9–10% in drying chambers. For a room with a relative humidity of more than 60% make doors with a continuous filling with wooden slats. After the frame is assembled, plywood or a hard fibreboard pre-plastered with glue is applied to it and attached to the frame with small nails 20-25 mm long. In the doors with a solid filling, the thickness of the cladding of solid fibreboard of 3 mm is allowed. After fixing the facing, the frame is turned and all the internal space is filled with rails with a thickness corresponding to the thickness of the frame. When laying the rails it is necessary to ensure that they are tightly pressed against one another, their surface is smooth, and the joints are located in a razbezhku. After filling with strips, the frame is closed on top of the second facing sheet, previously spread with glue, and attached with small nails on four sides. In the manufacture of a shield with a sparse filling, the frame is filled not entirely, but at intervals. A door shield with a honeycomb filling consists of a frame with cellular grids laid in it. Honeycombs are collected from strips of plywood or hard fibreboard 4 mm thick, 32 mm wide. In strips through 40 mm, grooves with a width equal to the thickness of the strips plus 1 mm and a depth equal to half the width of the strips plus 1 mm are cut. From the strips with slits, a grid is formed in the form of honeycombs with cells measuring 40 × 40 mm. The frame of the shield is filled with two or three cells. Lining material is glued with carbamide glue to inner doors, and KB-3 glue (waterproof) to outer doors. With a small annual production of doors for gluing, mechanical presses are used. Gluing the boards in mechanical presses consists of the following operations: forming the door shield, forming the packages and pressing them in, holding the package under pressure to set the glue, holding the door panels (acclimatizing). They form the door shields like this: put a pre-assembled frame on the work table located near the press, and on it - a cut sheet of plywood or a hard fibreboard with pre-applied glue on one plane. The glue is evenly distributed over the entire plane of the sheet; the layer should not be thick, otherwise excess glue will be squeezed out under pressure in the press, making it difficult to disassemble the bags. The facing sheet is laid with the smeared side on the frame. Its ends should extend beyond the frame evenly on all four sides. The laid sheet is fixed at the corners with small nails or hairpins, then the frame is turned over and the center of the shield is filled with bars, honeycombs, etc. Two bars with a section of 32 × 50–70 × 400 (700) mm are put tightly to the middle of the longitudinal bars for doors with a height of 2000 mm, and a length of 700 mm - for doors with a height of 2300 mm so that a lock can be slammed into the door regardless of whether it is right or left, and to install a handle. Cellular filling should fill all the internal space of the frame, and the ends of strips of some cells freely enter the free space between the ends of strips of other cells. After filling the middle of the shield, the frame is covered with another facing sheet, pre-lubricated with glue, and fixed in the corners with small nails. Then the assembled shield is removed from the desktop and transferred to the press. 18–20 shields 40 mm thick each are placed in the press. Shields should be laid strictly one above the other, without displacement; from above they are covered with a massive three-layer wooden shield similar to the base. Then include the drive mechanism of the press and the package is compressed. After gluing the boards, i.e. after 6–12 hours, the finished bag is disassembled, the boards are stacked for free exposure for 12–24 hours in a room with normal humidity (up to 60%) and a temperature of 18–20 ° C. In a hot hydraulic press, the boards are glued in the same sequence as in a mechanical press, but they are formed on a metal pallet. The pressure during gluing should be 0.5–0.8 MPa, and the smaller limit applies to shields with honeycomb and sparse filling, and the larger - with continuous filling. After gluing and aging, the boards are processed around the perimeter, and then the plates and layouts are installed. Perimeter processing includes filing the board to the required size and grinding the surface of the board. In the glass doors put the layouts on the glass. The box is made and the canvas is driven into it as well as in the framed (frame) doors. The line for the manufacture of door panels consists of a series of consecutive mechanisms. On the conveyor belt lay the facing sheet of solid fibreboard 4 mm thick, spread with glue on the mesh side. Two vertical bars of the frame and bars under the lock are placed on this sheet, after which the package is transferred to the next position, where two cross bars of the frame are put on it, which are fastened in the corners with paper clips. Then the middle is filled either with bars (for doors with continuous filling) or with honeycombs. In the next position, the bag is covered with a sheet of fibreboard, on the mesh side of which the glue is pre-applied. In the corners of the sheet is baited with small nails. Assembled door package chain conveyor is fed into the loading shelf. After loading all 15 floors of the stack with the feeder, packets of cloths are fed into the press P-797-6. Bonding is performed with carbamide adhesives (KF-G) for 6–8 minutes at a temperature of the press plates 115–120 ° C. After gluing, the press opens and the loading mechanism turns on, which loads the next batch of canvases from the bookcase into the press and at the same time partially pushes the glued sheets onto the unloading bookcase. To completely push the webs out of the press, the unloading mechanism turns on the unloading stand, which pushes each blade into the unloading stand, and from there it transfers to the lifting storage table, from where the blades enter the non-driving floor conveyor. On this conveyor, the web is held for 24 hours to equalize the stresses. Processing of door panels along the perimeter takes place as follows: after the exposure, the stack of glued door panels is fed to a hydraulic lift with an automatic loader, from where each canvas is alternately fed to a format end trimmer, on which longitudinal edges are processed first and then transverse; at the same time, the necessary bevel is formed with mills on the edges. When leaving the machine door leaf cover with linseed from all sides on a special fixture. After polishing through a roller conveyor, the canvas enters the machine, on which nests for half-loops are selected. Then each canvas is fed to a lifting drive table, where a stack of door panels is formed. As a stop of the required height is formed, they are fed by a double-chain floor conveyor to the dispensing mechanism, from which each blade is fed to the first drilling machine for sampling in the longitudinal edge of the slot under the body of the lock or latch. On the second drilling machine, a socket is selected under the lock bar and a hole for the lock handle. The processed cloths on the roller conveyor arrive for installation in boxes. The door assembly flow consists of two lines: I- assembly and transportation of boxes, II- assembly and transportation of blocks. On line Ithe work is carried out as follows. Box pieces, made in the woodworking shop, are carried on a trolley to a two-saw machine, in which nests are made for hinges. At the workplace, the worker drives the half-loop into the slot and fastens it with pins or screws, after which the bars with spikes smeared with glue are assembled in a box in an assembly machine. Assembled on glue and dowel boxes arrive on a double-chain conveyor-drive, on which the natural hardening of the glue takes place. As required from this conveyor boxes are transferred to the line for the assembly of blocks. Line IIlocated at right angles to the line Iand consists of a single-chain floor conveyor that moves the door leafs in a vertical position. Along the conveyor are jobs. At the first two, half-loops are screwed on the canvas, at the third workplace the screws are finally wrapped with a screwdriver, on the fourth - the blades are hung (driven) into the box. The worker, engaged in screwing the screws, controls the pedal stops, with the help of which the door is installed in the right place to perform working operations. Technical conditions for the manufacture of doors.Doors are made in accordance with State Standards and working drawings. Deviations from the nominal sizes of door units and assembly units (canvases, boxes) should comply with existing regulatory documents. On the front surfaces of the canvases, boxes, the hanging of the parts that do not have chamfers at the interfaces, is not allowed. Doors of increased moisture resistance are made of coniferous wood: pine, spruce, fir, larch and cedar. It is not allowed to use wood of different species in the door leaf or box, with the exception of pine, spruce, fir and cedar (for an opaque finish). Doors are mainly manufactured with opaque coatings. The doors are made of solid hardwood, coniferous and precious wood, selected in quality, color and texture and finished with a transparent coating. Instruments of the same type and purpose are installed on the same level in the doors. Carry doors and windows in containers (Fig. 111).  Fig. 111. Container for transportation of window and door units: 1 - frame; 2 - stand; 3 - retractable rod; 4 - clamping beam; 5 - clamping screw; 6 - rubberized tape When storing and transporting joinery, they should be protected from mechanical damage, pollution, moisture and direct sunlight. 3. Making joiner partitions and vestibules Joiner's partitions are manufactured in the form of shields according to a technology similar to the technology of manufacturing frame doors. Boards joiner's partitions make a width of 600, 1200 mm, a height of 2300 mm or more, 54, 64, 74 mm thick. For construction shields come assembled with panels and bindings. In the joiner's partitions, single single deaf (non-opening) sash, transom, are installed, which serve to illuminate one room from the light openings (windows) of the other. The file is installed in the grooves of the strapping bars. If the conditions of operation require a soundproof partition, then they make a thicker strapping, and the panel is glued from solid fibreboard, laying between them a soft fibreboard or mineral wool. Partitions are also assembled from profile boards with a thickness of 27–35 mm, a width of 64–140 mm in a quarter or in a groove and a crest. Boards are manufactured at the enterprises and delivered to the construction site by pogonazhem or in cut form. Tambour is a wooden frame, which is attached to the fencing shields. Depending on the loads, the frame of the tambour is made of bars with a cross section of 44–54 × 74–94 mm. Bars are supplied for construction with moisture content up to 18%, and in construction they are slaughtered in place. The vestibule boards are frames, lined on both sides with plywood of high water resistance or superhard fibreboard 6 or 8 mm thick with a continuous filling in the middle with wooden slats. The height and width of the shields depend on the dimensions of the tambour, the thickness must be at least 40 mm. Shields are manufactured by a technological process similar to the production of panel doors. For vestibules in public unique buildings, boards are used that are veneered with valuable wood veneer or finished with paper that imitates the texture of valuable wood species. 4. Manufacturing of built-in furniture Built-in wardrobes, mezzanines consist of door and mezzanine blocks, side and intermediate walls, baseboards, cabinet, mounting bar. Door and mezzanine blocks (shield) are manufactured according to the technological process, similar to the manufacture of panel board doors. Cloth doors of the cabinet, mezzanine lined with wooden plates in the groove and tongue, PVC profile or veneered with plastic edging. Attach the plates on the glue. In the manufacture of doors of cabinets of chipboard last cut out on circular saws, after which the edges on the milling machine choose a groove for fastening the plates. The plates are fixed in the assembly machines or clamps. After the shutter speed required to set the glue, the planes of the door panels are ground on a three-cylinder grinding machine. The doors can be covered with valuable wood veneer or plastered with PVC film, the side shield-wall is made of chipboard and veneered with valuable wood veneer or covered with PVC film. The intermediate wall is made of two solid fibreboard glued together with mesh sides to the inside. After gluing, it is necessary to keep the plates laid in the feet in the workshop at a temperature of 18–20 ° C and a relative humidity of 60% for 24 hours, after which they are sawn around the perimeter, and then the edges are coated with a drying cloth to prevent wetting. Adjustable shelves up to 800 mm long are made of plywood, and more than 800 mm long are made of particle board, the outer edge of which is faced with wooden lining. They cut the plates, the plywood for the shelves on the circular saw, the corners are cut out according to the marking or pattern on the band saw. The surface of the shelves is ground on a grinding machine. The cabinet elements, finished with fine wood, are varnished, and the unmade ones are painted with nitro enamel or oil paint. During transportation to protect against damage, the cabinet elements are packed in pairs with front surfaces to each other, laying paper between them. They store cabinet elements in a horizontal position in dry warehouses, and are transported in containers or covered wagons. For the construction of cabinets supply complete with appliances, packed in a separate container. 5. Production of plinths, platbands, floor boards, handrails, plating Parts are manufactured according to the following technological process: drying of wood, cutting of sawn timber along the length and width of circular sawing machines, embedding of defects with subsequent shutter speed necessary for the glue to set. Close up defects on the machine for drilling and embedding knots, process from four sides (milled) with the creation of a profile - on a four-sided longitudinal milling machine, cut to size - on a trimmer. Then the floorboards are antiseptic. Parts are supplied with pruned lengths of 2100 mm and more. CONSTRUCTION WORKS ON CONSTRUCTION 1. General information about installation and mounting equipment Installation of wooden structures is carried out in various ways: individual elements, parts or assembly units of structures. The method of installation of joinery depends on the size of the installed products and methods of their lifting. When installing wooden structures, the whole process is divided into separate stages consisting of preparatory work, assembly and installation of structures in the design position. Preparatory work involves checking: the correctness of the dimensions of the openings in which the structures are mounted; strength and stability of mounted wooden structures; working condition of tools and mechanisms for lifting, scaffolding, alarm. Before installation, wooden structures should be carefully checked and also checked whether everything has been done to protect them from moisture and fungal damage. Places slinging products marked with paint. Check the accuracy of the assembly of structures, compliance with its working drawings, as well as the allowed deviations. It is necessary to carefully check the installation sites of structures, to eliminate existing irregularities or deviations. Installation of structures in place is slinging, lifting and installing in the design position, alignment and final fixing. Wooden structures are mounted on pre-approved process charts, and if they are absent, according to an approved scheme. For the installation of wooden structures used mounting equipment - cranes, winches, blocks, hoists and various mounting accessories - slings, traverse, grips. These machines and devices are also used for loading and unloading. Cranes.In the construction are widely used rotary cranes, which are lifting and transport vehicles, with which you can make lifting, horizontal and inclined movement of goods, as well as rotate them around the vertical axis of the column (tower) of the crane. For installation of building structures used self-propelled jib cranes - pneumatic, crawler, automobile, etc. These cranes have greater mobility, their installation and movement does not require rail tracks. WinchesDistinguish winch special and general purpose. Special winches are used in cranes for lifting and lowering loads (cargo) and for changing the position of the boom (boom). By the method of installation, stationary and mobile winches are distinguished. General-purpose winches come with a manual or mechanical drive (from an electric motor or from an internal combustion engine). Winches with a manual drive are used for installation work with a low speed of movement of loads, as well as for pulling loads off when lifting them. Mechanically-driven winches are divided into gear, reversing and friction. Steel ropesused for lifting, lowering and moving goods, making slings, cables, guy rods. They equip lifting mechanisms - cranes, winches, tackle, hoist, etc.  Fig. 112Slings for construction: a - single-stranded 1SK; b - two-branch 2SK; в - three-branch 3SK; D - four-branch 4SK; e - ring SSC; e - two-loop UPC; W - scheme of slinging with two SCC lines; h - scheme of slinging cargo with two lines of UPC; 1 - detachable link; 2 - leveling link; 3 - leveling thread; 4 - rope branch; 5 - capture During operation, you must constantly monitor the condition of the ropes. Slings.For slinging construction materials, panels of floors, walls, beams, trusses, window and door blocks, cargo rope slings are used. Slings (fig. 112) with straight branches for lifting and transporting with single-branch branches - 1SK, two-branch - 2SK, three-branch - 3SK and four-branch - 4SK are produced. In addition, there are slings without mounting loops ring - SKK and two-loop - UPC. Load capacity of slings with straight branches, ring and two-loop 0.32–32 tons. Rope branches of the slings are made from a whole rope without splicing. When slinging goods, it is necessary to correctly pick up the sling and securely attach it to the load. Sling should not have sharp bends, loops or twists. To capture structures that need to be stitched at two points or more, traverses are used, which are an ordinary beam made of pipes with hangers. The rigging devices in the form of cross-arms, slings, grips are attached to the working bodies of lifting machines with rings, hooks, loops. 2. Assembly of window and door blocks in construction Window and door blocks come to the building site mostly pre-assembled, with hinged doors, window leaves, transom, canvases. Only in some cases at the construction window and balcony blocks are assembled from elements. Window and balcony blocks, as a rule, are installed in the design position as ready-made blocks with hinged elements. Assembly of window blocks.The work of assembling window blocks consists of fitting and hinging the vents into the casement (Fig. 113, but), fittings with flinging of the valves between themselves and to the box with the installation of slats (beadings) (Fig. 113, b), installing the half-sash on the casements and the box (Fig. 113, at) installation of reflux (Fig. 113, g), hanging the sash in the box (Fig. 113, d). After that, the devices are cut (wraps, brackets). Before installation in the opening window and balcony blocks, oil paint and paint. Elements of window units are assembled on site. After assembly, the block elements are held for 1–3 h to set the glue, and then set the loop, ebb, splat, etc. The nests under the loop are marked using the Pavlikhin template. For the formation of nests under the mortise hinges, you can use a set of three chisels (Fig. 114). One mortise hinge card is driven into the box bar, and the other into the inner binding bar. Unlike conventional mortise hinges attach studs. Hang the doors on special tables. Prefilling of the flaps is to select the folds that form the porch at the alignment point. Pitting can be done with mechanized or hand tools. For the attachment of the porch in the windows without removing them from the hinges they use a complementary plane (Fig. 115). When fitting the valves carefully check the correctness of the porch, i.e., their tightness to the quarters of the box. In all porches between the doors and the box, a gap of 2–4 mm is left for the subsequent covering of the doors with a layer of paint and free opening and closing of the doors.  Fig. 113. The sequence of the assembly of window blocks with separate bindings: a - inserting the vents; b - fitting the sash with the installation of a nacnik; in - installation half-loop; g - installation of low tide; d - hanging the valves in the box, installing layouts on the glass; 1 - leaf; 2 - small window; 3 - box  Fig. 114. Chisels for selection of sockets for mortise hinges: a - 44 mm wide; b - 30 mm wide; in - 32 mm wide; 1 - the handle; 2 - blade  Fig. 115 Finishing plane: 1 - knife; 2 - knife stop; 3 - mounting bolt; 4 - planer body; 5 - nut Then the doors are hinged on the hinges, ensuring that they open and smoothly, do not spring, and are stationary in any position after opening. Places setting the device is marked with templates. The simplest pattern is a thin board or plywood with cut-out contours of the instruments used for marking with a pencil. You can mark the places for setting the instruments by outlining the instruments themselves with a pencil. The nests for the instruments are selected with a chisel or chisel so that their depth along the entire contour of the instrument is the same. The devices are flush with the surface of the wood. The tolerance should be no more than 0.5 mm. Window and door fixtures are attached to the products with countersunk screws. The dimensions of the screws should correspond to the size of the holes in the devices. The approximate order of installation of devices on windows and balcony doors is shown in fig. 116.  Fig. 116.The order of installation of devices in the joinery: a - window blocks OS18-18V; OP18-18B; b - window blocks OS12-1, OSP5, OS12-13,5; in - balcony doors BS28-9, BR28-9; g - window blocks OS18-13,5; OP18-13,5; 1, 3 - loops; 2 - framuzhny device; 4 - stop; 5 - lock; 6 - wrapping; 7 - screed. For locking windows with paired bindings, apply a window wrap-fastener mortise ЗР1, screw-in mortise ЗР2. Usually, two wrapings are placed on each sash at a distance that ensures the sash is evenly adjoined to the box, and taking into account the possibility of opening bindings from the floor without using a stand. For shutters with windows up to 1100 mm high with paired or separate bindings, use ShN2 latch bolt, and for sash windows with a height of more than 1100 mm and balcony doors with twin or separate bindings or cloths - laid-on bolt ShN1. Gate valve ZT is used to lock the window sash residential and public buildings. In windows with separate covers for residential and public buildings for the opening of the valves used handle-type bracket PC. The same handles can be used in the balcony doors. Sash windows fix locks (Fig. 117).  Fig. 117.Clamp type FK1 (a) and its installation (b) For locking one of the canvases of double balcony doors with separate canvases, bolts of the type SV are used. Their moving parts should open smoothly, without much effort. Door (upper) bolts are installed at a height of 1.8-1.9 m, so that they can be opened from the floor. To limit the opening of the valves and prevent them from hitting the wall on the inner side of the outer sash of the unit with separate covers, install a window support of the type UO. For transoms of public buildings with paired and separate bindings up to 1300 mm wide, use the PF1 framuzh device, and for transoms up to 830 mm wide, use the PF2 device. In wood products that cause corrosion (oak, etc.), screws with anti-corrosion coating should be used. Assembly of door blocks.The work on assembling the door blocks consists of assembling the box, taking away the folds of canvas to align, fitting the door to the box, inserting hinges, the lock and other devices, installing the strips, hanging the linens, polishing and painting. Boxes assemble in the assembly machine (vayme). Cloth odnopolnogo doors must be carefully adjusted to the quarters of the box. When working manually, first fit the edge of one vertical bar, the second and then horizontal bar. At the double doors, first, a fold is taken along the trunk of the canvases and, after fitting, the canvases are folded so that the horizontal bars (frame doors) coincide, that is, they are at the same level. Then both blades adjust, they should fit snugly to the quarters of the box along the entire perimeter, not protruding beyond the plane of the bar of the box and not falling down. The canvas is hung on two or three loops, and the bautes of the upper and lower loops should be on the same vertical axis. Holes for locks in the door leafs are selected with the help of a conductor (Fig. 118), and sockets can also be selected on the hinged door leafs. Choose nests for locks in the doors as follows. The door is opened approximately at an angle of 75 ° and is fixed in this position by placing two wedges under the lower part of the canvas. Then mark the installation location of the conductor. The conductor set on the markup and screws fastened to the door.  Fig. 118. The jig for sampling lock holes in the doors: 1 - clamping pints; 2 - the door; 3 - rake; 4 - nails Fix the position of the conductor can be rail, nailed to the edge of the canvas with nails on top. The size of the rail length must correspond to the position of the lock from the top of the door. Holes in the door on the conductor choose electric drilling. First, choose the hole for the handle, the holes and the groove for the key, then - the groove for the lock. For closing the entrance doors in the apartment, as well as individual rooms of public buildings, a mortise cylinder and a lock with bolt ЗВ1 are used (Fig. 119, but). Locks are inserted into vertical bars. When installing locks with handles, it is necessary that the handle axis coincides with the key axis. Lock slats and grubs cut flush with the surface of the trim and box bars. For closing cabinets used constipation (Fig. 119, b, c), and for opening room deaf and glazed doors - a handle-bracket (Fig. 119, g). Attach the bracket to the door at a distance of 950-1000 mm from the floor. On the doors of the baths and the bathrooms install knobs-buttons (Fig. 119, d). In the doors that do not lock, use simple latches and handles-buttons. To protect against the penetration of kitchen odors in the room at the door of the kitchen set mortise latches.  Fig. 119.Devices for joinery: A - cylinder mortise lock for doors with bolt ЗВ1; b, c - constipation for cabinets; g - PC-type handle; d - pen-button RC-2; 1 - locking bracket; 2 - latch handle When installing painted window and door blocks, holes and other defects appear on the surface, which are puttied and painted. 3. Installation of window and door blocks During the construction of large-block, brick and wooden log, block and frame buildings, window and door blocks are installed mainly in the process of building walls. The blocks are fed to the installation site by lifting mechanisms. Before installing the surface of window and exterior door blocks in the opening, they adjoin the stone walls, they are antiseptic and protected by roll-on waterproofing materials (tar, roofing material). When the window and door frames are antiseptic around the perimeter of their construction, they are treated with antiseptic pastes using hydro– or spray guns. Paste should be applied evenly without gaps. When the ambient temperature is below 0 ° C, the paste is heated to a temperature of 30–40 ° C. After applying the paste and drying it around the perimeter to the box with small nails, strip strips of roofing material, roofing width equal to or somewhat greater than the width of the box. Doors or door leaf before lifting the unit to the design position should be fastened to the installation hooks (for unit lifting). Raise the blocks with a two-legged sling. On some construction sites, the blocks are completed in an apartment and lifted by a crane in a container. To direct the block to the design position, a thin steel or hemp rope is used, which is temporarily attached to the vertical bar of the box. The unit must be lifted carefully, without jerks, and lowered to the installation site smoothly. Turns of an arrow should not be sharp. After installation, the window box is calibrated horizontally and vertically with a level and plumb (Fig. 120). The axes of the window and door blocks should coincide with the axes of the openings. The coincidence of the axes of the blocks and openings is checked by a plumb over the mark of the axis of the opening made on its upper slope, and the cord must pass through exactly the intersection point of the diagonals of the box of the block. The block skews are eliminated with wedges. The window block is put in the opening freely, after which it is aligned and wedged in the design position. Sticking efforts should act only on the ends of the box. At the same time it is impossible to allow distortions of the box, otherwise the shutters, canvases will open and close poorly. Before installation, it is necessary to check whether the windows, flaps, transom, door leafs open and close well. After installation, the gaps between the doors, canvases and boxes should not exceed 2 mm, between the internal doors and the floor - 5–8 mm, between the doors and the floor in the bathrooms - 12 mm.  Fig. 120Verifying the installation of the window box in the opening: 1 - reinforced concrete lintel; 2 - wedges; 3 - window box; 4 - gap for caulker; 5 - plumb When installing window and door blocks, all elements of the same name are placed on the same line, for example, on the facade of a multi-storey building, vertical bars of bindings should be on the same vertical line. When installing the door unit in the opening, it is leveled by level and plumb both in the plane of the wall and across, so that the box of the unit does not protrude beyond the plane of the wall if the walls are not plastered. When plastered walls of the box should protrude beyond the plane of the wall to the thickness of the plaster to casing adjoined to the wall and box. Before fixing the unit, check if the box is not skewed. To do this, the unit is measured diagonally, pulling the cord from one angle to the opposite. The distortion of the box can also be checked with a plumb angle. Boxes installed in the openings of the outer walls must be at the same distance from the plane of the wall inside the building throughout its facade. Boxes of window and door blocks to stone walls and partitions are fixed with screws or steel ruffs, which are hammered into wooden antiseptic corks, embedded in the walls. The vertical bars of the boxes are attached to the openings in at least two places, and the distance between the screws and the ruffs should be no more than 1 m. The wooden partitions of the box are connected with nails. After installing the gaps between the box and the masonry of the outer walls in the opening and securing the blocks, it is necessary to heat the insulating materials. Caulk steel caulk. In residential buildings, window and balcony blocks are usually installed in a common opening. For better fastening of the blocks, preferably in the upper part of the opening (slope) at the junction of the blocks to put an additional tube or metal embedded element. The window and balcony blocks are fastened together with nails, laying between the blocks a rail 10–20 mm thick half the width of the box so that the remaining gap can be further cut. For sealing windows and balcony doors, as well as joints in the exterior panels in houses of high-rise floors, they apply mastic of polyisobutylene styrene with mastic. Mastic is well bonded to the surface of wood and concrete; at a positive air temperature, the mastic can be used without preheating. Door blocks in the openings of brick walls installed with a crane. The vertical bars of the door frame are fixed with ruffs driven into wooden antiseptic corks, laid when the walls are laid. In block and panel buildings, the box is fastened to wooden antiseptic corks, 50 × 80 × 120 mm in size. On separate constructions door blocks are installed in the process of laying walls. In order to better fasten the boxes to the masonry in height, wire segments are nailed to the vertical bars, which are then laid in the seams and sealed with mortar. When installing door frames in the walls (Fig. 121, a, b)need to ensure that the box was not skewed. When installing door blocks in partitions (Fig. 121, c), it is desirable that they do not protrude from the plane of the partition. Due to the fact that the partitions have a thickness of about 80 mm, boxes with a width of 74 mm are used for installation in the opening. In the walls of wooden houses (chopped, squared) in the openings on the logs, bars cut the crest, then set the box, which in the outer side has a groove, which is included in the crest. The gap formed between the box and the wall, caulk outside and inside the room.  Fig. 121.Examples of installation of door blocks in internal walls and partitions: a - in brick walls; b - in wall panels; in - in partitions; 1 - option with plaster; 2 - platband; 3 - rake  Fig. 122. Installation of window blocks in the openings of the stone walls of residential and public buildings: a - with paired bindings; b - with separate covers; 1 - platband; 2 - wooden cork; 3 - ruff; 4 - caulker; 5 - sealing material Installation of window blocks in the openings of the stone walls of residential and public buildings is shown in Fig. 122. Window units with separate bindings can be installed at once in whole or separately: first, the outdoor unit, and then the internal one. Care must be taken to ensure that there are no gaps between the outer and inner boxes, i.e. they must be tightly fitted to one another and firmly fastened with nails. The order of installation of door frames in standard houses of frame construction is shown in fig. 123. In the outer wall (Fig. 123, a b) the box is adjacent very close to the racks of the frame. After fixing and piercing the gaps, the box is closed on both sides with a lining. In partitions (Fig. 123, c, d) after installation the box is trimmed with a casing or a casing and lining. The installation of the box to the furnace is shown in fig. 123, d. When installed, the box is isolated from the furnace with flame retardant material.  Fig. 123.Installation of door frames in wooden houses of frame construction: a, b - in the outer wall; c, d - in partitions; д - adjoining to the furnace; 1 - door frame bar; 2 - plasterboard sheets; 3 - thick paper (air insulator); 4 - sparse wooden lining; 5 - frame frame; 6 - wood lining; 7 - felt wetted in clay; 8 - platband; 9 - hardboard; 10 - mineral felt (insulation); 11 - bituminous paper (steam insulator); 12 - soft fibreboard; 13 - outer skin After attaching the box to the wall, the door leaf is removed from the hinges in order not to damage it during the finishing (plastering) work. The ends of the vertical bars of the box are buried in the floor at the design depth. The gap formed between the box and the wall of the opening, caulk, and the slopes are plastered. After finishing the finishing work, the door leaf is again hung on the box, checking its fit to the quarters of the box. The coils of the windows of the balcony and exterior doors are sealed with elastic pads, fixed after painting and glazing blocks. The airtightness of window and balcony blocks, especially with paired bindings and linens, can be prevented by using devices that provide tension. For a snug fit to the walls or partitions, the frames should be fixed with an overlap of at least 10 mm. The correct installation of the casing is checked by plumb, level and square. Attach them to the box with nails with slightly sunken hats. In the corners they are connected to the "mustache". The platbands of valuable wood (oak, mahogany, rosewood, etc.) are fastened with screws. Platbands installed in the same room should have the same profile. Window and door blocks glaze after staining. Wooden windowsill boards are installed mainly in wooden houses, but they are also made in stone buildings after precipitation and plastering and sanitary-technical works. In one room, the windowsill boards should be on the same level. The bottom surface of the window sills, adjacent to the stone surfaces, should be antiseptic and isolated from the masonry walls with felt. In order to avoid moisture retention, the upper surface of the window sill should have a slope of 1% inside the room. In stone buildings, the ends of the boards, embedded in the walls, are antiseptic and insulated from the masonry with roofing boards, roofing felt or other waterproofing material. The length of the ends of the window sills, embedded in the wall, is about 40 mm. 4. Installation of joiner partitions Partitions are installed after flooring, plumbing and electrical work, plastering walls and glazing windows. Joiner's partitions from ready-made shields of a framework (paneled) construction are installed on a board gasket laid directly on the floor. The partition can be equal to the height of the room or slightly lower. Before installation, the shields should have even edges, i.e., should be well positioned. Shields are connected on plug-in studs and screws, wrapped at an angle to the junction. The number of spikes depends on the height of the partition: less than three spikes are not set. The joints of the shields are closed with layouts attached to the shields with screws or small nails with the drowning of the cap. To the floor partitions are fixed with screws, and to the walls - with fasteners. The junctions of the partitions with the walls and the floor are covered with a plinth. If the partition reaches the ceiling, it is covered with curved cornice. Partitions made of valuable wood are varnished after installation, and of coniferous wood they are painted with oil or enamel paints. When installing partitions ensure that they have a vertical position. Vertical installation partitions check plumb. Deviation from the vertical should not exceed 3 mm per 1 m, and for the entire height of the room - no more than 10 mm. Partitions of smooth shields are installed similarly. The frame partition is assembled from factory-made bars in a horizontal position on the floor near the installation site, and then raised to a vertical position and fixed to the floor with nails, and to walls with ruffs or nails, and then veneered with valuable veneer on both sides rocks, painted fibreboard or plates with a pattern that mimic the wood of valuable species. If under the operating conditions the partition should be soundproof, one or two layers of soft fibreboard or mineral wool boards are placed inside the frame. After assembly and installation, a vertical plating is checked by a plumb line. At fastening of a partition to stone walls in them establish antiseptic wooden traffic jams in advance. Plates or plywood intended for facing the partition should have a smooth surface without cavities and protuberances. Plate, plywood attached to the frame with nails. The joints of adjacent plates overlap profile layouts. 5. Installation of panels, vestibules. Installation of profile parts Panels (finishing) are installed in rooms in which sanitary and plastering works are performed, and walls are also dried. Before installing the panels on the walls mark the installation location of the bars of the frame, based on the size of the boards, as well as the premises. The frame (bars) are fixed with screws or ruffs to the antiseptic wooden plugs installed in the walls. The framework consists of bars with a section of 25? 80 mm. The spacing of the bars depends on the size of the panel (width). The humidity of the boards of the frame should be no more than 15%. Panels can be assembled on a rail, in a groove and a crest and in a quarter. The assembled frame must be strictly aligned vertically. Panels are installed on the floor. The paneling of the walls starts from the corner of the room, pressing the panel to the frame and checking the verticality of the side faces, and then nailing it to the frame bars with nails 40 mm long with a step of 300-400 mm. Nails are first baited at an angle into the groove, and then they are finished off with a hammer and with a doboin head. Then a key (rail) is driven into the groove (Fig. 124, but) and install the next panel. When mounting the panels in the groove and the crest (Fig. 124, ba) the first panel is installed and fastened in the same way as previously described. The second panel is installed close to the frame and the crest is driven into the groove by a hammer, and on the other side of the groove it is fastened with nails to the frame. The panels fit tightly to each other. Fix the panel layouts as shown in Fig. 124, at. Attach them with nails to the frame strictly vertically, leaving a small gap, and after checking the verticality insert layouts into the seam and fix them to the panels with nails or screws. Shields in the joints should be carefully fitted one to the other. Joints (connections) of shields are covered with layouts - splat. On top of the panel trim the eaves, which cover the gap between the panel and the wall. The eaves attach screws or studs to the bars of the frame. Bottom panel trim plinth. Pads are mainly assembled from pre-fabricated panels. Prior to installation, you must mark the place of installation of the elements of the vestibule. Installation of panels usually begin with the installation of one of the side walls, then the door unit and the second wall, ceiling panels. With a high elevation of the vestibule and the hanging of massive doors, a frame is erected, to which the shield panels of the side walls, the ceiling and the door block are then fastened. The frame of the vestibule or shields (without the installation of the frame) is attached to the walls with fasteners or squares. Panel panels, the door block are calibrated vertically and fixed, and then fastened. Between themselves, the panels are fastened with screws or metal fasteners, the door unit with shields is also fastened with screws. The floors of the recesses are arranged after the installation of the walls. The gaps between the walls and panel panels are covered with layouts.  Fig. 124.Panel installation scheme: a - rail mounting; b - mount in the groove and the comb; in - mount a quarter with the layout; 1 - key rake; 2 - nails for fastening panels to the frame; 3 - wall; 4 - nails for fastening frame bars to corks; 5 - frame bar; 6 - panel; 7 - layout  Fig. 125Installation scheme of the usual (a) and slotted (b) baseboards: 1 - layout; 2 - gasket The installation process for plinths (Fig. 125) on wooden floors consists of the following sequentially performed operations: drilling holes in walls, partitions with a diameter of 15 mm, a depth of 50 mm with a step of 1000–1200 mm at a height of 25–35 mm from the floor mark: driving into holes wooden antiseptic stoppers; cleaning the floor and walls from pollution; cutting along the length of baseboards with trimming on the "mustache"; fixing plinths to traffic jams. The plinth is fixed to the wall with nails driven into wooden corks. Slit baseboard is used in the case when the distance between the wall and the floor exceeds 15 mm. For a better fit to the wall in it, choose a groove 2 mm deep and 32 mm wide. The platbands framing the openings in the corners are joined by a “mustache” by trimming them. At the joints, the coupling should be tight, without gaps. With a transparent finish, the platbands before installation are picked up by texture. Platbands installed in the same room should have the same profile. Vertical and horizontal trim are installed at right angles. The correctness of their installation is checked by a plumb and a square. Install the trim, plinths in the room after plastering the walls and before the walls are covered with wallpaper. When fastening plinths and platbands with nails, the caps are sunk with a doboin box, and the cavity is patched to the ground. Mounted plinth, platband should be tightly adjacent to the surface. Wooden handrails are attached to the wooden railing with screws and nails, and to the metal railing with bolts with a recessed head. Recently used handrails made of polyvinyl chloride. 6. Installation of built-in wardrobes Built-in furniture (cabinets, mezzanines) are installed after laying the floor in the room, performing plastering and sanitary-technical works. Cabinets are assembled from prefabricated elements on the floor. They are attached to the floor, ceiling, walls with nails, screws and bolts. The elements of the cabinets are fixed to the walls with wooden plugs into which screws are screwed in or nails are hammered. The elements of the cabinets between each other are assembled with bolts or screws. The rigidity of the cabinet is provided by the strong connection of the walls with the door blocks, as well as with the lower and upper parts of the cabinet (entresols, etc.). Connect the elements of the cabinet on bolts or screws only after checking the correctness of the installation. Vertical installation check plumb and angle. In cabinets after installing them in place assemble shelves or rods for dresses. Types of connections of the elements of built-in cabinets are shown in Fig. 126 a B C. Cabinet elements adjacent to the floor, i.e. the bottom of the cabinet, covered with a plinth. Places of an adjoining of a cabinet to walls finish with laths or platbands. Depending on the size, the gaps between the ceiling and the top of the cabinet are covered with a rail or a special cornice. The shelf that separates the mezzanine door from the cupboard is attached tightly to the side walls of the cabinet, the rest of the shelves are made removable, and the shelves are put on underfloor bars, metal or plastic shelf holders. To facilitate cleaning the bottom of the cabinets make polik (Fig. 126, g). Doors of a case hang on pyatnikovy or card loops. Card loops protrude from the outside of the door; therefore, it is more expedient to use special loops (Fig. 126, d, e).  Fig. 126.The combination of elements of built-in furniture: a - the rear and side walls using a bar; b - side wall with door unit; in - a back wall with an intermediate wall; g - details of the lower part of the cabinet; d - loop; e - hinging the door; 1 - side wall; 2 - a screw; 3 - bar; 4 - rear wall of chipboard; 5 - bar door frame; 6 - door leaf; 7 - intermediate wall of solid wood-lacquered boards; 8 - polik (bottom) of plywood or hard fiberboard; 9 - floor boards; 10 - baseboard; 11 - loop card, console, chrome. For opening cupboard doors used handles. The cabinet doors are closed with valves consisting of an aluminum case and a latch mounted into it. To move the latch has a button. Doors are hung so that they are tightly covered and do not spring when opening and closing. Door leafs and other elements of the cabinet, covered with veneer of fine wood, lacquered, and if the cabinet elements are made of plywood, hard fibreboard or chipboard without cladding, they are painted with nitro enamel or oil paint to match the walls. In some residential buildings, the surfaces of the cabinets, facing the room, are plastered with the same wallpaper as the walls, and the inner surfaces are coated with linseed oil or with oil or enamel paints. At construction sites, it is necessary to produce elements of cabinets from particle boards 16 or 19 mm thick on site. In accordance with the working drawings, the sheet is used to dimension the cabinet elements - walls, doors, shelves, and then cut them with an electric power saw, hacksaw, etc. In those elements that require wooden edges to be installed on the edges, choose a groove on the plate's edge, which glue insert wood lining with a comb. The lining of the shield elements is made flush with the shield plane. FINISHING SURFACES OF CABLE-BUILDING PRODUCTS 1. Types of wood trim The joinery products are finished with paints and varnishes, protecting them from environmental exposure. Painted products have a good appearance, they are easier to keep clean, their durability increases. Types of finishes can be divided into the following main groups: transparent, opaque, imitation, etc. With a transparent finish, the surface of the wood is covered with colorless finishing materials that preserve or even more manifest the texture of the wood. Apply it to the decoration of furniture and high-quality building products: windows, doors, panels, made of wood of valuable breeds. A transparent finish is obtained by varnishing, polishing, waxing and coating with transparent films. When finishing with lacquering, varnishes are used, having in their composition film-forming substances in organic solvents, solvents, etc. Polyester, nitrocellulose and urea formaldehyde varnishes are used most often for wood finishing, less often oil and alcohol varnishes are used. Nitrocellulose varnishes dry well, give a transparent, elastic, durable and sufficiently weatherproof film, which is well polished. Urea-formaldehyde-based lacquers form a film with a shiny surface that is sufficiently transparent. The film formed by oil paints is elastic, durable, weatherproof, but not decorative enough; alcohol varnishes give a film with insufficient strength, weather resistance, low gloss. According to the degree of gloss, glossy, semi-gloss and matte coatings are distinguished. When waxing, i.e., applying a mixture of wax with volatile solvents (white spirit, turpentine) on the wood surface, a transparent film is also formed, which is formed by a thin layer of wax (volatile solvents evaporate during the drying process). The wax coating is usually applied on porous wood (oak, ash). The wax film is soft, so it is additionally covered with a layer of alcohol varnish. The wax coating has a matte finish. An opaque finish creates a film on the surface that covers the color and texture of the wood. Opaque finish is used in the manufacture of school, kitchen, medical, built-in and children's furniture, doors, windows. To obtain an opaque coating using oil, nitrocellulose, alkyd, perchlorovinyl, water-based paints and enamels. When painted with enamels with a high content of film-forming substances, glossy coatings are obtained, with a smaller amount - semi-glossy coatings, and when painted with oil paints - dull. Imitation finish improves the appearance of products made of wood, the texture of which does not have a beautiful pattern. The main methods of imitation finishing are deep dyeing, press-on texture paper with a pattern of fine wood, veneer, films, sheet plastic. Finishing the surface with an airbrushing method consists in applying paint with an airbrush gun creating a pattern (stencilled). Through airbrushing on the surface you can apply drawings with planar (ornaments) and three-dimensional image. Lamination is one of the types of imitation finishing and consists in lining chipboard or fibreboard with a paper impregnated with synthetic resins. When pressing paper-covered plates between metal pads at a pressure of 2.5–3 MPa and a temperature of 140–145 ° C, the plates produce a smooth and shiny surface. The performance qualities of lacquer coatings should have a number of physical and mechanical properties: wood adhesion, hardness, heat, light and water resistance. These properties are essential in the operating conditions of products. They are determined by the quality of paintwork materials, the conditions of their application, and the drying of coatings. Under the adhesion understand the adhesion strength of the paint coating with the wood surface, under the hardness - the resistance of the paint coating penetration of a more solid body. Water resistance - the ability of the coating to resist the effects of water on the surface of the product. It plays a very significant role in the operation of joinery (window blocks, exterior doors) in conditions of variable humidity. Paint coatings must be heat resistant, i.e. they must not collapse when heated by sunlight or other sources of heat. In addition, they must be elastic, since as the atmospheric conditions change, the paint-and-lacquer coatings dry out or swell, as a result of which cracks are formed, the coatings shrivel or peel off. 2. Preparation of surfaces of parts and products for finishing Carpenter training.Carpentry preparation includes embedding knots, cracks, removing dirt, cleaning the surface of wood and subsequent grinding. Knots and cracks close up manually or on machines. The cracks in the details are closed up, gluing in wooden inserts matched in size and rock, and cleaning the surfaces, and in the parts lined with veneer, gluing strips of the veneer of similar rock matched in color and texture. Small cracks grease and spat. The surface of the wood is cleaned with a sander. After sanding, the surface of the wood should be smooth, smooth and free from scoring, even in the places where the gravel is. Irregularities from the cleaned surface are removed by a manual cycle, which is a thin steel plate of a rectangular shape with a size of 150? 90? 0.7–0.8 mm. The cutting part of the cycle is ground at a right angle so that it forms two sharp rectangular edges. The cycle is held with both hands with a slope, at which it can cut, and somewhat obliquely, directing movement towards itself. In order that during the work of the cycle the fingers are less tired, it is recommended to use a bar, in the slot of which they insert a cycle. A good cycle should be thin, slightly elastic, firm, properly sharpened and pointed. The size and shape of the cycle should be such that it was comfortable to hold. When cleaning wood, the cycle usually does not cut it, but as it scrapes, that is, removes the top thin layer, leaving behind the smallest pile. When processing hardwood, this pile is small and has no practical value, and when processing softwood it is visible with the simple eye and noticeable to the touch, therefore, such breeds as aspen, linden, do not process but grind in cycles. Grinding smooths the surface, and also eliminates defects in color - craters, blisters, shagreens, waviness, raised hair, etc., obtained after applying the ground, putty, first coat of varnish or paint. It is possible to grind manually, with electric grinders or with belt grinding machines. Flat surfaces are polished with smooth and even wooden blocks, wrapped in sandpaper, from corner to corner and then along fibers. It is not recommended to grind across the fibers, because deep scratches form on the surface and are difficult to clean. The coatings are polished in a wet manner, using kerosene, turpentine, or dry to cool the surface to be ground, without the use of coolants. The surface of the wood is polished first with coarse-grained sandpaper, then medium-grained, and then fine-grained. It is necessary to grind effortlessly, since with strong pressure the quality of grinding deteriorates. Before the end of sanding, dust is removed from the wood surface with a cloth, and then moistened with water to raise the pile; The raised pile is easily removed by a sandpaper. A well-sanded surface should be smooth, clean and silky to the touch. Pastes, powders, and skins containing abrasives in the form of fine grains with sharp edges are used as grinding materials. Grinding powder - dry abrasive grains, not bound by binders. Grinding skins are a flexible base on which grinding grains are fixed with a binding material. Skins are produced on a fabric or paper basis in rolls and sheets. Sheet skins are used for manual grinding, rolled - for mechanized. Grinding skins are waterproof and non-waterproof; according to the type of abrasives used, corundum, electrocorundum, silicon carbide are distinguished. Depending on the type of sanding coating, skins of different grain sizes are used: coatings after local filling - 16, 20, 25; cover with a solid putty - 10, 12; primed coatings and the first layers of varnishes and enamels - 6, 8; final polishing of lacquer and enamel coating - 3. Finishing preparation.When preparing for a transparent finish, the surface of the wood should be thoroughly cleaned, sanded, degreased, bleached, primed. Removing the resin produced from coniferous wood, for which the surface of the wood is washed with a solvent (turpentine, benzene) or wiped with hot 5% sodium hydroxide solution; the resin on the surface is saponified, after which it is washed off with warm water or 2% soda solution. Bleaching eliminate stains translucent glue, traces of oil. Bleaching (with the exception of oak wood) is made with a 6–10% solution of oxalic acid, a 15% solution of hydrogen peroxide with the addition of a 2% solution of ammonia. The solution is applied to the wood surface with a brush or a brush. After 3–8 minutes, wash it off with warm water. Bleaching solutions are poisonous, so when working with them it is necessary to use glasses, rubber aprons and gloves. After bleaching, the surface of the wood is ground. Dyeing gives the wood the necessary tone or color and is also used to imitate the wood of low-value species for wood of valuable species. With a transparent wood finish dyeing should not change its natural color. Dyeing can be deep and superficial. With deep dyeing, all wood is impregnated, with a superficial impregnation depth of up to 2 mm. The most commonly used surface dyeing with water-soluble dyes. Surface dyeing is performed manually with a swab, dipping method, pneumatic spraying, roller method, etc. Hand paint small details with a tampon. The tampon is made of linen linen fabric that does not leave fibers on the wood surface. Horizontal surfaces are painted along the fibers in wide strips, and on vertical dye is applied from top to bottom. Dye is applied at a solution temperature of 40–50 ° C several times to obtain the desired color. The gap in time between each application of paint should not exceed 5 minutes. Excess paint applied is removed with a dry cloth. After the dye has completely dried (2 hours at a temperature of 18–20 ° C), the wood surface is rubbed along the fibers or polished with sandpaper. Paint by dipping method is applied in baths with a solution heated to 40–50 ° C. Pneumatic dyeing method used in the mass production of wood products. Dyeing can also be done by mordants, which are a solution of chromicum - ferrous sulfate, ferric chloride, copper sulfate (0.5–5%). The solution is prepared by dissolving the mordant in hot water, and then filtering it and cooling it. Apply the solution manually by dipping or spraying. To fill the pores and form a film that creates conditions for better adhesion of varnish to wood, the surfaces are primed. Priming is done under transparent and opaque coatings. Primer is a composition that forms the bottom layer of the coating. Primers consist of a solution of resins, nitrocellulose and plasticizers in a mixture of solvents. Parts and products, finished with acid hardening nitrolak, are primed with UkrNIIMOD-54 primer. The primer is a solution of carbamide and oxyterpene resins in solvents in addition to the adhesive solution and drying oil "Oksol". The hardener is an aqueous solution of oxalic acid. The surface of the wood after applying the emulsion primers GM-11, GM-12 does not require grinding. These primers do not lift the pile and exhibit a good texture of wood, applied with a swab and rollers. Thick soil is applied with a spatula, and liquid - with a tampon. When the swab is applied, the ground is rubbed into the surface of the wood, making circular motions. Excess soil is removed with a dry swab, moving it along the fibers. Parts made from wood of large-pore species are subjected to filling operation. The surface of the wood before applying the filler should be clean, even, without scratches, with a roughness of not more than 16 microns. The use of fillers reduces the consumption of varnish for wood coating. As porozapolniteli use special compositions KF-1, KS-2. Tinted porozapolnitel is used for finishing products faced with oak, ash, walnut, mahogany, urea-formaldehyde and semi-ester hot-hardening varnishes. Apply the composition with a tampon, foam sponge on flat-polishing machines. After application, the sealer is carefully rubbed with a tampon alternately along and across the wood fibers, after which the surface is wiped with a flannel cloth and then dried for 2 hours indoors at a temperature of 18–23 ° C. Also used composition in the form of mastic, which simultaneously primes and serves as a sealer under the transparent finish. Most often, wax paste is used for this purpose (1 part wax dissolved in 2 parts of turpentine or gasoline). Pasta cooked on gasoline dries faster (6–8 hours) than turpentine paste (20–24 hours), but it is more flammable. The paste is applied to the wood surface with a stiff hair brush in an even layer. When the surface after applying the paste is completely dry, it is rubbed with a brush with a stiff short and thick bristles, and then with a cloth until it becomes shiny. The surface covered with wax is finished with a transparent varnish. At some enterprises, waxing is replaced by polishing. Putty is used for opaque finishing of wood products. It is intended to level the surface and eliminate small cracks, dents. Putty is local and continuous. At local shpatlevaniye close up small defects; solid filling improves the appearance of finishing products. Fill primed and non-primed surfaces before coating them with paints or enamels. Depending on the film-forming substances of the putty, there are oil, glue, nitrolak, polyester, etc. The most often used are oil-glue putties, thick or liquid. Thick putty is prepared from a mixture of linseed oil (25%), chalk deposited (70%), glue 10–20% solution in an amount of 5%, liquid putty is prepared from the following mixture: 28% drying oil, 65% chalk and 7% glue 10 –20% solution. For filling joinery used quick-drying putty KM, consisting of the following components (in mass%): glue CMC (9%) - 18.5; casein glue (22%) - 1.9; SCS-30 latex - 3.9; laundry soap (10%) - 1; acidol - 2; chalk - 72.6; lime - 0.1. 3. Surface finishing of parts and products with paints and veneering The prepared wood surface is coated with varnishes, paints or enamels. Lacquer film gives the product a beautiful appearance and protects the surface from moisture. In the case of an opaque finish, wood is painted with oil paints — white and PF-14 enamels based on pentaphthalic resins. The minimum film thickness should be 50-70 microns. For dyeing used zinc white. The sequence of technological operations performed during the preparation of parts for painting with oil, enamel and synthetic paints of indoor surfaces is as follows: cleaning surfaces, cutting defects (knots, grinding) with jointing gaps, polishing (priming), partial lubrication with polishing of greased places, grinding greased places, the first paint, the second paint, and with a more high-quality paint - cleaning, cutting wood defects, profil (priming), partial lubrication with priolifka greased t, grinding grease places solid filler, sanding, priming, fleytsevanie, grinding, first coloration fleytsevanie, grinding, and the second coloration fleytsevanie or trimming. Carpentry interior and exterior painted with oil, enamel and epoxy paints. Interior joinery and built-in furniture are painted with PVA type polyvinyl acetate, oil and acrylic paints. Surfaces of parts and products, painted with oil, synthetic, enamel and lacquer formulations, must have the same texture - glossy or matte. Spots, patches, wrinkles, irregularities, traces of brushes, drips and translucent underlying layers of paint, non-coloring is not allowed. Manual application of paints and varnishes.Lacquers, paints, enamels are applied on narrow surfaces (edges) with handrails - short round bristle brushes of the type KR, on wide surfaces - by wide flat brushes or paint rollers. Instead of brushes, you can use brushes, as well as tampons. The varnish is applied to the dry surface of the wood, cleaned of dust, in uniform layers without drips, about 3–6 times. Each coat of varnish must be dried well before applying the next. The product is considered finished if its surface has the same and even gloss. High-quality products are finished by polishing, because the polished surface has a steady luster and a good look. Polishing is performed by manual and mechanized methods. For protection from contamination, drying and fire tampons are stored in a metal box. The mechanized drawing paints and varnishes.Spray paintwork materials by mechanical and pneumatic methods. The most widespread pneumatic spraying, in which under the action of compressed air paint materials are crushed and in the form of small particles are deposited on the painted product, spreading on its surface and forming a continuous coating. This method of wood finishing has some disadvantages: special chambers equipped with exhaust and cleaning devices are required for applying paint; when spraying up to 20–40% of the paint is lost to the formation of paint mist, which impairs sanitary working conditions. A more advanced method of finishing joinery is painting in a high voltage electric field, followed by drying in thermal-convection chambers. The essence of the painting process in the high voltage electric field is as follows: between the painted product having a positive charge and the sprayed particles of paints and varnishes having a negative charge, a constant high voltage electric field is created. Sprayed particles of paints and varnishes move along the power lines of the electric field and are deposited on the product. In fig. 127 shows a painting scheme for joinery in a high voltage electric field. Products are hung on the conveyor chain, with which they are fed into the normalization chamber to be coated with a special electrically conductive compound, then they are sent by the same conveyor to the painting chamber. After dyeing with enamels, the products enter the thermoradiation-convective drying chamber.  Fig. 127.Coloring scheme for joinery in a high-voltage electric field: 1 - the place of hanging products; 2 - the place of removal of products; 3 - conveyor chain; 4 - installation zone of electric heaters; 5 - zone of convective drying; 6 - asterisk; 7 - drying thermoradiation and convection chamber; 8 - electroloam chamber; 9 - camera normalization The quality of painting woodwork in an electric field is affected by the moisture content of the wood. So, when the humidity is below 8%, the color quality deteriorates. When painting joinery in an electric field of high voltage, almost all processes are automated, the loss of paints and varnishes is significantly reduced, sanitary and hygienic conditions for working in the workshop are improved, the areas for painting are reduced, and the quality of painting the surface is improved. Paints and varnishes are applied to the joinery also by the method of jet pouring. Products (windows, doors) are hung on an overhead conveyor, moving into a poured chamber, where paint or enamel is applied to the surface, flowing from nozzles under pressure up to 0.1 MPa in the form of a jet. After painting, the product enters the aging chamber in vapors of solvents. In addition to draining excess paint, this chamber distributes it evenly over the entire surface of the product. Excess paint flowing from the products comes to the collections in collections and, after filtration, into the pouring system. After soaking in the chamber, the products enter the convective multi-port drying chamber. The disadvantage of the spray-pouring method is the poor covering ability of the edges and a slightly increased paint consumption. Paintwork materials are applied on flat surfaces on rolling machines that are included in automatic lines, where they successively carry out the following operations: heating the door leaf, priming, drying, sanding, heating the canvas, varnishing, drying. Flat parts (shields, doors, plates) can be trimmed on a curtain-car (fig. 128). The main part of the machine is the filling head. The process of applying paintwork materials in bulk is that the parts laid on the conveyor are fed under the filling head, from which the paintwork material flows down as a continuous curtain and covers the parts evenly across the entire width with the same thickness of paint and varnish. Compared with pneumatic spraying, the loss of paints and varnishes are reduced and the sanitary conditions of work in the workshop are improved when pouring.  Fig. 128Scheme of the filling machine: 1 - detail; 2 - screen; 3 - drain dam; 4 - collector; 5 - partition; 6 - filter; 7 - coating; 8 - conveyor; 9 - tray Drying paint coatings.After applying the paint coatings, the products are dried in drying chambers, which, depending on the design, are subdivided into convective, thermoradiation, thermoradiation and convection. Cameras can be pass-through or dead-end. The drying time of paints and varnishes depends on the type of paint, layer thickness and temperature of the medium in which the coating dries. It is possible to accelerate the drying of the paintwork in three ways: by accumulating heat in the wood (preheating the wood), convective and thermoradiation. The process of heat accumulation is as follows: the surface of the product is preheated to a temperature of 100–105 ° C before painting, then painted and fed to another chamber for drying. Since the product was preheated, when passing through the second chamber, the solvents quickly evaporate and the surface dries out. This method is especially effective when finishing with quick-drying paints and varnishes: the drying time of the coating and the consumption of solvents are reduced. In convective drying, heat is transferred from the source to the painted surface with air heated to 40–60 ° C. Due to the low calorific value of air, the heat from the painted surface is transferred slowly, therefore, the surfaces of the products also dry slowly. A more rational is a thermoradiation method of drying paint coatings, which accelerates the drying process itself and requires smaller chambers. The drying process is reduced by absorbing the painted surface of infrared rays emitted by heated tubular heaters. The surface of the painted products, absorbing infrared rays, heats up, starting from the bottom of the paintwork, which allows free evaporation of the heated solvents. Vaporizing and passing through the paint layer, the solvents simultaneously heat it, which causes intense heating of the entire paint layer and significantly speeds up the drying. For laminating walls and partitions, paper-laminate is used - sheet material obtained by pressing at high pressure special papers that are impregnated with carbamide or phenol-formaldehyde resins. Laminated plastic comes in a different color with a glossy or polished surface. It is rather strong, water-resistant, durable, easy to clean. Plastic with a thickness of 1–1.6 mm is attached to the surface on mastics (KN-2, KN-3), and with a thickness of 2–3 mm - layouts attached to a wooden frame. To trim the surface of the walls, partitions with plastic sheets start from the bottom row from the corner of the room. Sheets are joined together in both vertical and horizontal directions. Before starting work, sheets are cut to size, edge edges are checked, and edge matching is checked. Mastic is applied on the back side of the sheet in a uniform layer no more than 1 mm thick. With a smeared side, gently, without displacement and skewing, a sheet is applied to the wall surface, after which it is rubbed evenly, first in the middle of the sheet, and then alternately left and right, up and down. Excess mastic, dirt is removed with a swab dipped in acetone. Rust (gap in the wall) 5 mm wide is left between the sheets. The position of the sheets until the mastic is set is fixed by inventory pressing devices. The seams between the sheets are painted with water-based paints or glued on the mastic KN-2 polyvinyl chloride base film. For fixing plastic sheets instead of mastic you can use wooden, polyvinyl chloride and metal layouts. At the same time, wall cladding starts from the corner of the room, attaching vertical angular and horizontal layouts, calibrate their position according to the plumb and level, then install the first sheet and put the second layout, etc. Fix the position of plastic sheets on the surface of the wall, partitions before fixing the layouts with nails, driven into the pre-drilled holes. As the sheets are fastened, the nails are pulled out. Layouts set so that they cover the holes from the nails. Layouts are fastened to the walls with screws with a pitch of 150–200 mm, for which, in sheets of plastic, markup holes are drilled with a diameter slightly larger than the diameter of the screw. After cladding on the surface of the paper-laminate plastic, stains, drips of mastic, scratches, voids between the plastic and the wall, partition, sheet expansion, etc., are not allowed. 4. Mechanization of finishing joinery and built-in furniture For finishing wooden parts and products of built-in furniture, a number of flow-mechanized and automated lines has been created. The lines are designed to prepare parts for varnishing and beating, as well as painting. The line of painting door panels, including for built-in furniture, by the rolling method consists of a mechanism for applying paint and a drying chamber. They work on the line as follows: the door leaf is conveyed by a conveyor under a tank from which paint flows out in a continuous stream, leveled with three foam rollers. Mechanism rollers and tank continuously move across the door leaf, rubbing evenly on the surface of the door applied paint. The edges of the door are painted with two vertical rollers. After the first layer is coated with paint, the door leaf enters the convection drying chamber, where the coating dries for 4 minutes at a temperature of 60–80 ° C. Then the canvas is turned over (turned over), and the other plane of the door is painted in the same way. On the line painted door size 2000? 800? 40 mm. Doors lined with fine wood, varnished on mechanized lines. The door leaf from the table is fed into a thermo-radiation chamber equipped with electric heaters (heating elements) with a temperature of 410 ° C. The door leaf passes through the chamber for 64 s, while its surface is heated to a temperature of 105 ° C. After warming up, the web is fed for priming the planes and edges to the machines and edge-cutting machine. Soil on the plane of the door leaf in the machine is applied with two rollers, covered with grooved rubber, and on the edges - with spray guns. The door leaf, covered with a pound, enters the drying chamber, which is equipped with a deflector. Due to the fact that the door leaf was preheated, the solvents evaporate faster when passing through the chamber. Then the cloth moves for grinding at first one plane in the first grinding machine supplied with a cylindrical brush. The door leaf, ground on one side with a pivoting device (tilter), turns over to the other side and is fed to the other two-cylinder grinding machine for grinding another plane. The door leaf, ground on both sides, is fed to the second thermo-radiation chamber, where it is reheated for 30 s. In this chamber, electric heaters have a temperature of 320 ° C. Heated canvas for varnishing both planes and edges enters the machine, after which it is transferred to the drying chamber. The finished canvas roller conveyor is transferred to the place of installation of devices. The following operations are performed on the finishing line of the OK515 valves: filling of defective places, drying of putties, grinding of filled places, applying the first layer of enamel, drying the applied layer of enamel, applying the second layer of enamel, drying the second layer of enamel, cooling the enamel. The line consists of a conveyor for filling the shutters of the overhead conveyor, drying chambers, two spray dressing plants, three lifting tables, two sash conveyors (left and right), eight pneumatic polishing machines, eight grinding heads. On the line, products are painted with a height of up to 220 cm, a width of up to 200 cm, and a thickness of up to 40 cm. The temperature in the drying chambers is 60–80 ° C. LAYING OF FLOOR LINOLEUM AND SYNTHETIC TILES 1. Materials for flooring Linoleum, tiles.Apply synthetic rolled and tiled materials to a covering of floors. As a roll coating, mainly linoleum is used, which is wear-resistant and has sufficient chemical resistance. Linoleum, depending on the type of binder, is available in the following types: polyvinyl chloride, alkyd, rubber, etc. In addition, linoleum can be on the heat insulating base and without it. Polyvinyl chloride multi-layered linoleum and single-layer without a basement are produced in three types: MP - multi-layered with a face layer of transparent polyvinyl chloride film with a printed pattern; M - multi-layered monochrome or marble; O - single layer monochromatic or marblelike. Linoleum is produced in rolls with a cloth length of at least 12 m, a width of 1200–2400 mm, and a thickness of 1.5 and 1.8 mm. It is used to cover floors in residential, public and industrial buildings, except for premises with heavy traffic. Depending on the structure and type of the front surface, PVC polyvinyl chloride linoleum is produced in five types: A - multi-bar duplicated with a face layer of transparent polyvinyl chloride film with a printed pattern; B - multi-bar with a printed pattern, protected by a transparent PVC layer; B - multi-bar one-color; G - multi-bar two-color; D - single-line one-color or marble-like. The length of the roll of linoleum must be at least 12 m, width 1350–2000 mm, thickness 1.6 and 2 mm for types A, B, C and 2 mm - for types G, D. It is used for flooring in residential, public and public areas industrial buildings without heavy traffic and without exposure to fats, oils, water. Depending on the production methods and the structure of the upper layer, polyvinyl chloride linoleum on a heat and sound insulating base is produced of five types: PR - promase; VK - roll-calender; VKP - roller-calender with a transparent facial polyvinyl chloride film; EK - extrusion; EKP - extrusion with a transparent facial polyvinyl chloride film. Linoleum is produced in rolls with a length of 12 m, a width of 1350–1800 mm, a sheath with a thickness of at least 3.6 mm. Intends for the device of floors in rooms of residential buildings. Alkyd linoleum is produced in two grades: A and B, distinguished by physical and mechanical properties, 2.5; 3; 4 and 5 mm, length 15–30 m, width 2 m. They are used to cover the floors of residential, public and industrial buildings that are not exposed to abrasive materials, acids, alkalis and solvents. Linoleum grade B with a thickness of 2.5 and 3 mm can not be used for flooring of public and industrial buildings with heavy traffic. Rubber linoleum (relin) produced the following types: A, B, C (antistatic). Type A linoleum is designed to cover floors in residential and industrial buildings; Type B - for the same premises, but equipped with forced ventilation; B - for flooring in special laboratories and surgical operating rooms. During transportation and storage of linoleum protect from damage, moisture and pollution. Rolls set in one row vertically. PVC tiles are available in two types: square and trapezoid. Square tiles are manufactured in sizes of 300 × 300 mm, thickness 1.5; 2 and 2.5 mm, trapezoidal tiles have dimensions shown in Fig. 129. Tiles are single- and multi-colored with a smooth and embossed front surface. On the front surface of the tiles should not be sagging, dents, scratches, shells, bumps, etc. Monochrome tiles should have a uniform color-resistant color throughout the area. Adhesives, mastics and primers.When veneering with synthetic materials, rubber mastics KN-2 and KN-3 are used from yellowish-brown to dark gray color, which are prepared from the following components (%): inden-coumarone resin - 10, rubber-naite - 25, kaolin filler - 25 and solvent - 40. As a solvent, apply in equal parts gasoline "Galosh" and ethyl acetate. The finished mastic is packaged in metal cans with a capacity of 1–10 kg. Apply mastic KN-2 for sticking rubber linoleum, the device underlying layers of concrete and fiberboard. Mastic KN-3 is similar in composition to mastic KN-2, but contains a smaller amount of nairite, and, besides kaolin, it contains chalk. Used for gluing polyvinyl chloride linoleum and tiles, as well as rubber linoleum.  Fig. 129.Polyvinyl chloride floor tiles (trapezoidal) Caseinolate mastic is used for gluing linoleum and fibreboard. Consists (parts by weight) of latex SKS-ZO SHR - 0.8, dry casein OB - 0.04; water - 0.16. Prepare the mastic as follows: water is poured into the DV-80 dispersant, casein is poured and the mixture is stirred for 2 minutes, after which the latex is poured and the mixture is stirred for 1 minute. The mass after mixing should be in the form of liquid sour cream. After 24 h, the mastic thickens, its validity period is 7 days. Mastic is applied to the base and back of linoleum with a notched trowel, after which it is held for 15 minutes, then the cloth is glued to the base and rubbed. The seams between the sheets of linoleum are pressed with slats, which are removed after the mastic has dried. Bituminous mastics are cold and hot. They are used for gluing on the base of fibreboard. Mastics are manufactured centrally, they come into construction in finished form. Cold bitumen mastic can also be prepared on construction sites with the following composition (% by weight): bitumen of grade BN 70/30 - 48, slaked lime - 12, asbestos powdered - 8, solvent - 32. Lime and asbestos are fillers. Mastic "Perminid" consists of (parts by weight): from resin PVC-LF - 18, divinyl-styrene rubber DST-30 - 5, resin octofor - 2.5, ethyl acetate - 58, pine rosin - 2.5, kaolin - 14. Primers are used to improve the penetration of paints and varnishes (adhesion) to the underlying layer and, in addition, to create a waterproof film that prevents the penetration of moisture from the base. At the construction site, the primer is usually prepared according to the following recipe (parts by weight): bitumen grade BN 70/30 - 1, gasoline or kerosene - 2-3. Gasoline or kerosene is poured into molten and dehydrated and then bitumen cooled to 80 ° C and stirred until a homogeneous mixture is formed. The primer is applied to the base 18–48 hours before sticking linoleum or tiles. At flooring of PVC linoleum based teplozvukoizoliruyuschey following adhesives (mastic) is used: bustilat polyvinyl acetate, shellac mastic adhesive, for floors polyvinylchloride linoleum tissue underlying cause - the same adhesives and, moreover, a synthetic bitumen mastic "Perminid". Baseless polyvinylchloride linoleum and tiles are fixed to the base on Perminid, synthetic bitumen, KN-2 and KN-3 mastic, rubber linoleum on KN-2 and KNN-3 mastic. 2. Bases for laying linoleum and tiles In order to cover the linoleum and tiles were of high quality and have a good appearance, you need to make a hard base - smooth, durable and without cracks. Due to the elasticity of linoleum when laying it on uneven foundations with hollows or mounds, the coating is uneven. The evenness of the coating is achieved by arranging cement-sand, light concrete and other screeds. Floor structures of linoleum and tiles when laying them on different bases are shown in Fig. 130. Of great importance when laying linoleum and tiles has a moisture basis. When humidity is more than 89%, tiles do not stick well. High-quality coatings are obtained after drying the grounds - cement-sand, light concrete and concrete screeds for 28–42 days. Boarding is used as a base. Linoleum or tiles are best laid on them about a year after the acceptance of the building into operation. The screed forms a dense surface along non-rigid or porous floor elements, and also aligns the underlying floor element. Monolithic cement-sand screeds are made from solutions of grade 150 and higher. The thickness of the screeds, depending on the underlying layer, ranges from 20–50 mm. In the case when linoleum is put on the mastic on the mastic, it is primed with a bituminous primer. To avoid cracking within 7–10 days, the screed should be systematically moistened and sprinkled with wet sawdust. Flatness screed check level and rail. In addition to monolithic, prefabricated cement-sand screeds of slabs 0.5–0.5 m in size and 35 mm thick are used, which are connected to trapezoid grooves and ridges. Sometimes polymer mortar is used to level the surface of the screeds, consisting of a cement-sand mortar with a PVA polyvinyl acetate dispersion with a thickness of 8–10 mm.  Fig. 130.Floors of linoleum and polymer tiles: 1 - coating (linoleum, tiles); 2 - mastic; 3 - screed of lightweight concrete or fibreboard; 4 - concrete underlayment; 5 - base soil; 6 - heat and sound insulation layer; 7 - cement-sand screed; 8 - floor slab with an uneven surface; 9 - floor slab. The solution is prepared at a construction site from a dry mixture (cement and sand) into which a polyvinyl acetate dispersion is introduced in an amount of 5% by weight of the dry mixture. Before applying the solution, the coupler is cleaned of sagging, dirt and dust. Solid fibreboard, which is attached to the base on bitumen mastic, is also used for screeding devices. The found unevenness of the base is eliminated by scrapers or grinding machines. Joints of fiberboard are glued along the entire length with thick paper strips 40–60 mm wide. Potholes close up with gypsum cement solution, and small ones are covered with putty. Clear the basis of dust, small garbage by means of damp sawdust. The humidity of the base should not exceed 6%. The plank base should also have a flat, non-sagging surface. The knots in the boards are plugged with glue. Boards with rot and worn replace new ones. Renovated wooden floor planed to obtain a flat surface. 3. Laying linoleum Polyvinyl chloride linoleum is laid in the following sequence: marking, drilling holes in the walls and installing corks in them for fixing baseboards, cleaning and leveling the surface of bases, embedding individual base defects with polymer cement composition, priming the base, laying fibreboard on mastic, clearing the seams between the plates with removal bitumen and filling them with polymer-cement composition, layout and exposure of cut linoleum, partial trimming of linoleum along the contour, drawing on the base of m astika and gluing carpet, rolling linoleum, trimming and gluing linoleum in the joints, installing baseboards, covering the floor with sawdust. The procedure for laying linoleum is shown in Fig. 131  Fig. 131Laying linoleum: a - cutting and layout of linoleum panels; b - mixing the mastic with an oar; in - cutting and gluing linoleum; d - rolling. Linoleum can be laid dry and on mastic. Usually, the linoleum cloths, prepared for the size of the room in a centralized manner in the workshops, are laid out on a dry and clean base and kept free for three days at a temperature not lower than 10–15 ° C, and the convex or curved parts of linoleum are loaded with a load ( sand) to their full alignment. After that, linoleum with a metal ruler and a knife is cut to the walls, partitions. Linoleum carpets are prepared in a room with a temperature of at least 15 ° C, and at floor level not lower than 10 ° C in the following order: sheets of linoleum are cut, edges of joined panels are welded. Linoleum is welded by means of Pilad-220M or CO-104. After welding, the carpet is transferred to the staging area. When entering the construction of linoleum in rolls, it is cut out only after it has been lying down for 2–3 days in a warm room. At the same time, it acquires elasticity, rolls well and does not break. It is necessary to roll the roll carefully so that there are no breaks, after which the knife is cut to the right length with a knife, taking into account the allowance for shrinkage (2–5 cm for lengths up to 6 m and 2–5 cm for lengths over 10 m). The width of the roll is cut out in such a way that the edges of adjacent panels have an overlap of 1.5–2 cm. The tool for laying linoleum is shown in fig. 132. Linoleum sheets for trimming and fitting are placed close to the walls and cut into place. The fit should be without gaps, especially in places where the cloth has a non-closing joint (at the doorways and among themselves). When cutting should be as little waste as possible. In the case when the width of the room is not a multiple of the width of the linoleum, the necessary piece is cut from the outermost cloth, and the remainder is used for laying in another place. Linoleum, stacked in hard to reach places, cut out on templates, cut out of cardboard and fitted in place. Raskalennye cloth rolled out and maintained before sticking for at least two days.  Fig. 132.Tools for laying linoleum: a - metal hammer; b - steel spatula; in - linoleum roller; G - linoleum knife; d - linoleum knife with replaceable blades; e - a device for trimming the edges of linoleum; W - large notched trowel; h - small notched trowel; and - rubber mallet. Linoleum can be laid indoors only at the end of all construction, installation and finishing works. The temperature in the room should not be lower than 15 ° C, and the relative humidity of the air should not exceed 70%. The linoleum cloth laid on the base is bent to the middle with the back side up, then the mastic is applied with a spatula onto a dry, dust-free base, leaving strips 100 mm wide at the junction of the cloth unopened. A thin layer of mastic smears the back side of the cloth, after which the bent and spread part of the cloth is glued to the prepared base. Then paste the second half of the cloth and edges. After laying the panels on the base, the surface is rolled using a vibratory roller (CO-153) to evenly distribute the mastic and increase the bonding strength. Glued linoleum has no hermetic joints. Sealing is achieved by welding. Plasticized linoleums with a low content of filler (polyvinyl chloride) can be welded. The thickness of the adhesive layer should not exceed 0.8 mm. You can glue the linoleum in another way. To do this, the cloth is rolled up to the middle of the room, face down, then mastic is applied to the base, after which the linoleum is pasted, rolling the roll. The glued panel is rolled down by a vibratory roller. When trimming edges, adjacent sheets should overlap one another by 1.5–2 cm. When gluing linoleum on KN-2 mastic (fast-hardening), the edge is cut simultaneously with laying linoleum, and when bitumen mastics (drying slowly) are used, in 2–3 days . The edges of the panels should closely adjoin one another and form an inconspicuous seam. On the edges laid overlapped, the joint is cut along the ruler with a sharp knife (Fig. 133) (both panels at the same time). After trimming, carefully raise the edges, clean the back of the panels and the base under them and apply mastic, after which the edges are pressed to the base and carefully rolled down with a roller.  Fig. 133. Trimming the linoleum joint: 1 - base; 2 - linoleum; 3 - a knife; 4 - metal ruler; 5 - mastic Polyvinyl chloride linoleum on the heat and sound insulating basis is kept indoors at room temperature for a day. Then it is rolled over the base and kept in this state for 48 hours, after which it is cut along the perimeter. The carpet trimmed to size is smoothed from the middle to the edges and fixed around the perimeter with the plinth so that the lower plane of the plinth presses it to the base, but at the same time it does not interfere with its mobility as the temperature changes. The plinth is fixed to the walls, partitions. The most common defects in coatings are blistering, blistering, waviness, cracks, edge lag, and wear of individual sections. Bubbles appear in cases where the thickness of the mastic exceeds 2 mm (dries slowly) or less than 0.5 mm. Bloating may occur as a result of poor smoothing (stitching) of linoleum. Remove bloating by puncture with his awl (release air), after which this place is smoothed with a hot iron and put a load on it. You can inject into the punctured place with a syringe hot mastic, then smooth out. If the entire surface of the linoleum is expanded, the coating is replaced. Waviness is removed in the same way as bloating. The deviation of the surface of the coating from the plane when tested with a two-meter control rod should not exceed 2 mm. Lifts between adjacent sheets are not allowed. The cracks are formed due to the fact that the linoleum before gluing was not kept in a warm room and shrunk. Edges come off because mastic was applied to a wet or dirty substrate. To eliminate this defect, the base is cleaned of dust and dried well, more waterproof mastic is applied and the edges are pressed tightly. Heavily worn areas gently cut and clean the base of the old mastic. A new piece of linoleum, similar in color to the old one, is put on the cut out place. At one end, the insert is baited with small nails, and on the other, two layers of linoleum are cut - new and old. Thus, the insert is cut from all sides. After trimming, the base is spread with mastic, put the insert, smooth it and cover it with a sheet of plywood on which the load is placed. When laying linoleum on mastic, it is necessary to strictly observe fire safety measures: it is forbidden to heat mastic on fire, use open fire, store mastic in a closed container. 4. The device of floors from synthetic tiles Coating of synthetic tiles is done in the following technological order: cleaning and leveling the surface of the base, priming the surface of the base, sorting the tiles by size and selecting them by color, exchanging and breaking the axes of the floor of the room according to the cord, setting the tiles without sticking to the pattern places of junction with walls, partitions, etc., heated tiles, applying mastic with a thickness of 0.8–1 mm with leveling it with a notched trowel, laying tiles on mastic with sealing the ends with rubber milk com, setting of plinths, cleaning cloth dampened with a solvent, places the projecting mastic, sawdust floor covering, tiles heated only in winter time when the room temperature is below 10 ° C and for laying them on a fast-hardening mastic. The coupler is cleaned with a metal scraper on a long handle, and the dust is removed with a vacuum cleaner of an industrial type. Troughs, irregularities on the coupler are eliminated by lubricating it with polymer cement composition with a spatula. The installation procedure is shown in fig. 134.  Fig. 134.The order of laying tiles: a - toe, sorting and layout of tiles in the foot; b - application to the mastic base; in - the beginning of laying tiles; g, d, e - laying tiles  Fig. 135. Tile laying options The floors of colored polyvinyl chloride tiles with a smooth or embossed surface are laid according to a given pattern (Fig. 135) on a dry primed base. The grounds of small rooms are ground with a fly brush, and for rooms of more than 500 cm 2, with a spray-rod from a pressure tank with compressed air. Tiles are brought into the room and maintained so that they acquire room temperature. After the primer layer dries, a longitudinal and transverse axes of the premises are marked on it with a cord. From the point of their intersection, two rows of tiles are laid perpendicular to each other, applying their edges to the axes (cords) and trying to lay an integer number of tiles along the length and width. If the integer number of tiles does not fit, the axes shift or trim the outermost tiles in a row by one size. The tiles are laid parallel to the walls of the room, starting from the middle, since when the axes are broken down, their intersection point is in the middle of the room. When laying tiles at an angle of 45 °, i.e. in an unfolded way, the edges of the tiles are parallel to the diagonals of the room. With a diagonal arrangement of tiles along the perimeter of the walls, a frieze is made, the width of which should be such that the main field of the frieze along the entire perimeter has halves of tiles of the same color. To clarify the correctness of the breakdown of the floor pattern, you need to dry before sticking tiles. To do this, first put four tiles at the intersection of the axes, i.e. up, down, right and left from the center of the axes. After that, the tiles are laid alternately close to one another on either side of the previously laid four tiles along the length and width of the room; if the integer number of tiles does not fit, shift the axis. Tiles stick in two ways: on yourself and on your own. When laying on himself, the worker, as sticking tiles, moves and is always on an uncovered base; when laying from himself the worker moves forward on the finished coating. When gluing polyvinyl chloride tiles, the mastic is applied on the base or on the tiles. KN-2 quick hardening mastic is applied on the base (up to 2–3 m 2 area, after which the tiles are carefully laid, observing the flatness of the laying and picking, as well as observing the allowable gaps. Mastic is poured from the bucket and leveled on the base evenly with a notched trowel. The thickness of the adhesive layer should not exceed 0.8 mm. The worker with his left hand takes the tile and, holding it with both hands on the side edges, puts it neatly on the base to the cord or close to the previously laid tiles on the mastic and tightly presses it to the base. For full sticking of a tile to the basis of its knock with a rubber hammer. Surplus mastic, protruding from the seams, remove rags dipped in solvent, which is prepared mastic. After gluing the tiles can not walk for three days. The main defects of tile coatings are: peeling of tiles, warping of edges, gaps in joints. Gluing the tiles occurs because they were glued to a dusty or damp base. When repairing, raise the tile, clean the base of the old mastic, dust, and if it is wet, it is dried, after which a new mastic is applied to this place and the tile is glued. In the case of peeling edges or corners, put thick paper or thin cardboard on the tile, smooth it with a hot iron, and then press it down with a load. Worn tiles are replaced with new ones as follows. Remove the defective tile, clean the base of the old mastic, customize the new tile under the old place and put it on the mastic, then for a few hours put the load on the tile. Ledges between adjacent tiles are not allowed. Due to the fact that mastic has in its composition harmful solvents, the premises in which the floors are laid, should be well ventilated. Hot bitumen to the place of installation should be brought in a closed container with a filling volume of not more than 75%. Mastic is allowed to be heated only in hot water. It is not allowed to use fire in places where mastic is stored and when laying floors. Smoking indoors when laying floors is prohibited. Linoleum floors should be washed with warm and clean water, and in case of heavy pollution - with warm and slightly soapy water. It is undesirable to wash floors with soda, as linoleum loses shine and fades from soda. Dirty stains that are not removable with hot water are removed with turpentine or chalk powder. On the surface of linoleum matte spots disappear after rubbing it with turpentine mastic. REPAIR OF COOL-BUILDING PRODUCTS AND CONSTRUCTIONS Repair of window blocks.Coniferous wood is used to repair window blocks with moisture for sashes, transoms, and vents 9 ± 3%, and for boxes - 12 ± 3%. In the window blocks, for the most part, the bars of the boxes and the individual bars of the flaps, air vents and less often the flaps as a whole fail. The individual bars of the boxes are replaced with new ones, made exactly according to the profile and size of the replaced bars. To replace the box bar (Fig. 136, but) remove the sash from the hinges, and then remove the box from the opening. After replacing the bar, the box around the perimeter is antiseptic and wrapped with tar, after which it is re-inserted into the opening, fixed to the wall and caulk gaps. In separate boxes and bars, instead of the damaged places, they are inserted with glue seals, glue seals are also put in places where hinges are inserted. If the bar in the casement is damaged entirely, it is replaced with a new one (Fig. 136, b), and if only a part of the bar is damaged, then only this part is replaced. A new piece of bar is connected with the remaining part of the bar with spikes and glue. When the flap is misaligned and the corner joints are weakened, the flap is straightened and squares are installed in the corners (Fig. 136, at) on the screws. The failed ebbs do not repair, but replace with new ones (Fig. 136, g), installing them instead of old ones with glue and screws or nails, having previously cleaned the installation site of the old glue. In the boxes of the boxes, the rotten part is replaced with a new one with a spike joint or a quarter with glue attachment. In the windowsill boards, repairs are made by inserting a lath on glue (Fig. 136, d). Door repair.In panel doors, the lining is peeled off during operation and the lining is cracked at the hinge attachment points. In places where the lining has come off, it is lifted and cleaned of the old glue. Then this place is smeared with glue and the lining is temporarily attached with nails or bars. After the glue has set, the nails or bars are removed. In places where hinges are fastened in the door trim, an unusable part is cut out and a new insert is put on the glue. Before full setting, the insert is fixed to the canvas with a clamp or nails.  Fig. 136.Repair of bindings, boxes, window sills: a - repair of the box - replacement of the lower part of the vertical bar; b - repair of the lower part of the sash, replacement of bars; в - fastening of corners with squares; g - replacement of reflux on the outer sash; d - repair of a window sill by inserting a lath on glue. |

Popular:
New
- Markup definition. Planar marking. Types of markup. Questions for self-test
- Pipe bending machines Various variations of pipe bending machine
- Safety during filing
- What should be the sharpening angle of the scriber
- Drawing on preparation of contours of future product
- Modern ways of cutting metal and its defects
- Kerner - so that the drill does not slip off!
- Objects of inanimate nature Examples of the influence of inanimate nature factors on plants
- Finishing joinery
- Block breakdown in AutoCAD - simple and effective teams from practitioners