Site sections
Editor's Choice:
- Expansion joints in buildings
- Chaber - what is it and its purpose
- Sharpening wood cutters: manual work, using grinding wheels and a grinding machine
- Belts and sandriks, crackers and volutes - secret codes of architecture on the example of the old Saratov Sandriks in architecture
- Surface grit - tooling work
- Maximum load on the balcony slab: how much can a balcony withstand in a panel house?
- Projects: symbols on drawings for water supply and sewage
- Marking and marking details How to mark the details with curved contours
- Tools for slotting Tools for slotting
- Tools for chiseling Slotting tools
Advertising
| How to connect two galvanized sheet. Seam connections. Docking Sheets |
|
A seam joint is a one-piece, but not rigid, end-to-end junction of thin metal sheets. The word "fold" comes from the German "Falz" and translates as "groove, groove." The most common this type of compound received in the roofing business. The fact is that when joining sheets of metal, it is necessary to solve problems related to their thermal expansion. A change in the geometric dimensions at temperature drops does not allow a rigid, tight joint to be realized. At the junction there is a stress of the material, leading to a significant deformation. That is why the best way to pair the fold connection is. When folding, two roofing elements are jointed, the edges of which are pre-processed so that, when they are mixed, a fixing seam can be obtained (Fig. 1). Seam seams are of three types:
Structurally, the seams are divided into two groups:
When connecting the end edges of the roofing sheets that run across the ramp, a recumbent fold is used (Fig. 2), and for the side edges that are directed parallel to the roof slope, it is standing. Lying folds are not considered to be completely reliable, therefore they are used less and less. In addition, the rolled roofing material can be cut to the entire length of the slope, which eliminates the need for cross-connection. But, since this type of fold has not completely outlived itself, we will consider its design features. The folding edge of the recumbent type is made as follows (Fig. 3): a) put the canvas on the edge of the marking table, upholstered on the ends of the corner. Then put a line along the limb of the roofing sheet. The width of the limb depends on the thickness of the sheet - the thinner the tin, the smaller the limb; b) with a wooden mallet or rubber hammer perform a neat limb; c) necessarily provide perpendicularity of the limb; e) the edges of the two webs are joined into a lock, which is pressed against the mallet; e) by means of a hammer and a bar of metal cut the upper fabric so as not to hush the seam. Standing rebateSingleThis type of fold is characterized by the simplest design. It is used on roofs with a large slope (at least 10 °). The procedure for installing a single standing seam: 1) on the side of the smaller edge tightly press the scraper to the high edge. Adjust the height of the scraper to match the smaller edge. Bend the high edge to the surface of the scraper with a mallet. Remove the combbib. 2) close the low limb fold high. 3) to press the fold with the help of a hammer and comb-bending bar, which is pressed tightly against the back side of the folded joint (Fig. 4). DoubleCompared to single seam, double seam is more reliable. Making it manually can be difficult, but if you use special tools, for example, seamers (Fig. 5), you can do the job well. It also greatly facilitates the work of bending machines, with which you can quickly and easily bend the edge to give it the desired profile. Double standing seam - this is the most used method for joining two adjacent canvases of the roof. A folding roof is one of the most common types of roofing. The manufacture of this folded joint begins with the creation of an angled standing seam, after which it is bent down by 90 °. To compensate for thermal deformations at the base of the folded structure, a gap of 3 to 5 mm is left. Since in order to obtain a double profile, it is necessary to increase the number of working operations, then, accordingly, the installation time of the roof covering increases. But these inconveniences are fully compensated for by the reliability of a thoroughly closed rebate, because it ensures the tight integrity of your roof during precipitation.
RackThis type of joining of roofing sheets is more characteristic of European housing construction, although, recently, the rack flange (Fig. 6) is gaining popularity among Russian roofers. Rack seam in its essence resembles a double vertical, but, by contrast, has a wider joint edge due to the use of a wooden bar. The folded parts of the roofing sheets are raised on the sides of the bar and fastened either here (the Belgian version) or on the surface of the bar (the German version). The peculiarity of the use of such a folded joint is that it can only be used on roofs with a slope of more than 3 °, otherwise water accumulated on the surface will penetrate into the roof structures. AngularDue to the volume and shadow cast by it, this folded joint looks quite elegant, which is why it is traditionally used for finishing large and well-viewed surfaces. It is typical for mounting roofs with a large slope. Fixation of the fold occurs in just one action. The design feature of the corner seam does not give rise to stress in the metal, which means that deformations of the roof surface are minimized. Russian specialists have developed a unique seam fastening pattern - a self-snapping fold (Fig. 7). This invention surpasses all foreign analogues in manufacturability. The use of "latch" saves the time of installation of the roof and does not need special folding equipment. On the roof of the canvas there are two figured profiles, made in such a way that one of them acts as the base of the latch, and the second plays the role of its cover. The profile with the latch cover of one web snaps onto the base profile of the other web by simply pressing from the top. Thus, a durable and reliable seam lock is formed. On the locking system locks you spend just a few seconds. And this means a noticeable reduction in the time required for the installation of the entire roof. The advantages of the fold - "latches" include:
The faltsevy roof is incredibly popular in low construction. It is recognized at the same time as a simple, reliable and high-quality construction. An important role is played by an affordable price. If you are the owner of a private house - perhaps it was your choice. We will be grateful for your story about how you covered the roof, and what type of flange connections were used during its installation. TO category: Mednichko-tinny works Folding and Seaming Wire Types of seam seams Fold is the bending of sheet material with the purpose of its connection; the connection itself (lock) - folding seam. Different types of seam and seam seams are shown in Figure 8. Seam seams come with single and double locks. Single lock seams are used when there is no need for tightness and high strength. Double-lock seams provide high strength and tightness, i.e., liquid and air impermeability. Depending on their position, the seams are divided into longitudinal and transverse. Longitudinal seams are made with a recumbent seam, and transverse - to stiffen the product - with a standing seam. When connecting, by a transverse seam, several parts of the product, having longitudinal seams, they are positioned so that the longitudinal seams are at some distance from each other. This provides a tight connection in transverse seams.
Fig. 1. Seam seams: a - with a single lock: b - with a double lock; in - bottom seams Bottoms to the body of products attached bottom seam seams (Fig. 8, e). The fold lock is made even along the entire length; after compaction of the folded joint, the surface of the fold should be smooth, without hillocks and thickenings. Fold seam rivets are not allowed. Making seam seams
Fig. 2. The sequence of manufacturing a single recumbent seam: a - g - technological operations Seam seams are made using percussion and support tools. The execution of a single recumbent suture (Fig. 2) is carried out in the following order: In the manufacture of seam connections on cylindrical blanks it is necessary that the first bend of the material at both ends of the sheet was held in different directions, otherwise the lock will not connect. In the manufacture of cylindrical products of small diameter, the second bend (operations 5-6) do not. In this case, operations 1–4 are carried out, then straight seams are joined into a lock and the seam is compacted with the aid of a seam-mechanism. If there is no fold maker, then the crimping is carried out using a strip of the same material, folded three times. The strip is placed on the border of the seam and sharp blows of the hammer simultaneously on the seam and strip compresses the seam. The manufacture of a single standing seam is quite clearly shown in Figure 3 and does not require further description.
Fig. 3. The sequence of manufacturing single standing seam seam: a - g - technological operations The procedure for obtaining a double recumbent seam seam (Fig. 4) is as follows:
Fig. 4. The sequence of manufacturing double recumbent seam seam: a - g - technological operations If the fold is on the outside of the product, and the inside of the seam should be smooth, the seam is treated with a fold-mesel or a strip of material folded four times. The fabrication of a double standing seam weld is shown in Figure 5.
Fig. 5. The sequence of manufacturing a double standing seam seam: a - g - technological operations A standing seam on cylindrical products is produced using a metal bar and a hammer with a square striker, in the following sequence (Fig. 6):
Fig. 6. The sequence of production of standing seam seam on cylindrical products: o - s - technological operations To obtain a recumbent circular seam, the pipe is placed on a semicircular mandrel and with blows of a mallet they flood the seam. If at the same time the seam begins to diverge, then it is crimped with the help of a support, striking the toe of the hammer. Wire wrapping Rolling wire is necessary to increase the rigidity of the edges of the product and is executed by the same tool as folding. Roll the wire by hand and on the zig-machine. Depending on the shape of the product, seaming is rectilinear and annular. Rectilinear seaming by hand is carried out as follows:
Fig. 7. Manual wire rolling: a - e - technological operations The process of rolling the wire on the zig-machine is shown in Figure 8.
Fig. 8. Rolling wire on zigmachine Ring seaming the wire manually perform on a metal semi-circular mandrel. The edge is bent on the workpiece in the same way as with a straight seam. Then a wire ring is put on the workpiece and in several places it is secured with a metal hammer and the whole edge is bent with a mallet. After performing this operation, the cylinder is installed vertically and finally bend the edge with a hammer with a square striker or headlamp. For self-production of round tubes, thin-sheet steel, black or galvanized, with a thickness of 0.45 - 0.5 - will be required. 0.55 mm . This material thickness is sufficient for the installation of low-pressure or domestic ventilation, exhaust gas equipment, drainage system. Using a long ruler, draw a pattern of a future pipe on a sheet of metal with a sharp metal scriber. Measure the length of the workpiece equal to the length of the pipe. If the pipe is inserted into the next one, then add the length of the "deadbolt" to the length of the workpiece (for example, 7 cm ). Calculate the width of the pattern by multiplying 3.14 by the internal diameter of the pipe in millimeters: D * 3.14 (mm). To the resulting size add the allowances for the folded connection - by 14 mm on both sides, or 28 mm to the width of the pattern from either side. The final formula for the width of the workpiece: 3.14D + 28 (mm). The cut blank cut out of the sheet with hand scissors for metal. According to the length of the workpiece, scratch and foldin different directions two edges for a faltsevy connection of a pipe. Bending edge width 7 mm . These edges can be bent and oblique, for example: for one end of the future pipe 7 mm , and for its other end - 9 mm (or 6 to 8 mm). Then the pipes will easily and tightly fit one into the other. The sequence of preparation of the folded connection is shown in the figure: In order to shape a straight sheet of tin, a thick-walled metal pipe with a diameter of 80–100 mm, suspended horizontally from a board or flat wall in two “clamps” of strips of sheet steel, is required, as shown in the following figure. Fill the pipe pattern with prepared seams into the gap between the board and the suspended pipe, and gradually twist around the pipe-mandrel to the desired shape, after each deflection, pushing (pushing) the workpiece down: Remove the workpiece from the fixture, check how correctly and evenly it is “rolled” into the shape of the pipe. Button buckles in the lock. Make sure that both fold edges are securely inserted into each other along the entire length of the connection. Dress up the prefabricated blank (or part of it) on the rail section extended beyond the workbench. Seal the seam of the pipe with a wooden mallet. Along the entire seam to besiege the material, that is, to undercut the edge of a hammer or mallet, creatingthus an additional lock that will prevent the seam edges from moving out of the joint. The reliability of the assembly can be insured rivet. Irregularities and possible ribbing of a homemade pipe should be straightened on the rail with a wooden hammer - a mallet. Sheet steel for the manufacture of tubular products, choose one on the surface of which does not remain at all, or there remains an inconspicuous trace when it is bent-straightened. This property of metal can be checked by slightly bending and then straightening the tin in the corner of the sheet. If a rolled material is used for the manufacture of the pipe, or a galvanized sheet that is clearly cut from the roll, then it should be cut out so that the direction of bending and rolling of the workpiece coincides with the direction of the rolled up roll - this will reduce the occurrence of ribs along the deflection lines. Optimum tube length 1m or 1.25 meters that coincides with the transverse dimensions of standard tin sheets. Mechanized production of thin-sheet steel pipes is carried out on machine tools in various ways, which are briefly described on the page. For a long time, the roofs were covered with sheet metal due to the relative ease of installation, low cost, the possibility of mounting the coating of the most complex forms and at a minimum angle of inclination to the horizon up to 15 degrees. In addition, they are indispensable in cases where it is necessary to block the roof of an object with a weak foundation, and other roofing material is not suitable for use because of the weight. This material has not lost its relevance today: along with the usual steel sheet, galvanized and profiled are also used. Modern technologies allow to apply protective coatings on them, significantly increasing the service life, and also to paint with paints in different colors. Due to this, the products have a rather attractive appearance and can decorate any house or cottage. Which sheet metal to choose
Before you cover the roof with iron with your own hands, you need to decide on the sheet material. There are the following types of sheet metal:
Preparation of roofing material
Roof covering with sheet or galvanized iron requires the use of a folded joint of metal structures. To do this, you need to unfold the roll, gently level it and remove special lubricant in the metal surface. Then you should bend the edges of the sheet at a right angle along the entire length, so that it is convenient to connect the sheets at a height.
The following types of connections exist:
In order to bend sheets, it is necessary to accurately mark the bend distance using calipers, focusing on the seam height of 10 mm depending on the type of connection required, as a correctly folded sheet will prevent additional problems on the roof during installation. On one side, the bend must be twice as large as on the other in order to form a single joint, and for a double joint they must have the same length. The width of the canvas should not be more than 1 m for ease of installation, and the length should correspond to the size of the roof with additional overlap, which will be needed to fix the gutters. It is convenient to do the bend on the workbench with a fixed metal angle and the workpiece: the sheet is set along the angle and, with the help of a wooden maker, is bent to a right angle or a horizontal state with a gap with a wooden mallet.
Installation of metal sheets is carried out on the roof with a fairly strong crate, which does not bend under the weight of installers. This moment is important because during the deflection of a galvanized or metal-shaped sheet, the protective coating may be damaged, and in a fairly short time the sheet will rust and become unusable. Commonly used edged boards, which are driven in with a distance of 100-300 mm from each other. Then proceed to the installation of roofing material.
First, the corners lay out the places of the roof bends, if any, and then from one of the corners begin to lay metal sheets. They are fastened to the crate with self-tapping screws with a metal gasket, or with the help of special locks - clamps made in the form of metal corners, fastened to the roof with nails or self-tapping screws, and crimped to the sheet metal by means of a formed folded joint. The second method is more laborious, but the roof surface will be even and without damage, which will significantly increase its service life.
Then it should be fixed with screws. If the connection is planned with a clamp, it is fastened close to the folded corner of the sheet. After that, the second sheet is laid and the connection is folded in the direction of a smaller bend with the help of a special tool, a comb bend, or a wooden mallet and a hammer. The first option is the most convenient and safe. The second option is suitable for more experienced installers, when you want to feel the force of impact of the mallet. After laying all the sheets the installation of gutters. VideoA supplement to the article will be a video about the fastening of roofing iron by a folded joint: Watch the video about the work of a professional roofer, in which he will give some useful recommendations: || Materials for leveling screeds and protective layer of roofs || Paint compositions and putties. Dryers || Mineral binders. Assignment and classification || Construction solutions. Types and classification of solutions || General information about roofs, roofs and the organization of roofing work. Roof classification || Preparation of the base under the roof. Substrate preparation || The device of roofs from rolled materials. Preparation of roofing materials || Device mastic roofs. Roofs from bituminous, polymer-bitumen and polymer mastic || The device of roofs on the panels of coatings of high factory readiness. Complex panels || The device of roofs from piece materials. Roofs from small-piece materials || Roofs from a metal tile. General Information || The device of the roof of sheet steel. Preparatory work || Roof repair. Roofs from rolled materials || Safety Lying and standing folds. For an ordinary roof covering slopes, eaves overhangs, wall gutters, gutters, etc., make paintings. The picture is an element of the roof covering, in which the edges are prepared for the folded joint. Usually they are made of two sheets of compound (85 ... 90%), rarely single sheets (10 ... 15%) for additives in the regular bands. Roofing sheet steel for the preparation of paintings should have a flat surface; all angles should be straight. The roofer performs the preparation of seam connections on a workbench, the shield of which is edged with angular steel on one or two sides. Seam connections are divided in appearance into recumbent (Fig. 167, a ... d) and standing (Fig. 167, d ... i), and, according to the degree of compaction, into single and double. (The sizes of folds are given for sheets with a thickness of 0.45 ... 0.7 mm. For thicker sheets, bends are increased by 20%.) Fig. 167. : Roofing sheets are connected one to another on the short side of the sheet with recumbent seam, and along the long - with standing (ridge). When covering roof slopes, standing folds are positioned along the slope, and the recumbent ones are placed across (parallel to the ridge of the roof), which does not prevent water flow from the slopes. Folded connections can be single or double. Unary recumbent fold (rice, 168) perform as follows. The sheet is placed on the edge of the workbench and the scriber draws a line to bend the folded edge. To prevent the sheet from moving, hold it with your left hand. First, at the corners of the sheet, at risk, they make a mallet with two lighthouse bends (Fig. 168, a), for which they take the risk with the edge of the corner on the workbench. Then, by the risk, the entire edge is bent (fig. 168, b), the sheet is turned over and the bent edge is dumped onto a plane (fig. 168, c, d). In the same way, the edges are prepared on the second sheet. After that, the sheets are joined into a lock (fig. 168, e) and sealed with a mallet. To prevent the fold from moving apart, it is cut with a metal bar and a hammer (Fig. 168, f).
Double folding fold form. The first four operations are performed similarly to the formation of a single fold. The prepared edge is then folded down 90 °, the sheet is turned over on the workbench with the folded edge upward and the fold is dumped onto the plane. Thus prepare the second sheet. The prepared edges of the sheets push one into the other, after which the fold is compacted with a mallet. Cut the fold with the strap and a hammer (Fig. 168, e). A single standing seam is formed with the help of a comb-bending and a mallet (Fig. 169, a. ..Zh). First, the edge of the bending scraper 1 is brought close to the high edge (Fig. 169, a) and the mallet is dumped on the plane of the scraper (indicated by the arrow). Then, having removed the comb-bend, the mallet tilts the edge downwards (Fig. 169, b), using the bar 2, the comb-bend is placed close to the reverse side of the fold (Fig. 169, c) and compacted.
To create a double standing seam, the comb-bend is installed on the plugs 3 (Fig. 169, d). The edge of the bending scraper is brought close to the high edge and the mallet is dumped on the plane of the scraper. Then the operation is repeated (Fig. 169, b, c). Crescent bend 2 is installed close to the reverse side of the seam and compacted it (Fig. 169, d). The last operation is stalling and sealing with a mallet double recumbent fold (Fig. 169, e). After that, the fold is dumped and compacted (Fig. 169, e). The folding bending machine (Fig. 170a) has two gon 1, to which the cheeks 6 are welded to the bent shelves. The cheeks are interconnected by a gon 9. In the horizontal gantry shelf of the square 9 a longitudinal groove is made. A bending square 10 is attached to the vertical shelf of the square 9 by hinges 14. The horizontal shelf of the folding square is in the same plane as the base of the recess of the square 9. A bracket 11 is attached to the horizontal shelf, which rotates the square and two stops 8.
On the inner sides of the cheeks 6 there is a movable machine unit, which consists of two movable rods 3, rigidly interconnected by a pressing square 4. The horizontal shelf of this square is made in the form of a wedge, under which the longitudinal bar 5 is attached to crimp the edge of the roofing sheet in the longitudinal recess of the square 9. Guides for rods are served by staples 7 and through passages at the ends of the horizontal shelf of the square 9. The movable device of the machine is held in the upper position by means of springs 2 It is convenient to insert a sheet into the machine and remove it after bending the edge. On the square 10 mounted pedal, consisting of the pedal bar 13 and the connecting rods 12. The machine is installed on the workbench so that the horizontal shelf of the square 9 is in the same plane with the working plane of the workbench. To bend the edges of the recumbent seam, the standard sheet 15 (Fig. 170, b) is placed on the workbench so that its narrow side edge is flush with the stops 8, and the foot is pressed on the pedal. As a result of pressing on the sheet, a small depression is formed (Fig. 170, c). With the help of the bracket 11, the bending square is turned, which bends the sheet edge by a given angle (Fig. 170, d). After the bend, the edges for the rebate are released on the pedal: at the same time, the movable device rushes upward under the action of springs. At the same time, the bending angle is retracted to its original position. At the moment of lifting the rolling device, the sheet jumps off the pressing square. After that, the sheet is turned 180 ° and in the same way bend the edge for the fold on the other side of the sheet. From the single paintings made collect double. The assembly is carried out manually or on a folding machine Navy-61. The collected picture is served on a large folding machine. Large faltsegibochny machine designs I.P. Prokhorov (Fig. 171) works like this. The picture is placed on the workbench 2 so that its large side fits close to the rear thrust rail 1. The other large side of the picture must be positioned so that its edge extends out from under the pressure bracket 5 to the outside by 20 mm. Following this, the edges of the picture are pressed to the square 4 workbenches. Then using the levers 8 turn the bending square 5, which bends the edge of the small standing seam. Since the bending angle is shorter than the presser, the corners of the picture remain uncompressed. In this case, pre-bent edges for recumbent seam folds.
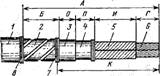
At the end of this operation, the bending angle elbow is retracted to its original position and the presser elbow rises to the top, and the picture is pulled out of the machine until it stops 7. Then the presser elbow is again lowered onto the edge of the picture lying on the workbench. After that, the levers 8 turn the bending square from itself along with the picture. As a result, in the picture, the edge of a large standing seam 35 mm high will be bent. The small faltsegibochny machine is used for a bend of edges on the short sides of sheets. On the frame made of the corners, the clamping corner with the plate welded from below is fortified. Raise and lower the presser corner with the pedal. The sheet of roofing steel is laid on the table of the machine and leads with the short side under the clamping corner with the release of the sheet edge to the width of the fold of the fold to the pins-stops on the bending bar. Pressing the pedal with his foot, the roofer clamps the sheet edge with a corner and, then rotating (behind the brace) the bending bar, bends the edge for the recumbent fold. After that, lowering the pedal, the roofer releases the sheet, unfolds it with the reverse side and puts it on the left half of the table, where the second roofer on the same machine bends the edges for the recumbent fold on the other side of the sheet. Sheets prepared in this way are joined together in pairs in paintings. Work is performed on a roller drive machine. The roller drive machine connects two sheets of roofing steel into the picture. In the center of the machine two rollers mounted on two shafts are located one above the other. The rollers are driven by an electric motor (through a gearbox) by means of a belt drive and gear system. The roofer interconnects the two sheets with bent edges and pushes them between the rollers, which compact the recumbent seam. Then bend the edges for the standing seam. Corner seam connections. Corner faltsevy connections are used when performing such details of a roof as caps and umbrellas for chimneys, and also at production of economic stock. The joining of two sheets with a simple angular seam begins with bending the edges 90 ° in them (Fig. 172, a), and one of them is laid on the plane of the sheet (Fig. 172, b). Then, putting on the workbench sheet with the edge bent up, enter it into the slot formed by the top of the edge of the other sheet (Fig. 172, c). After compaction, the resulting comb is dumped onto the plane of the first sheet (Fig. 172, d).
To connect two sheets with a combined corner fold, the edge of the sheet shifted from the workbench (fig. 172, e) is folded over by 30 ° and fractured (fig. 172, e). Then, turning the sheet upside down on the workbench, the resulting fracture is dumped onto a plane (Fig. 172, g) and the edge is bent, forming a double recumbent limb (Fig. 172, h). After that, a sheet with a double bend is installed on the workbench (Fig. 172, and) and a previously bent edge of another sheet is inserted into the slot of the second limb. In conclusion, the vertical edge on the limb of the first sheet is dumped onto the plane of the second and sealed on both sides with metal support. The width of the edges in sheets joined by corner bends depends on the thickness of the sheets. For simple corner joints, 5 ... 6 mm is enough, and for more complex edges, the width is 14 ... 16 mm. The sequence of operations for the device of the double corner fold will be analyzed using the example of inserting the bottom into a rectangular box. To the bottom of the size of the box they line the edges on the formation of folds and cut corners. After that, along the dashed lines in the bottom, all edges are folded in one direction, narrow bends are made on the edges to the outer sides. Then the corners of the box are notched and inserted into the bottom. The cuffs of the bottom dumped on the sides of the box, while using a mallet and a metal stop. Next, the box is placed on a workbench and all hanging edges of a single fold are successively leveled and bent by 90 °. In conclusion, the edges are dumped on the side walls of the box and compacted. In the manufacture of various roofing elements, as well as household equipment, the roofer has to connect parts not only with angular straight, but also curvilinear folds. Curved folds connect round and cut off at an angle of nozzles. The design of the curved fold is the same as the straight. An additional operation with a curved seam articulation is flanging. It consists in expanding the foldable edge by thinning its thickness. Making curved seam joints is called folding.
|


Popular:
New
- Markup definition. Planar marking. Types of markup. Questions for self-test
- Pipe bending machines Various variations of pipe bending machine
- Safety during filing
- What should be the sharpening angle of the scriber
- Drawing on preparation of contours of future product
- Modern ways of cutting metal and its defects
- Kerner - so that the drill does not slip off!
- Objects of inanimate nature Examples of the influence of inanimate nature factors on plants
- Finishing joinery
- Block breakdown in AutoCAD - simple and effective teams from practitioners