Site sections
Editor's Choice:
- If noise from neighbors interferes (memo)
- Why at home may there be a need to measure water resistance?
- Alteration "Khrushchev" kopeck piece in almost three rubles
- Do-it-yourself wallpaper
- Installation options for drywall in the bathroom
- Court decision to recover from the management company the amount of damage for the gulf of the apartment
- Living room and children's room in one room: options for partitions
- Rating of the best upholstery sofas: customer reviews
- Expansion joints in buildings
- Shaber - what is it and its purpose
Advertising
| From what profile do the walls in the bathroom. Installation options for drywall in the bathroom. Drywall bathroom |
|
Apartments built according to standard designs can rarely amaze the imagination with non-standard solutions in the design of premises, as a result of which it is often necessary to make considerable efforts to create in your home a cozy corner where you can relax not only physically, but also mentally. One of the most popular solutions, relevant not only from a functional, but also from a decorative point of view, is a partition in the bathroom. The need for its construction is due to the fact that several functional zones are allocated in the bathroom, each of which is characterized by its purpose. Within the three main functional areas, which include the area near the sink and toilet, as well as the shower area, plumbing equipment is installed, and therefore, there is a need for their functional delimitation. Also, the true purpose of the bathroom necessitates the allocation of a zone for storing things, which can be several. They are used to store towels, household cleaning products and cosmetics. However, if your bathroom does not differ in impressive dimensions, full zoning in this case will be inappropriate. Read how to get out of this situation and how to organize the zoning of a spacious bathroom using a partition, in this article. DIY plasterboard partitions in the bathroomRegardless of whether it is renovation or new construction, wall niches are a great way to create more space in your bathroom. A niche or shower shelf is easy to install and offers an ideal place to place dishes in the bathroom. Here you will find a brief explanation of how to install a wall niche in your bathroom. Why include a bathroom niche in your bathroom design?Easily create more storage space.If you plan to remodel your existing bathroom to get more space, incorporating a niche or shower niche in a new design is a great way to get more storage space. These unique bathroom design elements can be made to order almost anywhere, from the smallest and closest bathroom to the largest and most luxurious.The partition in the bathroom: the relevance of the problemIn the process of repairing a bathroom or an apartment as a whole, it is often necessary to develop a design for a room, as a result of which, we often come to the conclusion that we did not take into account some parameters of the room. For example, the width and height of the doorway that you need to know in order to bring a bath into the bathroom, the height of the gypsum plasterboard ceilings for installing ceiling lights, the location of furniture for the correct layout of the room and other parameters of the living room, without which you cannot successfully complete the job redevelopment project. If you are a happy owner of a spacious bathroom, you can not only place all the things and the necessary equipment, but also experiment with its zoning, the placement of plumbing and decorative design. The most common installation of partitions, delimiting the area in which the toilet is located, from the rest of the bathroom, due to the fact that this area is the least attractive. Therefore, designers recommend installing a shower cubicle, toilet or bidet as far as possible from the entrance, and to further mask this area with a decorative partition. Container wall niches can be placed both in drywall and in solid walls and can be used in existing wall structures, as well as in new walls. Shower niches and wall niches have a wide range of colors and finishes, so it’s easy to choose a design that's perfect for your home. Regardless of whether you choose the timeless elegance of stainless steel, the understated elegance of white and cream, or the unique modern look of anthracite, your bathroom will get a completely new look and you can enjoy the results every time you take a bath or shower.
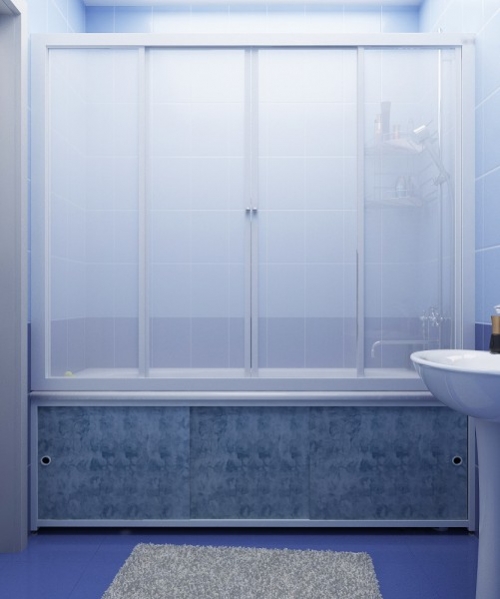
If the zone of the toilet bowl or bidet can be delimited by a decorative partition, then the area in which the shower is located should be separated by a reliable blind partition, which will protect the walls of the room from splashes and water leaks, therefore, high demands are made on its quality. Wall niches are also available in a variety of styles and options, making it easy to install this unique update into your existing space. Regardless of whether you choose the beauty of a border niche, the classic style of a limitless wall niche or the versatility of a tile without a frame, you are surely impressed with the results. Series container niches are available in various designs. Make a wall niche in your bathroomIncludes doors, lights and mirrors - includes variable installation depth and various colors - includes tiled doors and various colors. Here you will find a brief explanation of how to install wall niches in your bathroom. For best results, please read the installation guide carefully, as the exact instructions depend on the type of niche. We recommend that the installation is preferably carried out by qualified specialists in accordance with building codes.
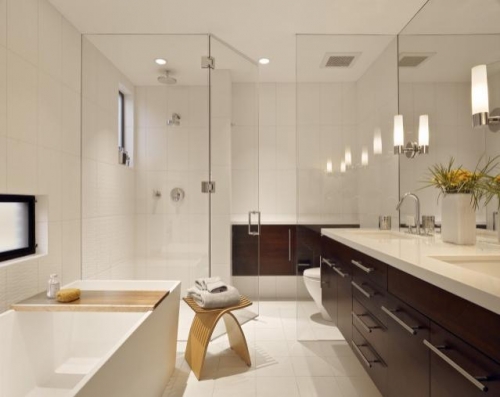
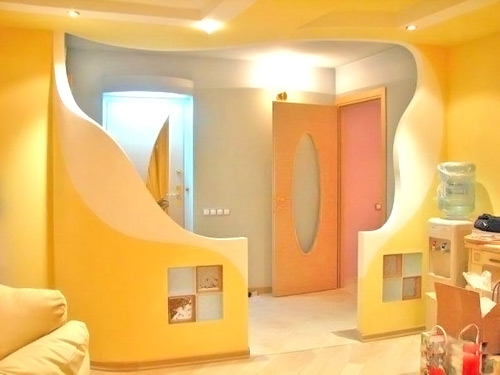
Partition in the bathroom photo
Placement Set the built-in kit to the desired position. We recommend installing a niche in the center of the two studs. Mark outlines. Then mark the contours or cuts on the wall using a pencil. Cut Cut the cavity with a saw or angle grinder. Cleaning the work area Before starting the installation process, check the cleanliness of the work area. Ensure that the surface is clean and free of adhesion reducing agents. Apply sealant Apply sealant to the wall to secure the integrated kit. Insert the built-in kit. Insert the built-in kit to enable a complete waterproof installation. The functional role of partitions in the bathroomFunctional purpose Only the owner himself can determine the partitions in the bathroom based on his needs and preferences. Despite this, in most interiors, the role of partitions is very ambiguous, since they can be useful not only from a practical, but also from an aesthetic point of view. Let's talk about this in more detail. Apply a self-adhesive waterproofing membraneClean surface Before applying the sealing membrane, make sure that all surfaces are clean and free of adhesion-reducing substances. Apply a self-adhesive membrane. Start by applying a vertical self-adhesive membrane and finish it with a horizontal membrane so that both membranes overlap. Calculation of materials and componentsInsert waterproofing membrane. The next step is the introduction of a waterproofing membrane in a flexible sealant. We recommend using it because it can be recycled after approx. 90 min! These wall niches have a variable installation depth and must be adjusted accordingly. Decorative function It is connected with the person’s constant striving for beauty, the desire to turn his house into a cozy corner, and the installation of a decorative partition in the bathroom will help to solve this problem. For example, if you decide to design a bathroom in the Japanese style, a decorative addition to its interior will be a decorative bamboo screen, which will not only emphasize the naturalism of the decoration, but will also become a profitable addition to it. Another advantageous solution for a bathtub in an oriental style will be the installation of a glass partition decorated with floral or ethnic patterns; Tile After the glue from the whole tile has dried, the walls around the niche can be tiled. Tiles may overlap the assembly flange in the kit. Apply sealant to the rear flange of the wall niche and insert this part into the assembly to fix it. Having basic knowledge about creating bathroom walls, as well as a few simple materials and tools, you can design or remodel the bathroom and turn it into a more convenient and useful room for your family. To make creative changes to the structure of your bathroom by creating some of its walls, refer to the information you find below.
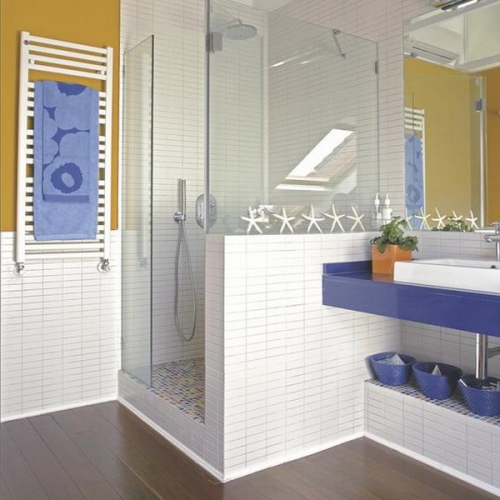
Room Zoning - Another important function of the partition, with which you can select several zones in the bathroom, each of which has its own functional. For example, by installing a partition, you can delimit a bath, toilet or shower. You can also install decorative columns on the sides of the mirror or washstand and thereby separate them from the common room or equip a small niche in which the washing machine will subsequently be installed; Step 1 - Planning Your Bathroom DesignA well-planned remodeled bathroom ensures that you can avoid repairs and future expensive changes. The first step in planning is deciding what you want your bathroom to look like. Search magazines for home improvements, do some online research and spend a few minutes on home television programs. Then drawing a few simple sketches will help you talk about the space, measurements and placement of windows, showers and cabinets.
Communications masking - a function that involves installing a partition in the case of strongly protruding pipes or other technical structures that are not possible to hide under false walls or a screen. In this case, the problem will be solved by installing a decorative partition or columns, on which you can hang a lamp or functionally significant shelves. Step 2 - Planning Your BathroomIf you are reconstructing, and not starting your construction from scratch, use the existing placement of utilities, entrances and cabinets in the design of your drawings. When planning your framing, remember that humidity in the bathroom will be an important factor due to the high moisture content of the air from showers and constant running water. For this reason, plan to use moisture protection to keep floors from water damage and mold buildup. Plan to use waterproof plasterboard. For exterior walls, include moisture barriers when planning.
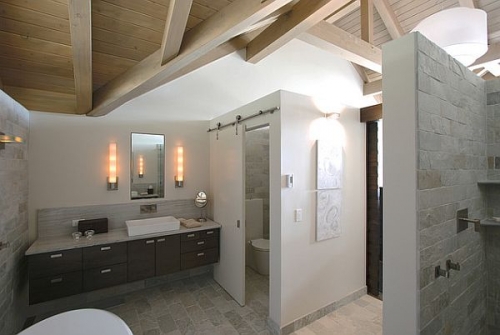
Advantages of bathrooms with a partition
Framing a bathroom is not like creating other rooms in your home. In addition to installing wall studs, floor, ceiling panels and drywall, you will need a frame for showers, plumbing and window openings. Use special materials such as moisture-proof drywall and waterproofing. For your new bathroom, unlike other rooms in the house, you will have a choice of window types, such as bow, double-hung windows, hangers and possibly even skylights. Each type of window will require its own unique frame, so plan ahead what type of windows you plan to install in your bathroom. The choice of material for partitions, taking into account the specifics of the roomBefore you buy a partition for a bathtub or build it yourself, you need to choose the most optimal material from which it will be made, during which it is necessary to take into account the specifics of the room. When choosing a material for the manufacture of partitions, it is first of all recommended to evaluate not only the economic, but also the technical feasibility of using one or another material. If your goal is to divide the room into several zones, it makes no sense to use concrete or brick, but if you install a wall-mounted washbasin on a newly built wall, these materials will be the best choice, unlike less durable drywall and glass. Compared to other designs in your bathroom, framing for partitions will be relatively simple. Partitions separating the spa, toilet or additional bath or shower can be easily installed using the same wall-mounting methods as in other areas of your home. It will be easier for you to set the bathroom framing if you build a frame outside your bathroom, then bring it to the bathroom and attach it to the floor and ceiling. When installing, be sure to use a waterproof plasterboard on the bathroom side of your interior wall.
To everyone who wondered: “How to make a partition in the bathroom?” - we recommend choosing the material taking into account the specifics of the room. Microclimatic conditions in the bathroom, namely increased humidity, necessitate the use of materials resistant to its effects, as well as easily amenable to decoration. The modern market can offer an abundance of materials that meet the above requirements and can be used for the manufacture of partitions in the bathroom. These include: Step 6 - Frame Your ElevatorFraming for showers will be more attentive and accurate than standard equipment. If your shower enclosure has gaps or gaps from inaccurate measurements or designs, you could eventually find leaks, mold, or water damage when water or humidity has entered these spaces. Marble basics. Marble is a metamorphic stone that has been used for thousands of years. Each piece of marble is different - diversity in living and coloring is often considered its best attribute. may have an even or less uniform appearance, depending on the type and quality of the marble you buy. Most high-quality marbles have a very even color palette with soft fluid. The appearance in this shower is elegant, soft and uniform.
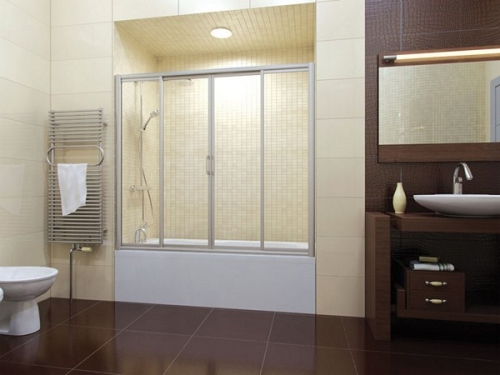
Some of the above materials are used for the construction of more capital partitions, relevant from a practical point of view. These include bricks, building blocks and reinforced concrete. The remaining materials, which include glass and drywall, are used in the case of installing partitions that carry only a decorative function and a zoning function, in view of the lower strength. This setup has marble with a more pronounced vein for a less uniform look. It can be just as attractive thanks to the unique shapes and details that the stone creates. Special considerations. Because marble contains minerals, there is always a risk that its iron content will turn into rust in the bathroom. A perfect installation can be destroyed when the iron is deeply immersed in marble stains from moisture and moisture. Installation of a glass partition in the bathroomJust lay the tile that you are considering in a bucket of water for two days, and then take it out and let it sit for another two days. Follow all changes carefully. Just say no to overwrite. Cleaning grout lines should be one of the least favorite duties when cleaning a bathroom. Using hard surfaces for your walls will save a lot of elbow grease. Stone slabs have several seam lines, and they are very thin.
It is important to know that most of the above materials, except glass and glass blocks, are characterized by a porous structure that promotes the penetration of moisture. This necessitates the use of waterproofing materials that prevent the penetration of moisture. These include plastering, coating and penetrating materials for waterproofing, among which the most versatile coating is waterproofing made on the basis of bitumen and polymers. It is not only easy to apply and dries quickly, but also easily lends itself to subsequent decorative finishing using mosaics, plastic panels, as well as mirror or tile. In areas where your walls do not have to be tiled, paint is a great option. Use one specially designed bathroom resistance to mold. My favorite is Benjamin Moore's Aura Balm and Matte Finish. I would love it in this sunny orange. What a beautiful color for your morning. How to fix a plastic partition in the bathroomGet everything off the floor. The disgusting number one chores in the bathroom get on all fours to clean around the toilet, clogged into a narrow space with this terrible, curved shape on the side. Wall mounted toilets make it easier to reach all sides. They also facilitate floor cleaning. Notice that in this bathroom they even wall mounted a toilet brush. Applying vanity to the wall will also make cleaning the floor easier. But, of course, if you have such beautiful legs, sometimes the decorative element is worth cleaning.
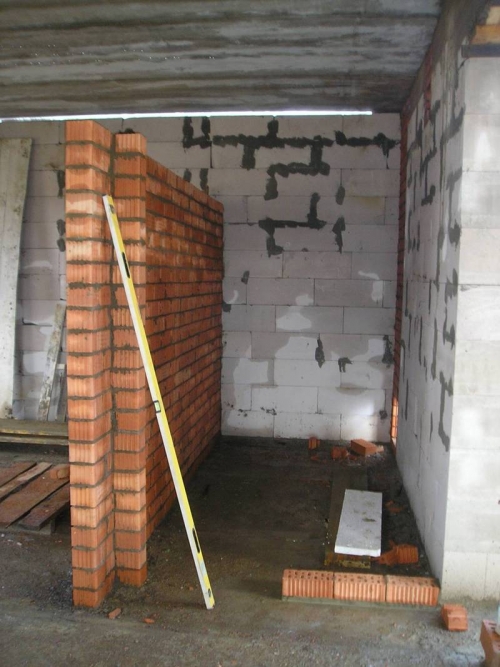
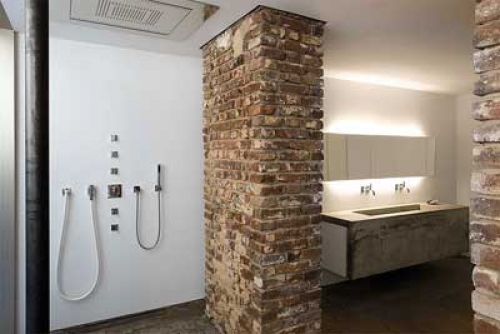
Concrete, brick and stone partitions for the bathroomIf you plan to build a capital partition in the bathroom, the best material for it will be concrete or ceramic brick. If we take cases from practice, it is difficult to cite such examples when a wall was erected in the bathroom by pouring concrete, with the exception of those cases when it was necessary to form concrete ledges for a shower cubicle or for installing a more common glass partition. Thus, we can conclude that this material is used mainly in those cases when it is necessary to build the basis for installing something. Brick is a more practical material used to install capital partitions for the bathroom, in view of the convenience of working with it. It can be brought into the apartment in any quantity necessary for you, to build both a partition and a more thorough wall, which can be laid out with various types of masonry, so that you can adjust the thickness of the constructed partition depending on the size of the room and your preferences. But, despite the fact that brick is a material that is easy and convenient to work with, experienced craftsmen continued to search for more practical and modern materials for arranging a partition in the bathroom, which was crowned with success. Wall mounted cranes are a better choice than deck mounted cranes. Gravity works for you, transferring water and soapy residues from the tap instead of collecting it all at the base. Wall-mounted taps also keep the rack transparent, making it easy to wipe. Choose a place for a tile carefully. The bathroom uses solid marble slabs around the business area of the bathroom, with a mosaic from the Christmas tree located above, so it leaves the spray area. Mold can destroy almost everything that it has. When you first find a spot of evil mold in the bathroom or basement, is it time to burn the house and start all over again? Or can you handle the problem yourself?
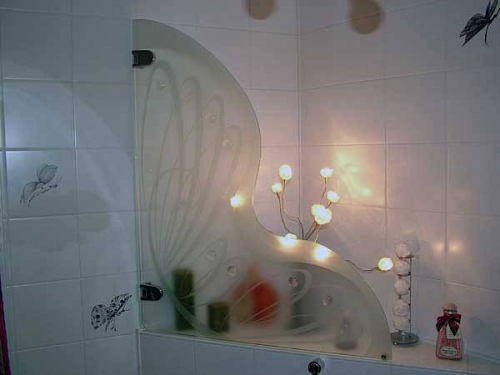
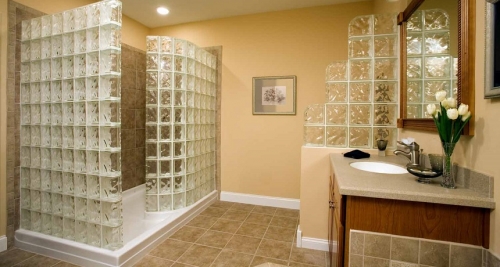
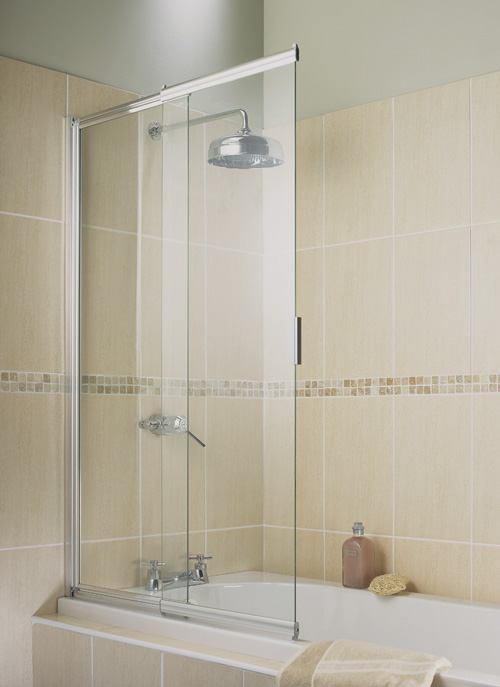
Glass partitions: original ideas for creating additional walls in the bathroomDespite the fact that capital designs are more reliable and durable, the most interesting for designers are partitions that perform a more decorative function in the interior of the bathroom. Unusual designs can not only attract attention, but also make the room extraordinary, as well as visually expand the space of a small bathroom. At the same time, no one canceled the practical functions - they are also characteristic of partitions in the bathroom, in the event that an experienced master managed to combine practical and decorative functionality in them. For this, experts recommend using several non-standard techniques.
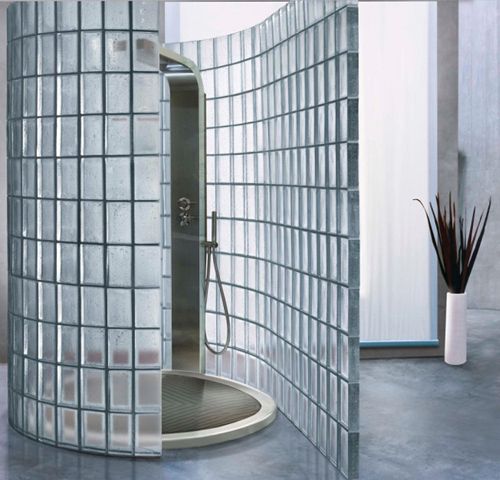
Glass blocks. By choosing them as the main material for the manufacture of partitions, you can add unusual notes to the traditional, unremarkable interior of the bathroom. This is due to the fact that modern modifications of the material look much more profitable than their older counterparts.
The manufacturer offers glass blocks made in the widest color gamut, and as a highlight of the material uses original details placed inside the glass blocks - shells, numerous sparkles or flowers. Light transmission and transparency are also variable parameters. The undoubted advantage of glass blocks is the ease of installation - using them as the main material, you can lay out walls of various configurations.
Strained glass- material produced in sheets, both medium and large sizes, in connection with which, the layman often experiences difficulties in the process of installing a sheet glass partition. As for the practical use of glass partitions for the bathroom, it is characterized by a significant narrowness compared to more capital partitions. Such barriers can only be used as shower partitions or as the main element used for zoning the space. However, this does not interfere with the growing popularity of glass partitions, since the main highlight of such a wall is weightlessness and transparency, which will be especially true in a small bathroom.
Drywall partitions for the bathroom: advantages and disadvantagesDespite the merits of the above materials, plasterboard designs are still the most popular. Drywall is a material whose structure is represented by a gypsum layer, which is covered on both sides by sheets of thick cardboard. The benefits of drywall include:
Drywall is also characterized by its drawbacks:
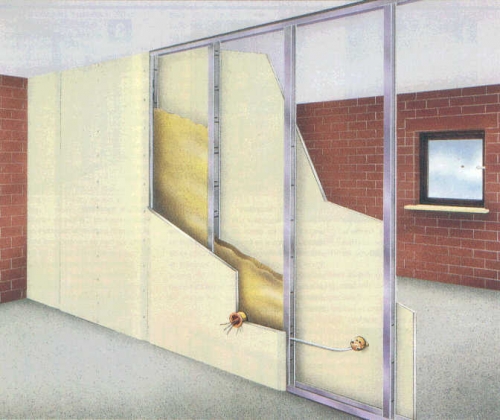
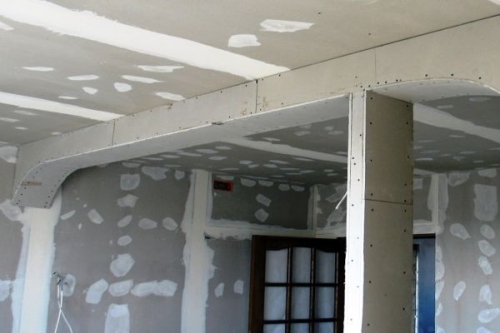
Drywall Partition Design: Preparing Materials and ToolsFrom the point of view of design features, the drywall partition in the bathroom is a metal frame, on both sides sheathed with sheets of drywall. The free space between the sheets can be used to mask unsightly communications, and the space that is not used in this area is filled with soundproofing material. If you want to organize more complex designs, you can bet on built-in shelves or additional lighting.
Required materials and tools
What tools to stock up on? Prepare in advance the following set of tools that you will need in the process:
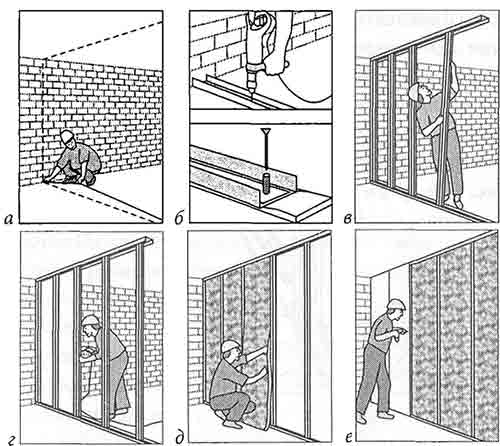
Installation work: sequence of actionsAt the installation site of the partition, mark the floor and, if necessary, in the place where you plan to equip the doorway. Schedule the installation of rack profiles with a step equal to 50 cm, after which, using the level, mark the ceiling and walls;
Considering the length of the partition, cut the guide profiles and use the nail plugs to fix them on the ceiling, then do the same on the floor. If the floor is wooden, use self-tapping screws for fastening profiles, if concrete, dowel-nails. At the same time, remember that the distance between the fasteners is at least a meter, and between the edge of the profile and the wall - at least 0.5 m;
Next, we proceed to cutting rack profiles, not forgetting that they should be the same length, namely 15-20 mm less than the height of the room, which will ensure ease of fastening of the guides. After cutting, they are strengthened in the vertical direction. Profiles located on the border with the wall are fixed with dowels and nails, and the rest of the posts are fixed with self-tapping screws with a press washer;
Important! If the height of the finished structure exceeds 2.6 m, it is necessary to strengthen it with the help of additional guides between the rack profiles; After installing the metal frame, they proceed to skin it. Having cut the sheets of drywall using a conventional sharpened knife, they are fixed on one side, positioning exactly butt, which will make the seams almost invisible. Fastening sheets to metal profiles is carried out using self-tapping screws equipped with a countersunk head. At the same time, the fastener cap is somewhat recessed into the material, which will make it almost invisible;
Heat and sound insulating material - layers of mineral wool are laid inside the structure. It is recommended to carry out this event with glasses and gloves. In order to fill the free cells of the structure most efficiently, mineral wool boards can be cut or torn, depending on your preferences; Having carried out this event, they are lining the second side of the structure, as a result of which, you will get a perfectly smooth surface, devoid of any irregularities and ready for further front decoration;
Before proceeding to the final stage of installation - front decoration, it is necessary to carry out a number of standard events. These include the filling of seams and hats of screws, before which the joints are glued with a reinforcing tape, as well as the application of a primer. After that, you can safely proceed to the front decoration of the partition, which depends only on your individual preferences. Trends in the modern interior offer to get rid of unnecessary partitions in residential spaces, but in the bathroom or wellness zone, the dividing fence is vice versa relevant. For wet rooms today, many technologies have been invented to avoid known problems associated with water. The building envelope of the bathroom should be moisture resistant and sufficiently strong. Hidden communications pass through them, and they themselves can serve as load-bearing structures for fixing plumbing. The technology for constructing such fences depends primarily on the material. What to make the bathroom fencing? Any internal walls and partitions occupy a certain volume and area. The thicker the wall, the larger the area it takes from other rooms. Equally important for such structures is its own weight. They should not overload the floors. At the same time, the partition must be powerful enough to withstand household loads. Partitions that are too thin, regardless of material, are not stable and soundproof. Mostly partitions are built of bricks, aerated concrete blocks, cinder blocks, porous ceramics, GWP (tongue and groove gypsum boards) or frame gypsum plasterboards. What to choose from? Solid brick - excellent wall material, including and for partitions. With a relatively small wall thickness, the fasteners are reliably held from it, are very durable and have good sound insulation. In addition, the brick is not afraid of moisture if it is in the zone of positive temperatures. Use in the design of the interior partition is just such a case. Most often, brick partitions are placed in half a brick. If put in a quarter, then the wall will be unstable, and fasteners - weak. Since the ratio of the thickness and height of the wall in half a brick is relative, every fifth row is best reinforced with a 6 mm wire mesh. The finished wall is plastered on both sides with a cement-sand composition. After plastering with a centimeter layer, the total thickness of the partition will be equal to 145 mm. The only, however, sometimes critical drawback of solid brick partitions is heavy weight. Not every ceiling can withstand a wall, 1 m of which can weigh 240 kg. Such partitions are best erected on a concrete floor or on reinforced concrete floors. Expanded clay blockshave a small weight, but due to the high water absorption, the bathrooms are not quite suitable for fencing. In addition, the accuracy of their size is poor. Walls from expanded clay concrete blocks have to be leveled with a significant layer of plaster, which increases the complexity of the work. Porous ceramic in the form of wall blocks it is suitable for partitions erected even on weak ceilings. By weight, they turn out to be twice as lighter than brick. The fixture in them holds normally if special expansion plugs are used. With a length of 40 mm, they withstand up to 80 kgf of pulling load. In this case, the main disadvantage of porous ceramic blocks is their fragility. When erecting partitions, the blocks must be adjusted (sawed) very carefully, otherwise gaps will remain in the structure of the partition, significantly reducing its sound insulation.
Foam concrete and aerated concrete. Special partition blocks are made from these materials. They can be quite thin - 100, 120 or 150 mm. The advantage of cellular concrete partitions is the ease and high speed of construction with minimal finishing work. The main disadvantages are strong water absorption and low strength. However, masonry made of foam concrete or gas silicate can be protected from moisture with solutions prepared from special hydrophobizing dry mixes such as KNAUF-Fugen-hydro, Dichtspachtel, Magnum, etc. In addition, partitions from cellular concrete blocks must be reinforced with a rod with a diameter of 7-8 mm, under which they are made grooves. Such partitions are attached to the walls and the upper ceiling with pins 30-40 cm long in increments of 100-120 cm. Tongue-and-groove gypsum boards. This material is today one of the most popular for partitions. Special hydrophobized plates are produced, which are convenient to use for fencing bathrooms and other wet areas. Such plates are painted in greenish color. They are available in two versions - 80 and 100 mm thick. There are plates full and with tubular voids. The latter are 1.6 times lighter, but much inferior in sound insulation indicators. GWP masonry is performed on gypsum adhesive solution, which is present in the assortment of many large manufacturers. For the construction of bathroom partitions, masonry can be carried out on a KNAUF-Fugen-hydro solution. GWP plates have precise geometric dimensions, so you do not need to plaster them - just go with gypsum putty, after patching the joints with the same composition.
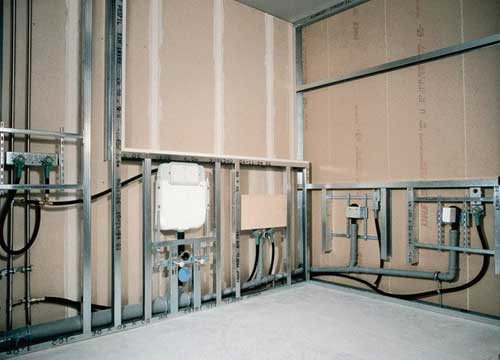
Frame partitions - These are the easiest of all of the above. They are being built very quickly. The presence of internal voids between the casing allows you to easily hide any communications in them. If the frame structure is reinforced with a steel sheet or corner, then plumbing and other equipment can be hung on it. One of the advantages of frame partitions is to obtain perfectly even surfaces on which any finishing can easily fit. The skin of the frame partition is most often made of waterproof gypsum board, and a fiberglass insulator is placed inside. In this form, a partition with a small thickness provides sound insulation almost like a brick wall in a half brick. According to the results of tests of GKL manufacturers, the frame partition even outperforms the brick one by about 4 dB. The moisture problem is easily solved for frame drywall partitions - they are covered on the part of the likely wetting with waterproofing mastics, and then get off. Residual moisture will diffuse through the mineral wool and the outer layer of drywall, so the structure remains almost dry. In addition, the inner lining can be made from GVL, and fill the joints with sealant. It is enough to open such sheets with a hydrophobizing primer to avoid delamination. Sandwich panels made of extruded polystyrene foam with armocement coating are characterized by the lowest weight and the highest heat and vapor barrier properties. Unfortunately, they delay the sound weakly. However, the main soundproofing element in the frame partition is not sheathing, but fiber filling. The obvious disadvantage of the panels is the high cost of 850 rubles / m² and higher. The thickness of such cladding is found from 20 mm. A good material for the frame partition of the bathrooms is the cement slabs of the KNAUF-Aquapanel Internal system. It costs from 600 rubles. for 1 m² (Jan. 2015), but stronger and more durable GKLV.
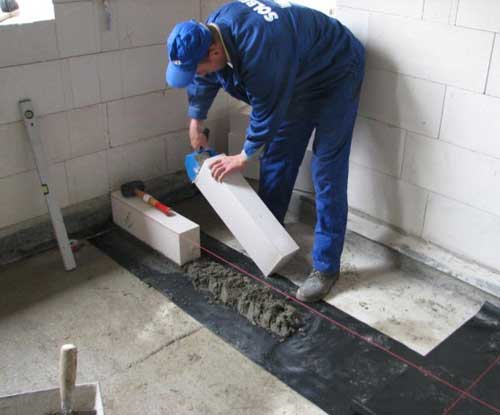
Floor in the bathroomIn bathrooms and bathrooms, there is a risk of spilling large amounts of water. But even minor puddles in the absence of waterproofing of the floor will lead to its overmoistening. As a result - the appearance of mold spots on the ceiling in the lower room and even leakage. As a reliable waterproof barrier, polymer or bituminous mastics, as well as rolled waterproofing materials from modified bitumen, are used. Waterproofing is carried out directly on the floor. It is led out to the walls by at least 10 cm. However, the height of the screed to be made over the waterproofing must be taken into account. The height of this screed is 40-50 mm. Specialists recommend the use of hydraulic concrete. It can be prepared from ordinary sand-cement mortar by adding a plasticizer such as Asolin-K or Monolith. After 3-4 hours from pouring the screed, thresholds of 4 cm high are formed. The threshold can not be cast if a leak control system is installed in the bathroom. The screed in the bathroom or bathtub can be “dry”. It is made of quarter panels. Such panels are produced by KNAUF. After laying the dry screed, you can immediately begin finishing work. Normative baseDuring the construction or reconstruction of the bathroom, the following excerpts from the standards may come in handy:
|


New
- Features of plastering tetrahedral columns with dry mix
- How to rivet a rivet - automatic and manual methods for different materials What rivet to rivet steel sheets
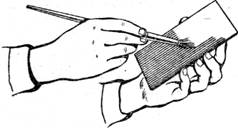
- Appointment of flat marking
- What is it worth to use a reinforcing mesh for concrete, wallpaper, plastering technology - plastic, fiberglass or metal
- Editing strip and sheet material
- Open lesson "editing, bending"
- Installation of flights of stairs and platforms: general information
- Repair of water pipes in the apartment Repair of steel pipes
- Markup definition. Flat marking. Types of markup. Questions for self-test
- Pipe Bending Machines Various variations of pipe bending machine