Site sections
Editor's Choice:
- Bedroom design options in blue for a couple
- How to paint wallpaper for painting: tips and tricks
- Kitchen design in Khrushchev: useful tips for those who have a small kitchen
- How to punish noisy neighbors from above
- Design of a nursery for children of different sexes
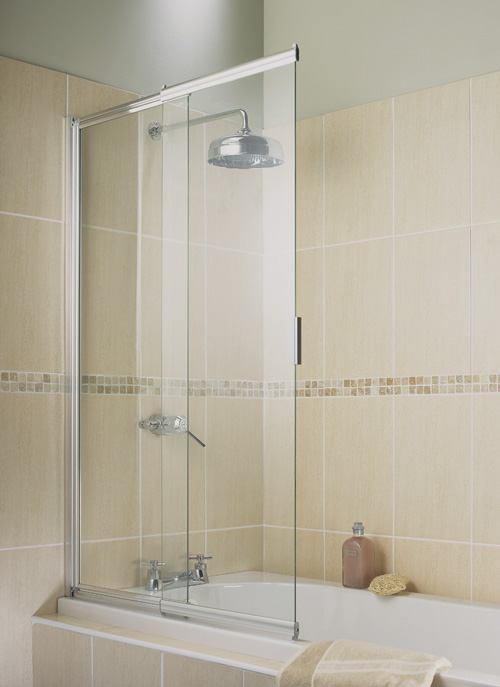
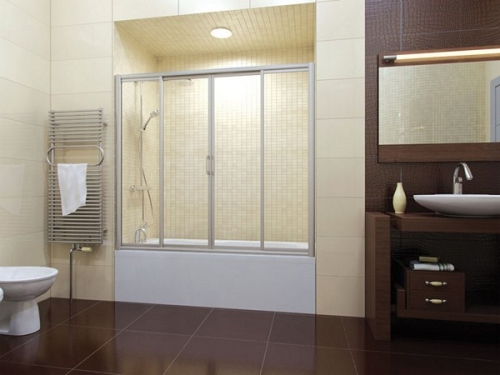
- Shower cabin in the interior of a small bathroom
- Which light is better - warm or cold
- How to care for recently pierced ears
- What to do if the neighbors above are constantly poured
- Materials used for suspended kitchen ceilings
Advertising
| The construction of the walls of the bathroom. How to make a partition in the bathroom |
|
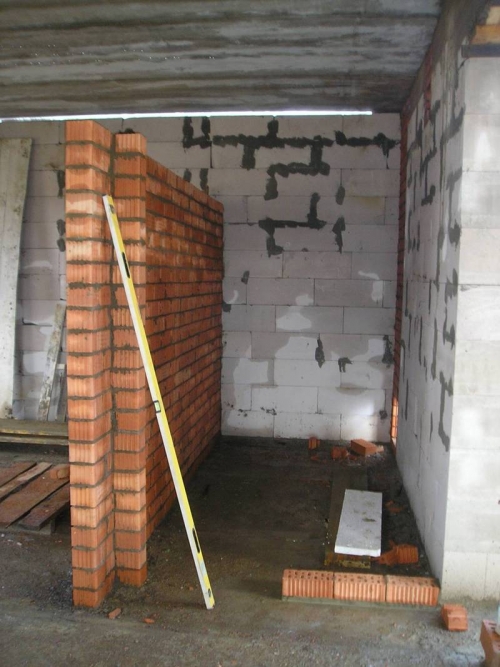
The bathroom along with the kitchen is traditionally considered the most difficult room in terms of repair. Now these auxiliary rooms are crammed with home appliances and sanitary appliances, there are hundreds of meters of various communications. In addition, our concepts of reliability, beauty and comfort have reached a new level - this is normal. Choosing the material for the walls of the bathroomThe Soviet model options are already satisfied with very few people, by the way, and in new buildings, too, everything is not going smoothly, either in terms of design or quality. Already a million times checked - to align the old structures is more expensive and more troublesome than to build new ones. What is better to build the walls of the bathroom? There are many solutions (brick, cellular concrete, gypsum block, frame), but they all have their own advantages and disadvantages. There are several technology selection options. Here are some things to pay special attention to: The walls of the bathroom of brickA brick is the most reliable, but also the heaviest material (we also consider masonry mortar, and plaster). The only place where such technology can be safely applied is the new houses built of monolithic reinforced concrete (in regular places, near load-bearing walls and columns, structures of small length). And then, the maximum thickness of the pier should be limited to 130 (1/2 brick) or 80 millimeters (on the edge), since the load on the floor may be too serious. Hollow brick is almost never used for the construction of a bathroom, either due to poor moisture resistance or due to poor sound transmission, and the carrying capacity of this material is very limited. Although there is a high-quality branded brick with voids, but it is not cheap.
The pluses of the walls of solid clay brick include: high density (dowels perfectly hold in the array), high moisture resistance, good soundproofing.
Partitions are built of brick for a relatively long time, besides a lot of time is needed for their complete drying. Add here the need for mandatory plastering of the structure on both sides - this is again moisture, dirt, time. Bathroom of cellular concreteFoam concrete, aerated concrete, gas silicate, autoclaved cellular concrete - these blocks are well suited for the manufacture of partitions in old houses, as their mass is 3-4 times less than the bricks needed for the same quadrature. The wall of aerated concrete quite well withstands moisture, but many craftsmen still use waterproofing for "safety net". Such materials are quite easily and quickly mounted, well tailored and processed, they are quite easy to make pens.
Mortar is needed a little (you can use tile glue), the walls dry quickly, but you need to align the partition before plastering (the outer side from the bathroom), though not in the same layer as on the brick. Get ready for the large consumption of deep-penetrating primer.
At the height there will be sound insulation indicators, the price of the finished wall is quite reasonable. Some issues may cause the bearing capacity of cellular concrete (cantilever loads). Depending on the type of material (the density must be at least 500 kg / m3) and the integrity of a particular manufacturer, it will be necessary to select certain fasteners for hanging furniture, equipment and accessories. Large boiler is better to mount on a chemical anchor.
Pazogrebnevy gypsum boardsThe mass of GWP is significantly less than that of a brick covering the corresponding quadrature, so the material is suitable for almost any overlap. The situation with water absorption is somewhat more complicated - in the bathroom it is better to use a moisture-resistant variant (usually “water-repellent” are available in a different color).
The GWP wall is assembled quickly, since Fugenfüller is used as a bonding compound (it is also used as a “hydro” for bathrooms). Theoretically, it is possible to finish a partition in 2-3 hours, only you need to prime the walls at least twice. A little exaggerated GWP properties "fit" in an ideal plane - putty from the outside of the bathroom can hardly be avoided. A big plus is the ease of handling tongue-and-groove slabs.
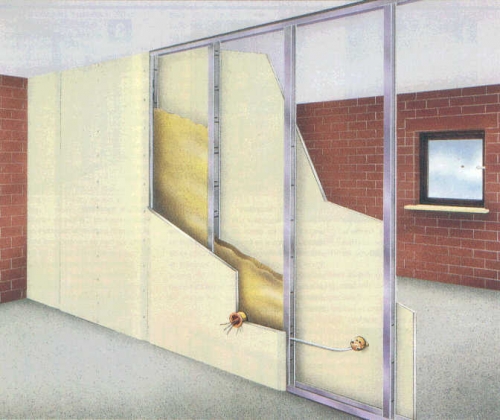
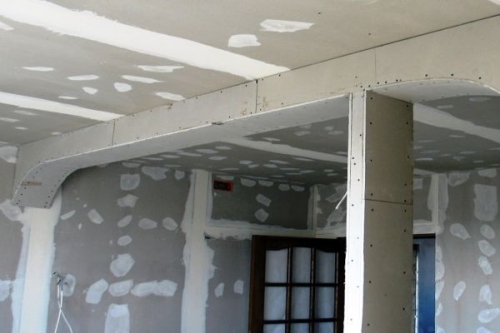
With sound insulation, more or less everything is fine, the wall with a thickness of 80 mm fits the regulations. To strength there are claims. For some reason, there may be weak zones in the material that do not hold the standard dowel - you have to be tricky with various self-tapping screws. Strobing allows a maximum of half the thickness of the partition, so even with a 40 mm diameter pan (for example, for a washbasin) problems can arise even with a 100 mm GWP. Plasterboard bathroomThe fears of people who value stone classics are in vain. Correctly assembled frame partitions perfectly cope with the task. Due to its low weight, the design can be used anywhere, there are no restrictions on the configuration (even the radius can be made). The wall is assembled quickly, without the use of a large number of wet processes. Almost any number of communication lines (sewage, water supply, electrician) can be very conveniently located between profiles. For frameworks, special types of outputs have been developed, such as, for example, “eared” MRI, which are fixed on gypsum plasterboard.
The bearing capacity of partitions on profiles is decent, it is only necessary to use fasteners for hollow structures. For heavy objects, it should be integrated at the points of location of the fasteners into the frame between the posts of the plywood inserts — for example, 21 mm thick (included in the PPN-profile). The option is possible with a wooden bar, a board (less desirable option due to the possibility of wood for deformation)
Mortgaged a large number of screws scrolls through GCR. Boiler 100 liters, dimensional sink, radiator - all this is fixed tightly. Double-skinning options are preferred. Racks should be installed after 400 mm, in the box doorway lumber is placed on the entire height of the room. Moisture-resistant green plasterboard perfectly maintains the temperature and humidity conditions of the bathroom. The manufacturer insists on the need for waterproofing treatment - the masters do it, but even without that, the gypsum panel stands without problems; Of course, there are also special sheet materials like “Aquapanel”, “Magnesite plate” - but this can already be applied even in a public pool. Once the guides have been installed on the floor and on the ceiling, and one rack is attached to the two opposite walls, ... Trends of modern interior offer to get rid of unnecessary partitions in residential areas, but in the bathroom or wellness area separating the fence is the opposite. For wet rooms today, many technologies have been invented to avoid the known problems associated with water. Enclosing structures of the bathroom should be moisture resistant and sufficiently durable. They are hidden communications, and they themselves can serve as supporting structures for fixing plumbing. The technology of construction of such fences depends primarily on the material. What to do to fencing the bathroom? Any internal walls and partitions occupy a certain volume and area. The thicker the wall, the greater the area it takes away from other rooms. No less important for such structures and its own weight. They should not overload the overlap. At the same time, the partition should be powerful enough so that it can withstand household loads. Too thin partitions, regardless of the material do not differ in stability and sound insulation. Basically, partitions are made of brick, cellular concrete blocks, cinder blocks, porous ceramics, GWP (groove-ridge gypsum boards) or frame plasterboard. What to choose from? Solid brick - excellent wall material, incl. and for partitions. With a relatively small thickness of the wall from it securely hold fasteners, very durable and have good sound insulation. In addition, the brick is not afraid of moisture, if it is in the zone of positive temperatures. Use in the construction of an interior partition is just such a case. Most often, brick partitions are placed in half-brick. If put in a quarter, the wall will be unstable, and fasteners - weak. Since the ratio of the thickness and height of the half-brick wall is relative, it is better to reinforce every fifth row with a 6 mm wire mesh. The finished wall is plastered on both sides with a cement-sand composition. After plastering with a centimeter layer, the total thickness of the partition will be 145 mm. The only, however, sometimes, critical lack of solid brick partitions is a lot of weight. Not every overlap can withstand a wall, 1 m of which can weigh 240 kg. Such partitions are best erected on a concrete floor or on reinforced concrete floors. Ceramsite blockshave a small weight, but because of the high water absorption for fencing the bathroom is not quite suitable. In addition, the accuracy of their size leaves much to be desired. The walls of lightweight aggregate blocks have to be leveled with a significant layer of plaster, which increases the complexity of the work. Porous Ceramics in the form of wall blocks suitable for partitions erected even on weak floors. By weight, they are twice as easy as brick. The fasteners in them are kept normally, if special expansion dowels are used. With a length of 40 mm, they withstand up to 80 kgf pull load. In this case, the main disadvantage of porous ceramic blocks is their fragility. When building partitions, the blocks need to be adjusted (sawed) very carefully, otherwise the structure of the partition will leave a gap, significantly reducing its sound insulation.
Foam concrete and aerated concrete. From these materials make special partitioning blocks. They can be quite thin - 100, 120 or 150 mm. The advantage of cellular concrete partitions is the ease and high speed of construction with minimal finishing works. The main disadvantages are strong water absorption and low strength. However, the laying of foam concrete or gas silicate can be protected from moisture with solutions prepared from special water-repellent dry mixtures of the type KNAUF-Fugen-hydro, Dichtspachtel, Magnum, etc. In addition, the partitions from concrete blocks with a diameter of 7-8 mm should be reinforced under which grooves. Such partitions are attached to the walls and the upper overlap with pins 30-40 cm long with a step of 100-120 cm. Pazogrebnevy gypsum boards. This material is today one of the most popular for partitions. Special hydrophobic plates are produced, which are convenient to use for fencing toilets and other wet areas. These plates are painted in greenish color. They are available in two versions - 80 and 100 mm thick. There are plates corpulent and with tubular emptiness. The latter is 1.6 times lighter, but much inferior in sound insulation performance. Masoning of GWP is performed on a gypsum adhesive solution, which is present in the assortment of many large manufacturers. For the construction of bathroom partitions, masonry can be maintained on a KNAUF-Fugen-hydro solution. The slabs of GWP have exact geometrical dimensions, therefore, they are not necessary to plaster - it is enough to walk with gypsum putty, having previously sealed the joints with the same composition.
Frame partitions - This is the easiest of all of the above. They are built very quickly. The presence of internal voids between the skins allows you to easily hide any communication in them. If the frame structure is reinforced with a steel sheet or corner, then plumbing and other equipment can be hung on it. One of the advantages of frame partitions is to obtain ideally smooth surfaces on which any finishing finish can be easily laid. The casing of the frame partition is most often made of waterproof plasterboard, and a fiber glass insulator is placed inside. In this form, the partition with a small thickness provides sound insulation almost like a brick wall with a half-brick. According to the results of tests of manufacturers GKL frame partition even wins a brick about 4 dB. The problem of moisture is solved for frame drywall partitions easily - they are covered by the likely wet with waterproofing mastic, and then get rid of. The residual moisture will diffuse through the mineral wool and the outer layer of drywall, so the construction remains almost dry. In addition, the inner lining can be made of GVL, and the joints filled with sealant. It is enough to open such sheets with a water-repellent primer in order to avoid stratification. Sandwich panels of extruded polystyrene foam with cement-cement coating have the lowest weight and the highest heat and vapor barrier properties. Unfortunately, the sound they delay slightly. However, the main soundproofing link in the frame partition is not a plating, but a fibrous filling. The obvious lack of panels - high cost - 850 rubles / m² and higher. The thickness of the skin is found from 20 mm. Good material for a frame partition of bathrooms - cement plates of the KNAUF-Akvapanel Inner system. It costs from 600 rubles. for 1 m² (Jan. 2015), but stronger and more durable GKLV.
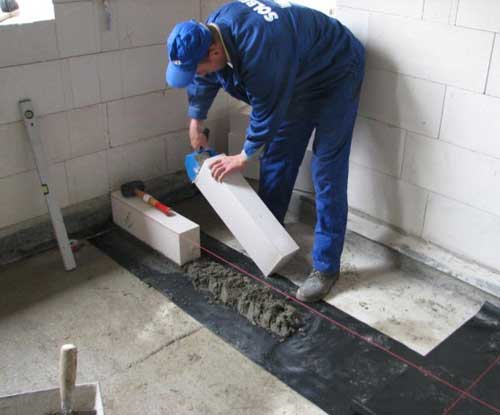
Floor in the bathroomIn bathrooms and bathrooms there is a risk of spilling large amounts of water. But even minor puddles in the absence of waterproofing overlap will lead to its overwetting. As a consequence - the appearance of mold stains on the ceiling in the lower room and even leakage. Polymer or bitumen mastics are used as a reliable waterproof barrier, as well as rolled waterproofing materials from modified bitumen. Waterproofing is performed directly on the ceiling. It is brought to the walls at least 10 cm. However, it is necessary to take into account the height of the screed, which will be performed over waterproofing. The height of this screed is 40-50 mm. Experts recommend using hydrotechnic concrete. It can be prepared from a conventional sand-cement mortar by adding a plasticizer such as Asolin-K or Monolith. After 3-4 hours from pouring the screed, thresholds 4 cm high are formed. The threshold can be not cast if the leakage monitoring system is installed in the bathroom. Screed in the bathroom or bathroom can be "dry." It is made of panels and a quarter. Such panels are produced by KNAUF. After laying dry screed, you can immediately begin finishing work. Normative baseWhen building or renovating a bathroom, the following extracts from standards may be useful:
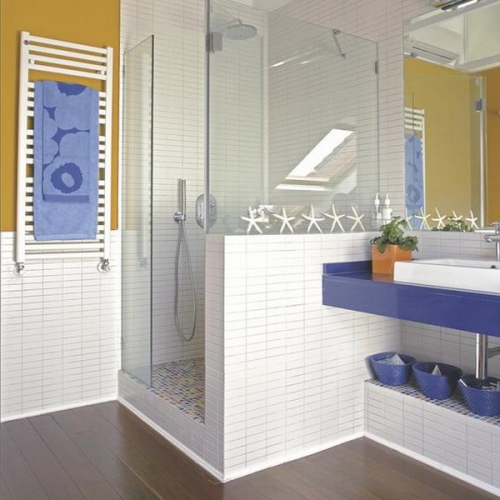
Flats built according to standard designs rarely strike the imagination with non-standard solutions in the design of premises, as a result of which it is often necessary to put a lot of effort into creating a cozy corner in your house where you can relax not only physically but also morally. One of the popular solutions that are relevant not only from a functional, but also a decorative point of view, is a partition in the bathroom. The need for its construction is related to the fact that in the bathroom there are several functional zones, each of which is characterized by its purpose. Within the three main functional areas, which include the area near the sink and toilet, as well as the shower area, have sanitary equipment, and therefore, there is a need for their functional separation. Also, the true purpose of the bathroom necessitates the allocation of a storage area, which can be several. They are used for storing towels, household chemicals and cosmetic accessories. However, if your bathroom does not have impressive dimensions, full zoning in this case would be inappropriate. How to get out of this situation and how to organize the zoning of a spacious bathroom using a partition, read in this article. Partition in the bathroom: the relevance of the problemIn the process of repairing a bathroom or an apartment as a whole, it is often necessary to develop a project for a room, according to the results of which, we often conclude that we did not take into account some of the parameters of the room. For example, the width and height of the doorway that you need to know in order to bring a bathroom to the bathroom, the height of the plasterboard ceilings to install ceiling lights, the location of furniture for proper room planning and other parameters of the dwelling, without knowing which, you cannot successfully complete redevelopment project. If you are a happy owner of a spacious bathroom, you can not only place all the things and necessary equipment, but also experiment with its zoning, placement of sanitary ware and decorative design. The most common installation of partitions, delimiting the area in which the toilet is located, from the rest of the bathroom space, due to the fact that this area is the least attractive. Therefore, designers recommend installing a shower stall, toilet or bidet as far as possible from the entrance, and for even greater masking to delimit this area with a decorative partition.
If the toilet or bidet zone can be delimited by a decorative partition, it is better to separate the zone in which the shower enclosure is located by a reliable deaf partition that protects the walls of the room from splashing and water leaks, and therefore, high quality requirements are placed on it.
The partition in the bathroom photo
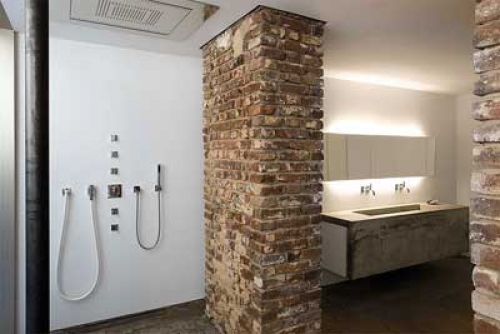
The functional role of partitions in the bathroomFunctional purpose only the owner can determine the partitions in the bathroom, based on his needs and preferences. Despite this, in most interiors the role of partitions is very ambiguous, since they can be useful not only from a practical, but also from an aesthetic point of view. Let's talk about this in more detail. Decorative function associated with the constant desire of man to the beautiful, the desire to turn your home into a cozy corner, and to solve this problem will help install a decorative partition in the bathroom. For example, if you decide to decorate a bathroom in the Japanese style, a decorative bamboo screen will become an excellent addition to its interior, which will not only emphasize the naturalism of the decoration, but will also be a beneficial addition to it. Another beneficial solution for a bath in an oriental style would be the installation of a glass partition decorated with floristic or ethnic patterns;
Zoning room - Another important function of the partition, through which the bathroom can be divided into several zones, each of which has its own functional. For example, by installing a partition, you can delimit a bath, toilet or shower. You can also install decorative columns on either side of the mirror or washbasin, and thus separate them from the common room or arrange a small niche in which the washing machine will be installed later;
Masking communications - a function that involves the installation of partitions in the case of strongly protruding pipes or other technical structures that are not possible to hide under false walls or a screen. In this case, the problem can be solved by the installation of a decorative partition or columns, on which you can hang a lamp or functionally significant shelves.
Bathroom dividers
The choice of material for partitions, taking into account the specifics of the roomBefore you buy a partition for a bath or build it yourself, you need to choose the most optimal material from which it will be made, in the process which you must take into account the specificity of the room. When choosing a material for the manufacture of partitions, it is first recommended to evaluate not only the economic but also the technical feasibility of using a particular material. If your goal is to divide the room into several zones, it makes no sense to use concrete or brick, but if you install a suspended washbasin on the newly erected wall, these materials will be the most optimal choice, unlike less durable drywall and glass.
Anyone who asked the question: “How to make a partition in the bathroom?” - we recommend choosing a material with regard to the specifics of the room. Microclimatic conditions in the bathroom, namely, high humidity, necessitate the use of materials that are resistant to its effects, as well as easy to finish. The modern market can offer an abundance of materials that meet the above requirements and can be used for the manufacture of partitions in the bathroom. These include:
Some of the above materials are used for the construction of more capital partitions that are relevant from a practical point of view. These include brick, building blocks and reinforced concrete. The remaining materials, which include glass and drywall are used in the case of installing partitions that carry only a decorative function and the function of zoning, in view of lower strength.
It is important to know that most of the above mentioned materials, except glass and glass blocks, are characterized by a porous structure that promotes moisture penetration. This necessitates the use of waterproofing materials that prevent the penetration of moisture. These include plaster, coating and penetrating materials for waterproofing, among which the most universal is considered to be waterproofing based on bitumen and polymers. It is not only easy to apply and dries quickly, but it is also easy to decorate later with mosaic, plastic panels, as well as mirror or tile.
Concrete, brick and stone partitions for the bathroomIf you plan to build a capital partition in the bathroom, concrete or ceramic brick will be the best material for it. If we take cases from practice, it is difficult to give such examples when a wall was erected in a bathroom by pouring concrete, except when it was necessary to form concrete ledges under the shower stall or under the installation of a more common glass partition. Thus, we can conclude that this material is used mainly in cases where it is necessary to build a foundation for the installation of something. Brick is a more practical material used for the installation of capital partitions for the bathroom, in view of the convenience of working with him. It can be brought into the apartment in any quantity necessary for you, to build both a partition and a more solid wall, which can be laid out with various types of masonry, so you can adjust the thickness of the partition to be built depending on the area of the room and your preferences. But, despite the fact that the brick is a material with which it is easy and convenient to work, experienced craftsmen continued to search for more practical and modern materials for arranging the partition in the bathroom, which was crowned with success.
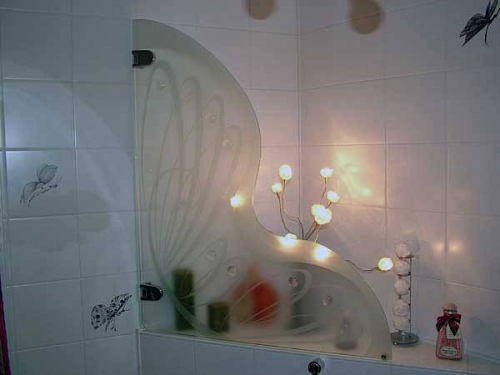
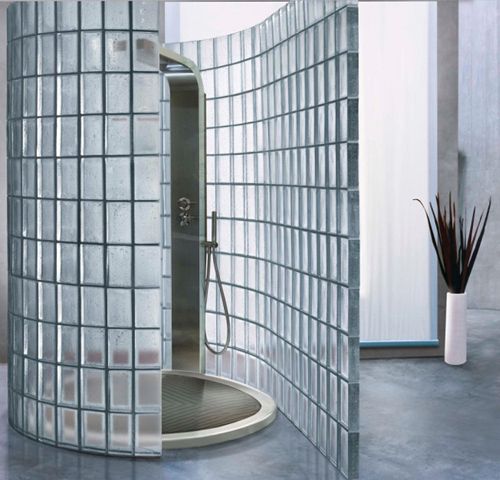
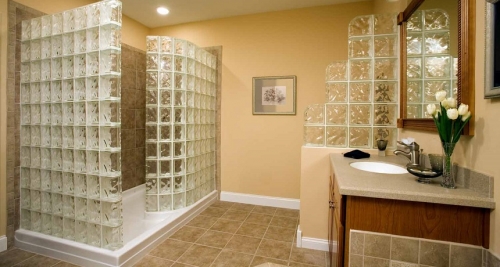
Glass partitions: original ideas for creating additional walls in the bathroomDespite the fact that capital constructions are more reliable and durable, the most interesting for designers are the partitions that perform a decorative function in the bathroom interior. Unusual designs can not only attract attention, but also make the room extraordinary, as well as visually expand the space of a small bathroom. At the same time, no one has canceled the practical functions - they are also characteristic of partitions in the bathroom, if the experienced master managed to combine practical and decorative functionality in them. For this, experts recommend using several non-standard tricks.
Glass blocks. By selecting them as the main material for the manufacture of partitions, you can add unusual notes to the traditional, unremarkable interior of the bathroom. This is due to the fact that modern modifications of the material look much more profitable than their older counterparts.
The manufacturer offers glass blocks made in the widest range of colors, and as the highlight of the material uses original parts placed inside the glass blocks - shells, numerous sparkles or flowers. Light transmittance and transparency are also variable parameters. The undoubted advantage of glass blocks is the ease of installation - using them as the main material, you can lay out walls of various configurations.
Strained glass- material produced in sheets, both medium and large sizes, in connection with which, a layman often has difficulty in the process of installing a partition of sheet glass. As for the practical use of glass partitions for the bathroom, it is characterized by a significant narrowness compared with more capital partitions. Such fences can only be used as shower partitions or as the main element used for zoning space. However, this does not prevent the growing popularity of glass partitions, since the main highlight of such a wall is weightlessness and transparency, which will be especially important in the conditions of a small-sized bathroom.
Plasterboard bath partitions: advantages and disadvantagesDespite the advantages of the materials described above, plasterboard structures are still the most popular. Drywall is a material whose structure is represented by a gypsum layer, which is covered on both sides by sheets of thick cardboard. The advantages of drywall include:
Drywalls are also characterized by its drawbacks:
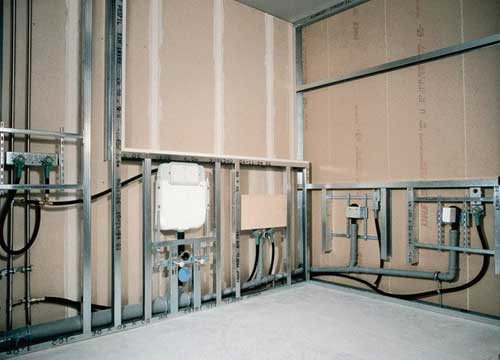
Construction of plasterboard walls: preparation of materials and toolsIn terms of design features, the plasterboard partition in the bathroom is a metal frame, on both sides sheathed with sheets of plasterboard. The free space between the sheets can be used to disguise unsightly communications, and the space that is not used in this area is filled with soundproof material. If you want to organize more complex designs, you can bet on the built-in shelves or additional lighting.
Required materials and tools
What tools to stock up on? Prepare in advance the following set of tools that you will need in the process:
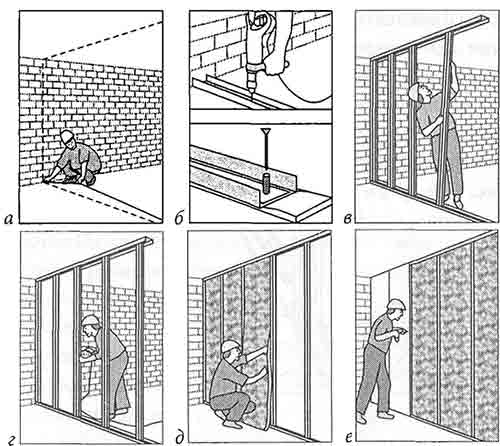
Installation work: sequence of actionsAt the place of installation of the partition, mark the floor and, if necessary, in the place where you plan to build the doorway. Schedule the installation of rack profiles in increments of 50 cm, after which, using a level, mark the ceiling and walls;
Taking into account the length of the partition, cut the guide profiles and fix them to the ceiling with the help of a dowel of nails, then perform the same on the floor. If the floor is wooden, use self-tapping screws for fixing profiles, if concrete - dowel-nails. At the same time, remember that the distance between fasteners is at least one meter, and between the edge of the profile and the wall - at least 0.5 m;
Next, go to cutting rack-mount profiles, not forgetting that they must be the same length, namely, 15-20 mm less than the height of the room, which will provide ease of mounting rails. After cutting them strengthen in the vertical direction. Profiles, located on the border with the wall, are fixed with the help of dowel-nails, and the rest are self-tapping screws with a press washer;
Important! If the height of the finished structure exceeds 2.6 m, it is necessary to reinforce it with additional guides between the rack profiles; After installing the metal frame proceed to its trim. Cut the sheets of drywall with the help of the usual sharply sharpened knife, they are fixed on one side, with exactly butt, which will make the seams almost invisible. The sheets are fastened to metal profiles using self-tapping screws equipped with a countersunk head. At the same time, the fastener cap is slightly embedded in the material, which will make it almost invisible;
Inside the structure is laid heat and sound insulation material - layers of mineral wool. It is recommended to make this action with glasses and gloves. To most effectively fill the free cells of the structure, mineral wool plates can be cut or torn, depending on your preferences; By carrying out this event, the second side of the structure is lined, as a result, you get a perfectly smooth surface, devoid of any irregularities and ready for further facial finishing;
Before proceeding to the final stage of installation - face decoration, it is necessary to carry out a number of standard activities. These include putty seams and caps screws, in front of which the joints glue reinforcing tape, as well as the application of primer. After that, you can safely proceed to the facial finish of the partition, which depends only on your individual preferences. Bathroom - the place in the house that is most exposed to the negative effects of moisture. In this case, it is there that girls in the morning induce "beauty" and all family members perform hygienic procedures. Therefore, the room should always be clean and effectively decorated. Mildew stains, yellow drips and other traces of high humidity are unacceptable. The ceiling, plumbing, floor and walls in the bathroom should shine clean and maintain the original appearance as long as possible. Choosing a way of finishing and designThe most common finishes are:
Before you make the walls in the bathroom, you need to analyze all the advantages and disadvantages of each of these materials. The most popular is tile. It withstands temperature extremes, high humidity, easy to clean and clean. In addition, tiled and mosaic walls look very stylish, especially with a competent selection of patterns and colors. The only weak point is the seams on which the fungus often “sits down”, since they have a porous surface. Modern waterproof latex paints look good, tolerate conditions of high humidity, but require careful surface preparation. They will emphasize the slightest unevenness and make it more visible. What else can sheathe walls in the bathroom? For example, plastic panels. They are easy to maintain, easy to do by hand, but they don't have many design options. Fiberglass still fit. The material perfectly tolerates any operating conditions, but it costs a lot. Ordinary, even waterproof wallpaper will last less, as the water will fall into the joints and destroy the material. For larger bathrooms, it is recommended to make walls of plasterboard. To do this, you need to use a moisture resistant sheet (green), followed by painting with special paints. Such a finish will provide good sound insulation and allow you to hide communications.
Another option for the use of drywall in the bathroom will be to use it as the basis for laying tiles. On such a surface, the tile is kept very well, but for this you will need two layers of hL. Without such measures, the decorative layer will not hold. Next, we will discuss how to properly make the wall trim in the bathroom. Installation options for drywall in the bathroomFirst of all, you need to decide how the material will be mounted on top of the ceiling. There are two options for mounting walls of plasterboard in the bathroom: on a metal frame and directly on reinforced concrete (or brick). Each of them has a number of pros and cons. Installation on the frame - it is more troublesome and requires a certain qualification. But the result is a durable and durable construction, which can be safely decorated with ceramic tiles, used for wiring, communications and installation of lighting. The main thing is to correctly mark up and calculate the required number of "consumables". Installation of sheets without base is made directly on the wall, using special glue. The main advantage of this method is a smaller thickness compared to installation on the frame. But for bathrooms, this option is not too suitable. If in the future it is planned to lay the tile, the glue may not withstand and the wall will collapse as the plasterboard parts fall out. So, what to make the walls in the bathroom, if the area allows, and the floor is uneven? Best of all, moisture resistant plasterboard, followed by paint or tile coating. Calculation of materials and componentsFor processing one square meter of space, you will need the materials and components shown in Table 1. The calculation is given for the variant when the metal frame and single-layer plating are used. With a two-layer trim under the tile consumption of drywall will increase. Table 1 - Facing 1 sq.m. of the wall in the bathroom with sheets of moisture-resistant drywall (according to Knauf documentation)
In addition, work can be performed using not ceiling profiles (CD and UD), but with the help of profiles CW and UW (rack and guide, respectively). If the surface of the sheet is further painted, then Perlfix glue can also be used. For mounting on the glue list of "consumables" will be much less:
The calculation is indicated without taking into account the consumption of decorative coatings in the form of paint or tile. Technology installation GKLV in the bathroomAfter all the preparatory procedures are completed, you can proceed to the marking of floors and wall cladding in the bathroom with sheets of drywall. This procedure is quite time-consuming and involves the following sequence of actions:
Sheets of drywall are screwed with screws at a distance of about 15 cm from each other along the edges and at a distance of 20-30 cm in the center of the sheet. It remains only to finish and the walls will look almost perfect. There are almost no situations when you do not need to know how to close the corners in the bathroom. Finishing corners - this is one of the most difficult moments in the work. Frame installation of drywall allows you to make them almost perfect, but in these places you may need a larger layer of putty. Therefore, from the point of view of the formation of corners, the frame method is considered the best. When frameless plasterboard finishing of the walls in the bathroom, a more thorough preparation of the floor will be needed, since the material plates will be glued directly onto it. Next, apply glue, but only on one piece or sheet! Do not rush and handle everything at once, as it dries quickly and you can not manage to trim the entire drywall. Important: between the sheets gklv and the floor, sheets and ceiling, be sure to leave free space (up to 15 mm). It fits the gaskets, which will allow the base material to change the volume with changing environmental conditions, which is especially important for bathrooms. Finishing with frameless installation method will not be very different from installation on the frame. Only the tiles will have to be abandoned. That's all. The walls in the bathroom are almost finished. It remains to choose the color of paint or tile laying method. Medium-sized room (for example, a combined bathroom) can be designed using bright, contrasting colors and patterns. How to choose the right design of the bathroom and what curly elements of drywall can I use? |


| Read: |
|---|
Popular:
How to fix a grip profile to a wall
|
New
- The interior of the room with wallpaper in flowers
- Piercing - “8 earrings, a lot of photos, how to care, how many heal, where to do, how to accelerate healing, what would I bring back?
- Window opening in a brick wall
- Finishing the bathroom with plastic panels
- Long narrow kitchen - layout (41 photos) of comfortable space
- White apron on the white kitchen - a classic combination
- Selection, consumption and features of applying paint on the wallpaper
- Designing a wardrobe - six simple steps
- Rating of the best oil heaters by user reviews
- What ear pierce guys normal orientation


