Site sections
Editor's Choice:
- Completion of country houses
- Design project of a three-room apartment
- Is it possible to build a balcony on the second floor
- Overview of the room interior with a balcony
- Kill neighbors that interfere with sleep
- Sample collective complaint against neighbors
- How to teach lesson to noisy neighbors
- We put things in order in kitchen cabinets and drawers
- Interesting interior solutions for different rooms
- Architectural styles of private country houses
Advertising
| DIY door frame installation step by step instructions. Installing the door frame: tips for assembling the box in different ways and installing it in the doorway yourself. |
|
Buying a new door, the buyer receives a not completely ready-made design for installation. Manufacturers do not specifically fix loops, do not insert locks, leaving customers freedom of action. It is not known which way the door will open, at what height hinges, locks will be fixed. Therefore, a non-trivial installation issue arises before the buyer. Alternatively, you can use the services of specialists. Or trust yourself in assembling the door frame. To do this, it is recommended to study the technological nuances and prepare tools. Replacing doors of any kind a priori carries a decorative function. Such designs can revive the interior, complement the standard design with a “cherry from the cake”. Often, new doors do not meet the standards for existing openings and frames, as a result of which any installation of the door frame is made with the complete replacement of the old load-bearing elements. Stage one: preparationAll the doors on the market in the middle price range are delivered complete with a dismantled door frame. It will not be difficult to independently assemble it, subject to all recommendations. According to technology, the process includes the mandatory implementation of a number of operations. The advice of carpenters regarding door coverings (decorative film, veneer) seems important. It is necessary to work with the material as carefully as possible, otherwise chips and scratches will ruin the impression of a high-quality installation. When the door leaves are bought and are waiting for installation, you can proceed to the preparation stage. The following tools should be selected:
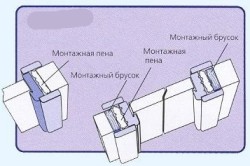
Naturally, for a complete set you will need hinges that will help you understand how to put the door frame. Second phase: assembly processAny box for installing an interior door provides the following fragments:
The installer's task is to combine all the details strictly in size. There are several methods of securing the beam, but the most popular is the spike connection. According to it, spikes are created on the vertical and horizontal components, which are then combined with the grooves of other elements. Residents often ask questions like: "How to assemble the door frame so that there are no ugly gaps and chipping marks on the corners?" For beginners, experts recommend joining canvases at an angle of 90 °. To do this, you do not need to cut and grind the bars. For more confident in their abilities, the second option remains - a connection at an angle of 45 °. We show how to assemble a door frame in a video.
Hinge installation
The final stage of assembly
How to make a door frame
To get a rigid base of the box, fix narrow timber strips at the corners of the structure. In the absence of a threshold, fasten the lower part of the opening with a temporary bar of the corresponding dimensions. Do not worry about nail hats, as cashiers will be installed on the box. They will hide all the elements of the joints and fixtures. Naturally, the process of mounting the door frame can only begin after disassembling the previous design and processing the opening. The best option for fixing the structure is mounting foam. But for increased reliability, it is recommended to fix it with anchor bolts. Learn the nuances of installing a door frame on a video. In doing so, pay attention to the following points:
What is noteworthy is that all types of doors are installed in this way. Therefore, if the question arises: "How to assemble a door frame for a MDF door?", You will not experience problems. How to assemble a door frame for a wooden bathNatural wood is an excellent material for construction. It is distinguished by naturalness, environmental friendliness, durability and practicality. The only negative for the builder is the shrinkage process. Openings in wooden log cabins or timber structures should not be equipped immediately after the construction of crowns. There are two options:
Experts assure that in both cases, the components of the box play the role of crown connectors. Directly above the opening always provide a gap that protects from significant deformation of the structure during the shrinkage of the entire structure. ConclusionUnprincipled, what type of door you are going to install, what is the width of the doorway, the basic rules of installation are the same. Using the recommendations and carefully following the step-by-step installation plan, you will be able to install any interior door. A variety of reasons can influence the decision to mount a box yourself. Someone wants to save their money in this way, and for someone it is fundamentally important to do it yourself. After all, it is not known how these masters work. Maybe their work will not last a couple of years. And again, you need to redo it for your money. There are many more such premises. But another thing is important - to establish this construction itself is not at all difficult and quite real. Even the lack of professional skills does not hurt to take up the tool. The article will tell readers in detail about how to install the door frame, in what sequence you need to perform this work and what to pay attention to during installation. Preparatory stage. What you need to have with youIt is impossible to cook any dish without the missing ingredients. So it is here. To be ready for independent activity, it is necessary to ensure in advance the availability of all necessary tools and building materials.
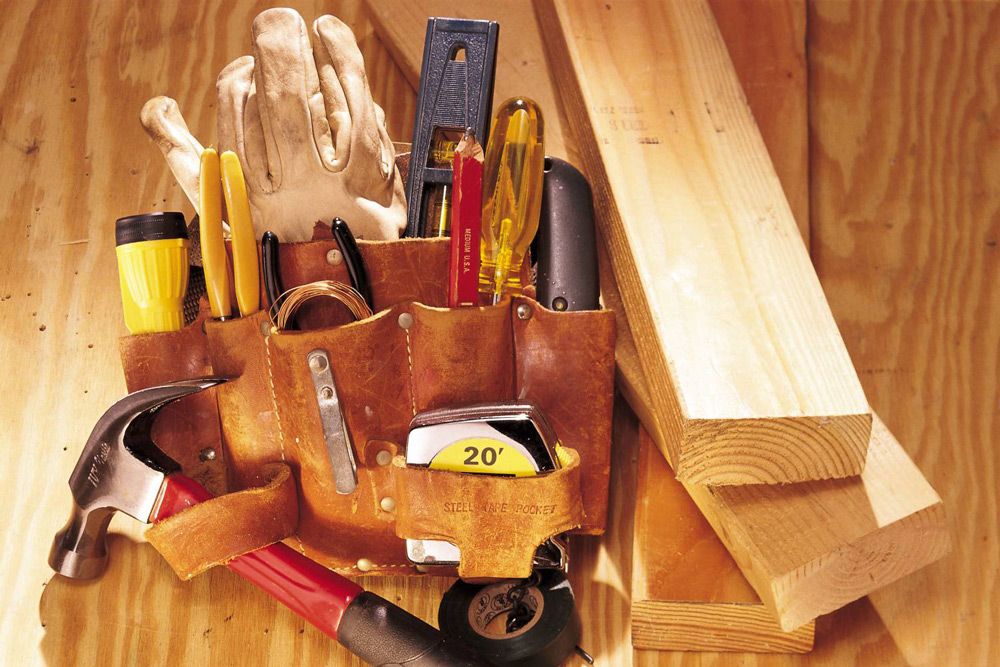 It’s better to immediately prepare the necessary tools. It’s better to immediately prepare the necessary tools. General outline of actionsThe installation algorithm is as follows:
Determine the sizeThere are several rules that establish the dependence of the thickness of the recreation center on the wall thickness. According to experts, the ratio of such sizes should be as follows:
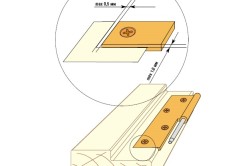
The two cases given are the most common. In almost every building, the indicated wall sizes are used. Therefore, choosing the right box will not be difficult.  The thickness of the door frame depends on the thickness of the wall The thickness of the door frame depends on the thickness of the wall Observance of such proportions is also necessary so that the Palace of Culture looks good against the background of the wall, does not protrude strongly from it, or, conversely, is not too thin. With this approach, the box will hold firmly and reliably. And then the installation of platbands will then seem nonsense. After all, if the wall thickness is greater than the box, then the latter will need to be "enlarged" with the help of additional slats or boards. This is, on the one hand, additional costs, and on the other - an unaesthetic look. Getting startedFirst of all, you need to measure the width and height of the entire opening with a tape measure. The resulting figures should be greater than the width of the future door and frame in the aggregate. This is necessary in order for the box to enter the opening without problems and not be larger than it. It is recommended to subtract 30 mm from the obtained opening width in order to get a small gap between the recreation center and the wall (that is, 15 mm on both sides). The same gap should be left on top. The clearance does not apply to the bottom. But if a structure without a threshold is installed, then between the lower part of the door (and not the recreation center) it is recommended to leave from 0.8 to 2 cm free space. The size of the latter is affected by the purpose of the room and the type of flooring.
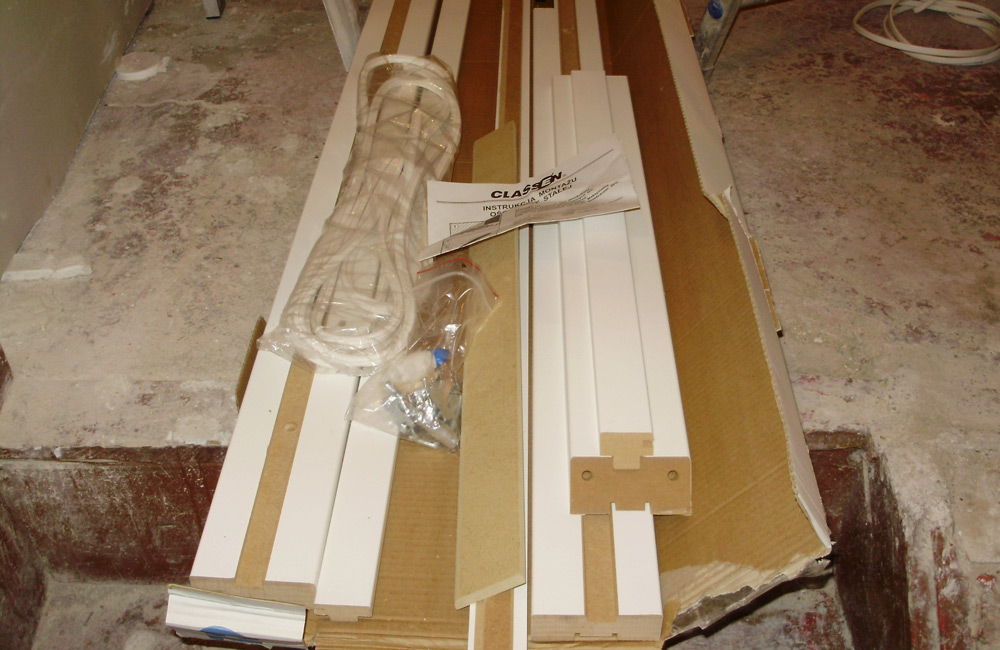
Next, you should attach the level to the sides of the opening and to its upper part. According to the information received, it is necessary to evaluate how vertical or horizontal is littered. If such irregularities have been identified, then they must be eliminated. If one of the sides is skewed, then the door will then not close or will spring and do not fit snugly everywhere. If the opening is perfectly even (which is extremely rare), then you can safely proceed to the construction of the box. How to assemble the structure yourselfTypically, DC is sold unassembled. These are four long slats, two of which are lateral, plus the upper and lower. The last threshold bar may not be included. It all depends on the type of door.
After calculating the exact dimensions of the recreation center, taking into account the fact that it enters the aperture without problems and there will still be a small gap, it is necessary to proceed with its design. The assembly of the box implies a reliable connection of all the planks to each other so that they form one. In such cases, the following types of fasteners are used:
The collection procedure itself will look like this:
Go to the installation processTo put the assembled DC in the doorway, you must completely make sure that it is assembled reliably, correctly and has no flaws. The procedure consists of the following steps:
findingsInstalling the door frame is not at all difficult. This work is within the reach of everyone. Even those who do not have special skills. Such a decision carries many positive aspects. On the one hand - cost savings, and on the other - the acquisition of new skills for further work. All newcomers to a reliable and safe installation only need to follow the recommendations of professionals. Only in this way can success be achieved when carrying out repairs at home. And the rules presented in the article will only contribute to this. Greetings, friends! When it comes to repairs, many of us often face the issue of replacing interior doors. In order not to resort to the help of professionals and save a "tidy" amount - I will teach you how to correctly and competently install a door interior door do-it-yourself. For example, in Rostov-on-Don, installing one door costs about 1,500 rubles. And if you need to install not one but several? - there is a saving :) In order not to “make a fuss” - you only need to adhere to a few simple rules! By the way, installation is carried out only after its competent assembly, and if everything is ready for you, then you can proceed. Essential tool
If everything is available, then you can proceed. Opening preparation Friends, on my personal example I will tell you how correctly install the door frame from MDF. But in order to start - it is necessary to correctly prepare the doorway itself.
This indecency must be removed
Insert scrap and break! (sorry for taftalogy)
Usually one cut is enough to extract the whole “loot”, but in my case the opposite part stubbornly resisted and I had to resort to scrap again.
And the doorway is free
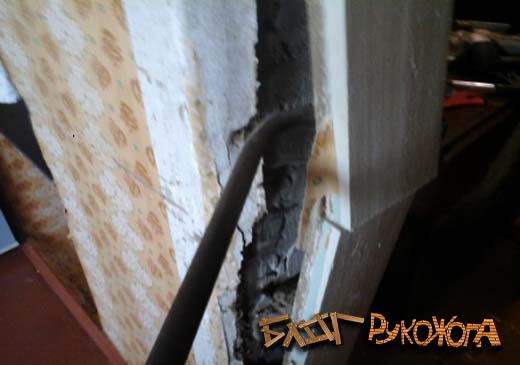
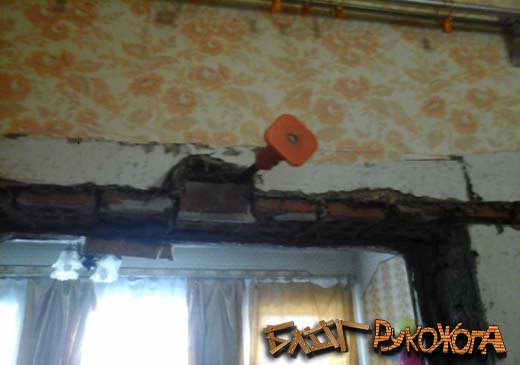
It would seem - everything is ready, but there is one small but. The thing is that the doorway is almost 15 cm lower than the required one. Since the wall is made of bricks, it is necessary to slowly remove the "mortgages" - in our case this is the 50th metal corner. With the help of a hammer, we remove the corners and such a picture remains.Above in the photo you can see how much I need to remove in order to install a standard two-meter canvas!
With great care, I remove the masonry with a chisel.
I make a “shtrob” under a new “mortgage” and put everything in its place.
I weld the design so that nothing "scatter"
As you can see, some of the bricks fell off themselves, leaving a decent gap, but nothing - the gimmick of a fiction! The main thing is that the door jumper is standing tight! So, the doorway is fully prepared for the installation of the door frame - go ahead. Installation We proceed directly to the installation of the door frame. We install the door into the opening and fasten it to the wedges. We are trying to achieve alignment with the walls, so that later we can easily establish cashing. We fasten the looped side of the box at the level - this is the place where the loops are installed. First you must comply with the horizontal level.
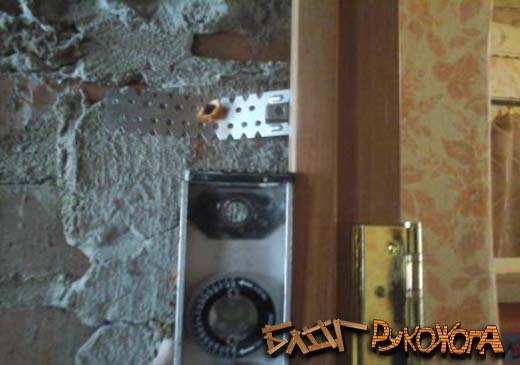
Yes, I completely forgot - I install the door frame without holes. In order to do this, I use 1 mm thick suspensions for drywall. On each side of the door frame, I fixed 3 suspensions. I chose the place for fastening so that the holes that I will drill fell directly into the brick itself, and not into the solution. If you have a wall made of foam or gas block - then even easier - and you don’t need to drill anything - you can simply fix it with a self-tapping screw. Use flat-head press washers to prevent the hangers from hanging out.
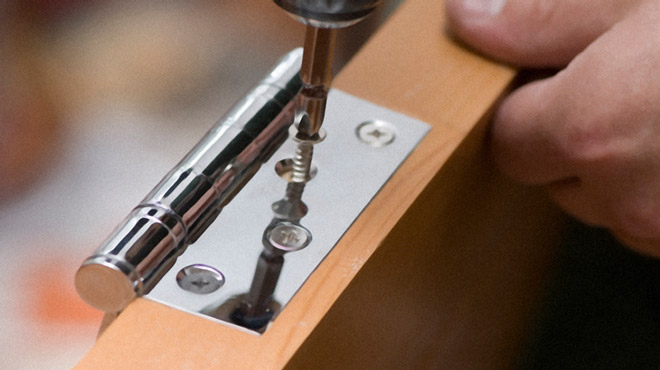
After you put the hinge side in level - drill a hole and fasten.
After the doors are vertical, you must set the horizontal. Using the level we fix the door frame. Thus, it turns out that the suspension, which is located on the side of the door opening, exposes the vertical, and the other side is responsible for the horizon. Nothing complicated - just try it! The hinge side is exposed - hang the door on the hinges. Adjust the door pressure, that is, the door should close close to the door frame. If there are gaps, then pushing or pushing the second side - adjust the closing / opening. Then wedge the opposite hinged side of the door and fasten. In my case, I again use suspensions.
The next step is foaming the door. Foam should be used with an extension of not more than 1 to 3. For lack of a professional pistol and foam, I used Titanium 65 foam. Before foaming, it is necessary to prepare for the fact that it will not be possible to use the door for 4 hours (this is how much mounting foam is needed until it solidifies completely at room temperature). Before foaming the door, it is necessary to carry out a series of manipulations so that the door does not crush. How I do it:
Especially for those who don’t understand anything ничего How to install a door frame with your own hands - videoThat's all my dear handshakes! I hope I was able to answer the question how to install a door frame. The next step in installing interior doors will be what I will certainly teach you too. Good luck in your repair and construction endeavors! The front door has always been considered the face of the house, and people were especially responsible for installing it. Currently, the door is installed no less carefully, and special scrupulousness is present when installing interior doors. In each case, the door frame plays a key role in the installation. Correctly assemble it and install it in the doorway - this means ensuring reliable (without distortions) locking the door and the precise operation of all mechanisms. Let's try to figure out how to assemble a door frame. Firms manufacturing door blocks of the highest quality are engaged in the installation of their products.Such work is carried out through organizations by attracting specially trained personnel. The point is this: it is easier to ensure the installation of the door than to receive a number of complaints about the quality of the goods and lose a number of potential customers. A simpler door can be sold not only without a door frame, but also without the availability of parts for making this box. We consider in detail this particular case. What materials and tools will be needed?
So, you need to make all the parts yourself and assemble a box from them. To do this, you will need:
Work order
First we process the bars (measurement, planing, additional drying). The bars should be 3-4 cm wider after processing than the door leaf. Now you need to measure the thickness of the door and set aside a segment 2 mm larger than the measurement result from the edge of the bar. At this distance you have to draw a longitudinal line along the entire bar. The marked part should be planed or cut on a milling machine. Cutting is preferable, since the surface will be much smoother and will look more aesthetically pleasing. The sequence of your actions will completely coincide with those that you would carry out if you had stocks of factory production. Namely, you have to fulfill several more important points: to think over and implement all the articulations of the door frame elements, mount the gaskets, prepare the places for fastening the door hinges and in the doorway. Wooden spikes or metal screws?The joints of the bars that make up the door frame can be different. Very often, the door frame is connected to the spikes. It is a worthy and durable connection, but for an inexperienced joiner, such work will be very difficult. It is much easier to assemble all the details on the joints using self-tapping screws. It is easy to do.
First you need to attach the blank for the top of the box to the horizontal cut of the door and, making a slight indent from the edge of the door leaf, draw two lines on the blank at the edges of the door. We saw off a bar along these lines. The blank should be 4-7 mm wider than the door itself. We also make the lower blank (if you are going to provide a door with a threshold) and two vertical blanks. We place two vertical blanks on a horizontal plane and lay vertical elements on them so that none of the blanks protrudes beyond the edges. On the vertical parts of the box, mark the lower edge of the vertical elements. According to these marks, the protruding part of the profile of the uprights will be cut. First, make a neat cut perpendicular to the workpiece to the entire depth of the protruding profile. The incised part is carefully removed with a chisel. In this case, there is no need to rush, because with a strong push (hit) on the chisel, you risk getting a chip on the door box, so all the preliminary work will have to be done again. When all the protrusions on the vertical blanks are removed and all the places where the deletions were made are cleaned, the door frame can already be assembled into a single whole. Door frame assembly
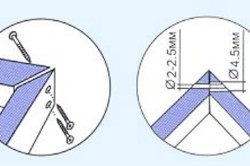
First, we make through holes in the vertical elements of the box with a thin drill. It is necessary to distribute the drilling places so that they are at least 15 mm from the edge of the workpiece and fall on the central part of the horizontal bars. And now we are collecting two marked elements for self-tapping screws. It is advisable to take self-tapping screws of such a length that they are immersed in a horizontal bar by at least 3 cm, and the step should be small. Similarly, collect all other elements into a box. There is no need to rush, since it is necessary to constantly monitor the presence of all elements in one plane. And to do this is not easy, since it is difficult to find an absolutely horizontal plane for assembly, so even the construction level will not help here. How to do without a building level?It is appropriate to use the old way: we pull two strings along the diagonals. If all points of the box are in the same plane, then the threads should touch each other without creating sagging or tension. If this is not the case, then release the mount at the corners of the box and align. Then tighten all screws securely.
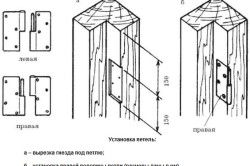
On this, the door frame can be considered assembled. In fairness, we note that the described option will be considered the simplest, even primitive. The box still needs to be “completed” by installing seals on it and ensuring the availability of places for fastening the hinges. Seals should be installed on the box according to the instructions attached to the seals. Very often, door seals come on an adhesive basis. With proper surface preparation, even these elements will last you a very long time, but it is better to use more reliable seals. Remember that the pads not only provide thermal insulation of the door, but also very “dampen” the noise from closing. For this reason, it is impossible to refuse such an important element. How are door hinges fastened?And now the door frame should be provided with places for fastening the door hinges. Since the loops are available in various options, then the places for them can be different. After purchasing (or manufacturing) the hinges, they must be attached to the vertical beam of the door frame at least 20 cm from the horizontal beam and circle the loop with a sharpened pencil. In the marked area, a layer of wood equal to the thickness of the loop itself is to be removed. It is better to make an incision along the line with a special wood cutter. But you can use the usual sharpened knife. The main thing is that the cut line is flat. And now along the line at an angle of 40-50 degrees with a chisel, cut off the edge. Then with the same tool we remove the wood along the entire marked plane.
Door frame bar: h - height, m \u200b\u200b- width, l - length. The door frame must be installed in its place of operation. If all the work described above was performed correctly, then align the door frame along the front with an electric planer. This measure is necessary, since even the most experienced craftsmen cannot “fit” the parts during the assembly so that they fit perfectly together. A planer will easily correct this drawback. Sometimes you can hear that planing is best done after the door frame has been installed. You can agree with this opinion if the house is just under construction. If the door frame is installed instead of the old one that has become unusable, then it is better to carry out all the actions before installation.
And this means that the door will spontaneously open or close. After installing the door frame, you need to hang the door, adjust the hinges, install the lock (or latch) and make the lining. And the most pleasant moment is the finishing work. Door frame finishYou can create in this direction as much as you like, but adhere to the main rules when working with wood: a tree does not like pests, moisture and paint. Alas, many residents do not see any beauty in the wood structure, so mercilessly paint all the wooden products. Do not follow this direction. Just try to polish the door, soak it and cover all this beauty with a colorless matte varnish (and, together with the door, also process all the other elements of the wooden block). Then, you will definitely say to the envy of your neighbors that you collected it yourself. Sometimes you can hear other tips on how to properly assemble the door frame. You can trust everyone, but you yourself will appreciate all the advantages of designs. Naturally, an experienced carpenter will describe the whole process more carefully, having thought through all the details. And along the way, he will add so many operations incomprehensible to you in the description that you can get a complex of technical inferiority. You should only take on those designs that you can do without special skills. Complex structures can only lead to cost overruns and your time.
Those who like tinkering and do-it-yourself repairs may want to familiarize themselves with how to assemble and install interior doors. In fact, this process takes some time and requires effort. Therefore, at the very beginning, you should familiarize yourself with all the steps that you have to go through, and only then get to work. First of all, they assemble the interior door, and only then they are engaged in its installation. In order for the products to be free of gaps and other defects, the following steps must be performed:
Stage one: preparatory work with the room
When buying a new door, you should be prepared for the fact that the doorway may not correspond in size. Therefore, before heading to the store, it is advisable to take the dimensions of the opening, and here it is also taken into account that the new door will have its own jamb, which will have to be replaced in place of the old one. Next, pay attention to which room the doors are selected: in the kitchen, bathroom, restroom, etc. Why is this so important? Because each room has its own communication, which by the time of installation should already be ready. The same goes for water pipes or heating. They are installed taking into account the necessary slope, and it is better to entrust this matter to a professional. Exclusive lovers should pay attention to wiring. Now it has become fashionable to design interior doors with lighting. This means that all wires must be pre-routed to the necessary points.
How to prepare a doorway? It was indicated above that special attention should be paid to this place. First of all, take out the old opening. At this stage, only the box can be damaged; the walls of the opening themselves must be preserved intact. Many are trying to save money by installing a new door in an old jamb. As practice shows, this does not lead to anything good. The door may at least not enter the box, and at the very least - leave significant gaps in the closed state or not close. After dismantling the old frame, marking is made, with which the location of the door handle, the method of opening (inside or from the room), etc. are indicated. Do not forget about stripping, which involves the removal of excess trim, such as pieces of hanging cement, etc. Back to the table of contents
Regardless of the type of door being installed, the installation has the basic classical steps:
As for the tools, it is as follows:
A little advice from specialists: to control the evenness of the installation, it is best to have a plumb bob on hand. If you use a rubber mallet, there is a chance that traces will remain on the surface, so it should immediately be replaced with a wooden one. To fix the frame, dowels are best suited. And when it comes to the hinges, it is better to entrust this task with yellow-pass galvanized self-tapping screws. The standard fasteners in the kit are not particularly reliable. In order not to purchase wedges and spacers separately, they can be made independently, and the entire process of preparation must take place along with the installation of the door itself, since this is how you can choose the right sizes. Back to the table of contents Stage two: assembly and installation of the door frame
First of all, the process of clearing gaps is carried out, while it is necessary to take into account flooring. If interior doors are intended for residential premises, then gaps are best done in 1 cm. The procedure for collecting the box is as follows:
To fix the box, it is recommended to use pieces of cardboard or hardboard, but only so that they all have the same thickness. This will help to provide gaps between the edge of the door and the frame itself. They will be 0.3-0.4 cm. But here it is necessary to control the wedges during the twisting of screws so that they do not move freely. In order for the door to function correctly, special attention is paid to fitting the fittings. To mount the lock, do the following:
|


| Read: |
|---|
New
- Design bedroom classic style wallpaper
- How to make ventilation in the apartment yourself?
- Surfboard - all about surfboards: type, size, shape
- Is it possible to carry out noise work on Sunday
- We preserve vision: the right light
- Color in the interior of the living room (50 photos): beautiful combinations
- Family horoscope for august
- Which foam rubber is better to use for a sofa
- How to choose an interior style if you like everything
- The combination of modern and classic style in the interior


