Site sections
Editor's Choice:
- Bedroom design options in blue for a couple
- How to paint wallpaper for painting: tips and tricks
- Kitchen design in Khrushchev: useful tips for those who have a small kitchen
- How to punish noisy neighbors from above
- Design of a nursery for children of different sexes
- Shower cabin in the interior of a small bathroom
- Which light is better - warm or cold
- How to care for recently pierced ears
- What to do if the neighbors above are constantly poured
- Materials used for suspended kitchen ceilings
Advertising
| Connection diagram of chandeliers with remote control. Chandelier with remote control - the device and installation |
|
The advantages and disadvantages of chandeliers with remote control Chandelier has long been called a lamp that is installed under the ceiling. They come in many different types and designs. You can find a chandelier, which has one light bulb, and in the next room it is already suspended with several light bulbs. You can turn on all the lights at once, and if the switch is doubled, then the lights are connected in turn. Today chandeliers with remote control have appeared on the construction market, it is possible to turn them on and off using the control panel. How are chandeliers with remote controlsThe question may arise about what the remote control is for, when it can be turned on and off with an installed switch. Next comes the next question about the need for the switch itself, if there is a remote control. Usually such chandeliers have not one, but several light groups, LED lighting to create lighting effects and halogen bulbs for lighting, all of which can be controlled remotely.
The consoles always work in the same bundle with the receivers tuned to the same frequency and are sold in the same set. With the help of the receiver is controlled by the controller that controls the creation of light and color effects. To control the effects there are buttons on the console. The controller can also be controlled using a switch. It is programmed and configured in such a way that each time the switch is turned on, a new light mode will be connected. Power supplies for LEDs and halogen lamps are also located in the chandelier cases. How to assemble a chandelierAfter opening the packing box, check the completeness of the delivery. Must be:
In the case of the chandelier, which will be fixed on the ceiling, install the controller and power supply. They need to be limited in freedom of movement, that is, it must be carefully secured in the case with double-sided tape. How to connect a chandelier with remote controlTo perform the connection, you must have:
The wiring is pretty simple. A new chandelier is usually installed to replace the old lamp. The LED chandelier, with the possibility of remote control, can be connected if there are three wires at the connection point. If a switch with two keys is installed in the wall, then there will be three wires. In the apartments, which are built according to new projects, four wires can be brought out, one of which will be grounded.
Further, using a probe or an indicator, they determine the “zero” and “phases” on the wires and label them, since further work will be carried out with the power supply turned off and it will not work to determine them even with a probe. If there is a hook from the old chandelier on the ceiling, it is removed, it is not needed. The sets of LED, always includes brackets for mounting to the ceiling, so they should be installed. Pay particular attention to this so that one day it will not fall from the ceiling. To control the operating modes of LED lamps, they can be completed with remote ones, and some models also have stationary control panels. Wiring diagrams are somewhat different. The stationary remote control is installed in the place of the switch in the wall. With its help, in addition to controlling the lighting, you can search for the lost control panel.
The execution of commands from the console is handled by the controller, which must be connected to the chandelier. The order of its connection and the scheme are on the back of the controller box. The controller is usually mounted in the chandelier under the ceiling. Terminals with markings N and L connect the wires that were doubled under the ceiling. The third conductor is waiting for its connection to the "output" terminal. If there is a fourth, grounding wire, it is connected to the yellow wire of the luminaire. Before the first power-up, once again carefully check all connections and connections, and only then insert the power into the remote control and make a test power-up. Shapovalova Margarita Vasilyevna http://propotolok.guru Modern technology is constantly evolving and improving. No exception and ceiling chandeliers. Now you can control the lighting device remotely, without approaching the switch. Separate designs of consoles are not only push-button. With their help, you can give voice commands, which the lighting system performs fairly accurately. Thus, the scheme of a chandelier with a remote control has become a reality, while variants are very popular. The advantages of remote controlThe main advantage of chandeliers with remote control is the ability to turn them on and off at a distance, without leaving their place. This is especially true for large apartments, equipped with several lamps at once. Chandeliers can be controlled at distances of 30-100 meters, the signal can easily pass through walls, making it possible to turn off the lights in another room. The appearance of these lighting devices is not at all different from similar standard devices. Signal receiving elements are completely invisible. The operating modes of each type of chandelier depend on such factors as the type and number of lamps, the presence of lighting with several primary colors. Therefore, in the remote control, it is possible not only to set the color, but also to smoothly change it.
The main lighting is also easily controlled by turning off several selected lamps or by reducing their brightness. The control panel itself is the main element in the system, because without it, control as such is impossible. However, in the event of its failure, it can be switched on and can be made with an ordinary switch. On the remote there are buttons that provide access to any of the modes of operation of the lamps.
The remote control system can be purchased separately and integrated into almost any type of luminaire. Choice of chandeliers with remote controlFirst of all, the choice is made according to the type of light source. The cheapest option is considered to be chandeliers, where conventional incandescent lamps are installed. Much more expensive chandeliers are provided for energy-saving, halogen and LED lamps. However, they have much higher profitability and a long service life. Yes, and they look more sophisticated in comparison with ordinary lamps. Much depends on the power of the chandelier and the level of illumination. Depending on which room will be installed one or another lamp. A significant role is played by the area of the remote control, as well as the design and overall dimensions of the chandelier itself. The chandeliers, controlled with the help of a remote control, are still only entering the Russian market, but have already earned great popularity among consumers. After all, even a simple and inexpensive Chinese chandelier with such a function is very convenient in everyday use. At the same time, despite the apparent complexity, it is possible to repair the chandelier with the control panel with your own hands - this will save a lot of money, because the masters appreciate such work as decent money. But there is nothing particularly difficult in it - it is important to just understand the intricacies, and this can be done through the Internet. Anatomy of a chandelier with remote controlTo start the repair of chandeliers with remote control you need to study its structure. After all, its filling is somewhat different from the usual electric lighting device. As a rule, all controlled chandeliers have 3 main electronics units:
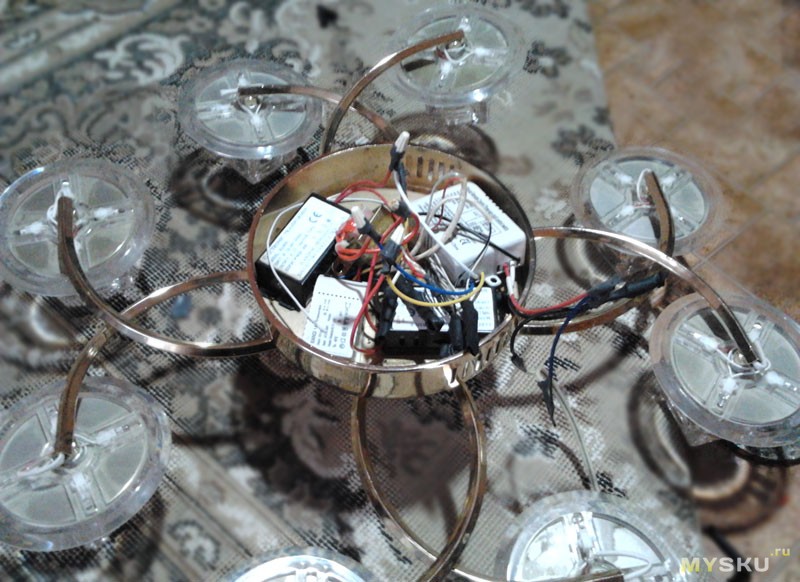
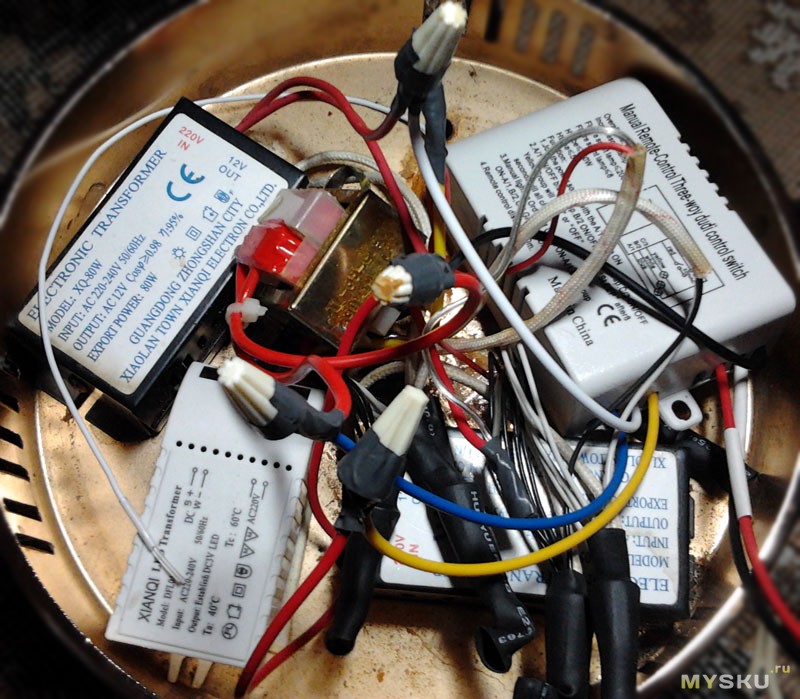
The LED lamp has in its design several LEDs of different colors, which are necessary for a planned change in the color of the backlight. It is, in fact, a purely decorative element, which, however, often breaks. To power the LEDs in the design of the electronic filling there is a special capacitor, which reduces the voltage to the network to the value required by the diodes, and the diodes themselves are connected in series, therefore, when one burns out, the whole circuit goes out. Repairing an LED chandelier with a remote control often comes down not to replacing individual diodes, but to replacing the entire unit - this is faster and more reliable. Halogen lamps derive their energy from special transformers that impulse convert the applied voltage. If the cause of failure is in halogen lamps, then you need to check each of them with a multimeter. If everything is all right with them, then it makes sense to check the transformers - there are several of them in such a chandelier, so you have to tinker. A radio control relay, depending on the model, has a certain number of electromagnetic relays, which are necessary for switching current of different power. The relay receives power from the extinguishing type capacitor, and the excess energy disappears in the depths of the ballast capacitor. According to statistics, the weakest point of the radio control relay is the place of its soldering into the total charge - over time and winding up the operating hours, it can simply fall off. Another mandatory element of a radio-controlled chandelier is a remote control. This is a fairly simple device, having in its arsenal a minimum set of functions and buttons. The electronic circuit of the console to the disgrace is simple and reliable, so the most common cause of failure of the console is simply dead batteries. Search for the necessary partsIf you are still not afraid of the difficulties and did not abandon such a “crazy” idea, like repairing a chandelier with your own control panel, then you need to find all the necessary elements. If prices are not the most affordable or there are no necessary elements, then you should seek help from the Internet - in many online stores, especially those that organize the supply of goods from China, you can find a wide variety of radio and electrical components. In this case, it may take a long time to wait, however, this method of searching for goods is currently one of the most convenient. In addition, here you can look after yourself with a new chandelier with a remote control in case attempts to rehabilitate an extinguished chandelier are not crowned with success. Another had a chandelier for 9 small light bulbs and with LED illumination, but flooded it from the roof with water so that the smoke began. Removed, disassembled, - it turned out, only part of the remote control unit failed. It was possible to fix it, but since there is an opportunity to buy a new one at an affordable price, why not use it?
Proper installation of the ceiling lamp. Chandeliers with remote control are very popular, almost every apartment or house has a chandelier - a ceiling lamp. Usually, the lamp is placed in the center of the ceiling so that the room is evenly lit. They are hung on a hook or, with the help of dowels, rigidly mounted on the ceiling. There are two methods of installing the lamp and chandeliers on the control panel:
Many old apartments in the ceiling have a very large hole for fixing the hook. To hide this hole, you need to shift to the bar so that the hole was covered with a chandelier. So you can fix cheap, but very common. Well, if someone will help you.
MountFirst of all, the base is attached to the ceiling with three - four dowels. The supply wires are connected to the transformer primary winding by terminals of the terminal block. They are easy to identify because they are thinner than the wires of the secondary winding. Be sure to connect to the chandelier ground wire. After that, the outer panel with special decorative bolts attached to the base. Before you install the ceiling lights with your own hands, do not forget to remove from them lightly and fragile elements in order to accidentally break nothing. When the chandelier is connected, you need to check its working status in all modes. At the very end of the installation of the chandelier with your own hands, you can return all the details in place. The chandelier on the remote, which is hung on the hook, connects very easily. It should be hung on a hook, attach the power wires, cover the wire connection and hook with a decorative cap, fasten the cap carefully. Also check the performance of the lamp and install easily breakable parts. how to connect a chandelier with a remote on the ceiling. Installation of ceiling chandeliers
Many Soviet-era chandeliers worked with three lighting modes. Such lamps consist of two electrical wires, each containing a group of lamps connected in parallel with each other. One wire coming out of the chandelier is common to others. If there is a tension between the common and any other, both groups work. Connecting wires to the chandelier
It is important to find a common wire from wires protruding from the ceiling. You can separate the wires in different directions, turn on both keys of the switch. Use an indicator screwdriver to touch each wire, the wire on which the indicator light does not work and will be common. After that, turn off the switch keys and check the voltage again. When properly connected, the indicator light on the screwdriver will not work on any wire. If the indicator is triggered when the switch is turned on and off, it may indicate a wrong wire connection. Then you need to check everything in reliable ways. It is better to take special measuring devices, such as a multimeter. Set the device to the voltage measurement position, turn on the switch keys. Touch the multimeter alternately to each wire. Bend the two wires in different directions, turn on one switch button and turn off the other. Between the bent wires should disappear. Now with the multimeter probes touch the third wire and alternately up to two bent, the common wire will be where tension occurs. This wire needs to be tagged. To find the common wire on the chandelier with remote control, you need to measure the resistance between the three wires on the chandelier. When you find two wires with high resistance, the third one will be common. Now properly connect the chandelier with the remote with your own hands. Do not forget to completely disconnect the apartment. Connect the wires sticking out of the ceiling to the chandelier wires with a terminal connector. If the chandelier has a fourth - grounding - wire (yellow-green), it is simply necessary to isolate it. With proper connection, the chandelier working on the console, after shutdown, works. In the new apartments from the ceiling there are four wires, the fourth - the ground. It must be attached to the chandelier, to the same wire. If you see four wires of the same color from the ceiling, you will have to find a ground wire. It is necessary to disable the introductory machine. Attach a piece of wire without insulation to the instrument probe, wind another stripped end of the wire to the valve of an unpainted battery. Set the multimeter to the resistance measurement mode and alternately touch the four wires. The ground wire will be where the device will show resistance.
In old apartments, chandeliers with one control panel are easily connected, and independently. There is no need to connect the ground, it is well enough to isolate. New apartments require connection and grounding. If the wall switch is always left on, you can not remove it. If it is not needed, then you need to connect two wires in place of the switch. When installing the chandelier with your own hands with a stationary on the remote control, you need to turn off the power, remove the switch, wires to the side. On the ceiling, connect the common with one of the two wires and turn on the power. There should be voltage between the ends of the attached wires. These wires need to be connected to the terminals N and L on the stationary console, and the remaining wire to the terminal "output". The ceiling wires with the chandelier are connected as follows: to the dual one, to the single one - the second, the grounding wires, if any, are interconnected. Chandeliers with remote control have an electronic controller that helps to sort out the modes of operation of the chandelier. Controllers are sold with remote controls, you can buy without a chandelier. The connection of the chandelier working on the remote can be done through the controller, which allows to increase the number of modes. If the chandelier is small, the controller can be installed in the hole in the ceiling. Now you can easily connect any ceiling light. Above all, do not forget to turn off the electricity when working for your own safety. |
 The control scheme works with the help of a radio channel, it allows you to control devices outside the direct line of sight, the range from 10 to 100 meters.
 It would seem that there is nothing difficult to assemble and connect it to the electrical network. In fact, it is, but it takes a lot of time to unpack and prepare for the assembly of all its components. When everything is unpacked and prepared for installation, you can safely begin work.
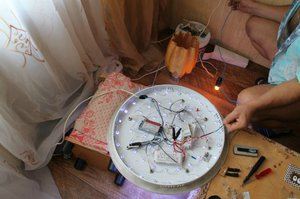 When installing the stationary control panel, we again recall the need to turn off the power supply, remove the switch and disconnect the wires from it. The next step is to connect the common wire to the ceiling with any phase wire. When you turn on the power on the connected wires will be the supply voltage. These wires are connected to the input terminals on the remote. The third conductor must be connected to the output terminal.
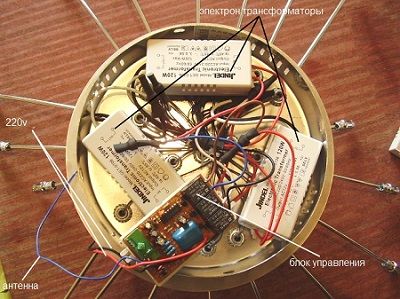

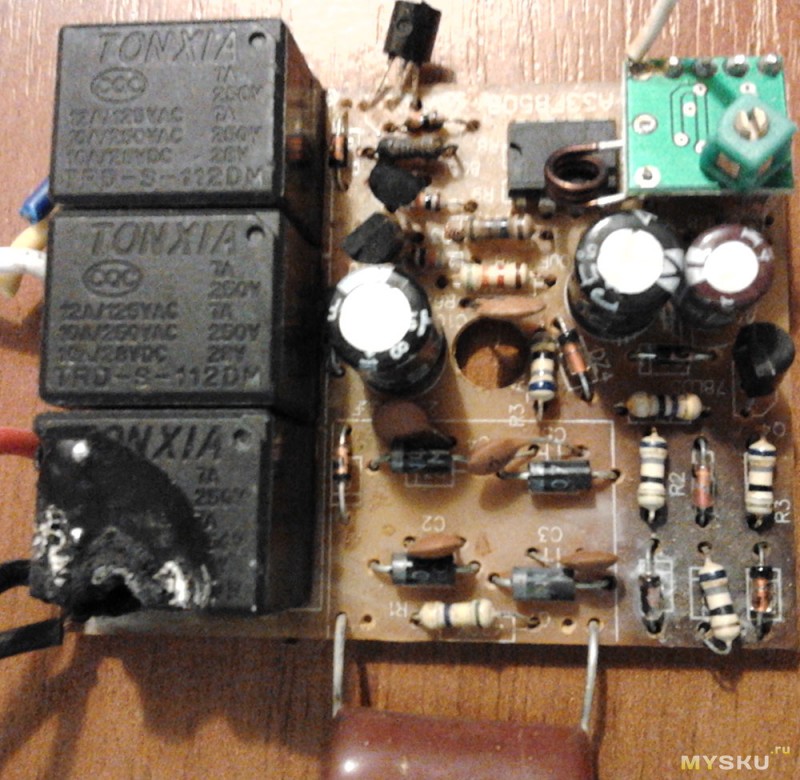
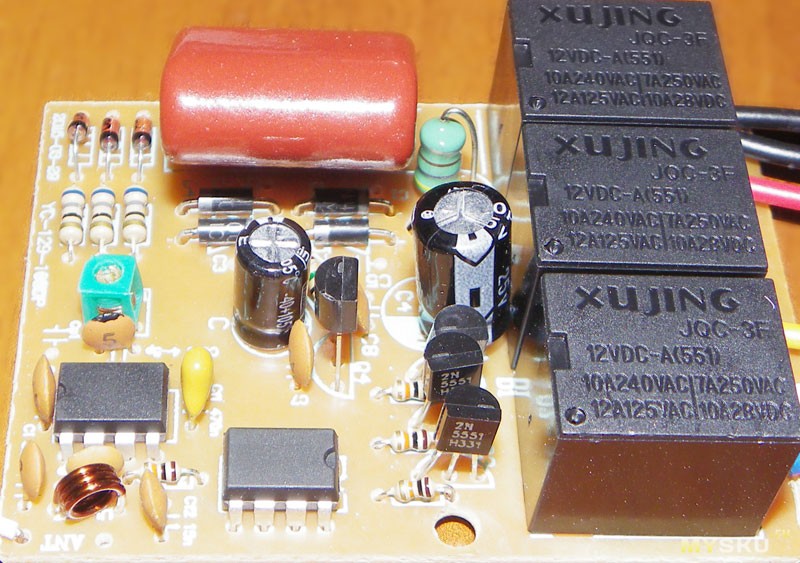


 Power supply units in black cases - for 12V bulbs, on the lower left - our long-suffering diode bridge in the case from the old power supply and a transformer nearby; in a good way, it is necessary to replace it with a more powerful one and limit the current through the LEDs - let's do it if they start to burn out or if the Friend has a little blue light =)
 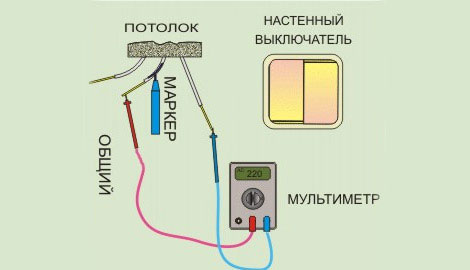 With one phase, the voltage should appear between the working zero and the phase. The correct connection of the wires to the chandelier is the common wire of the luminaire attached to the working zero, and the phase is fed to the two wires through a double switch. Wrong connection - the common wire is connected to the phase, and the working zero is supplied to the two remaining wires through the switch, the chandelier will work. In this case, the person, when replacing the lamp, can strike with a current, even when the switch is off.
 The latest innovations in the field of lighting fixtures have become chandeliers with a remote control, now we will tell you how you can connect it yourself. Such chandeliers with remote control have several LED lights and a controller. New chandeliers on the console can be used not only as lighting fixtures, but also as a timer or color music. For control, a remote control is attached to the luminaires, some have two - remote and stationary, which performs a search, in case of loss of the chandelier remote control. Basic control panel mounted on the wall, like a switch. Thanks to the buzzer, the lost remote is easy to find.
| Read: |
|---|
Popular:
How to fix a grip profile to a wall
|
New
- The interior of the room with wallpaper in flowers
- Piercing - “8 earrings, a lot of photos, how to care, how many heal, where to do, how to accelerate healing, what would I bring back?
- Window opening in a brick wall
- Finishing the bathroom with plastic panels
- Long narrow kitchen - layout (41 photos) of comfortable space
- White apron on the white kitchen - a classic combination
- Selection, consumption and features of applying paint on the wallpaper
- Designing a wardrobe - six simple steps
- Rating of the best oil heaters by user reviews
- What ear pierce guys normal orientation


