Site sections
Editor's Choice:
- Bedroom design options in blue for a couple
- How to paint wallpaper for painting: tips and tricks
- Kitchen design in Khrushchev: useful tips for those who have a small kitchen
- How to punish noisy neighbors from above
- Design of a nursery for children of different sexes
- Shower cabin in the interior of a small bathroom
- Which light is better - warm or cold
- How to care for recently pierced ears
- What to do if the neighbors above are constantly poured
- Materials used for suspended kitchen ceilings
Advertising
| How to glue non-woven wallpaper meter. Some disadvantages and inconveniences. Performing all the preparatory work |
|
You should know that there is no better and more convenient material for pasting walls than non-woven wallpaper. If the ceiling and walls are planned to be decorated with a fillet, then it is initially necessary to glue them, and then proceed to glue the wallpaper. How to glue non-woven wallpaper: technologyMaterial of this type has the following advantages:
The scheme of cleaning the wall from the old finish: a) cleaning, b) smoothing, c) moving the tool. Before you glue meter non-woven wallpaper, you need to measure the height of the walls. If the joint of the wall and ceiling will be decorated with a fillet, then it must be glued before wallpapering the walls. You will need to measure the height from floor to ceiling or fillets, if the latter is used. To the value that will be received, you will need to add 10 cm for stock. On the wall from which the wallpapering will begin, at a distance of 1 m from the corner you will need to tap a strictly vertical line, for which you need to use a plumb line and a long ruler. The plumb line can be made with your own hands from a cord of the desired length, while at one of its ends you must tie a heavy bolt or nut. Elements that will be needed to glue the material on a non-woven base:
Performing all the preparatory work
Before pasting the wallpaper, you will need to prepare the wall. You need to make sure that the wall is completely flat, there are no bumps, cracks or any other noticeable defects. The base will need to be carefully cleaned of the old coating. So that you can easily remove the old wallpaper, you need to wet the coating. This can be done using water and a rag. Moistened material can be removed from the wall with a spatula. If the wall is not perfectly smooth and you need to perform repair work, you need to putty before gluing the material on non-woven base in the corners and other problem areas. After that, the wall must be primed with glue or with a deep penetration primer. If glue was chosen, it is recommended to make a weaker mixture. Speaking about how to glue non-woven wallpaper, you should know that there are 2 basic rules that must be followed:
Next, you need to prepare the material for pasting and coloring. To do this, cut them into strips. It is important to remember to leave allowances of 10 cm on each of the canvases. It is important to remember and respect the pattern, if there is such a need. How to apply glue to the wallpaper?The material must begin to glue on the corner, top to bottom. In this case, you need to consistently smooth it in the direction of the vertical, using a roller or brush for wallpaper. You need to press lightly, so that the new layer goes back to the edge of the pasted.
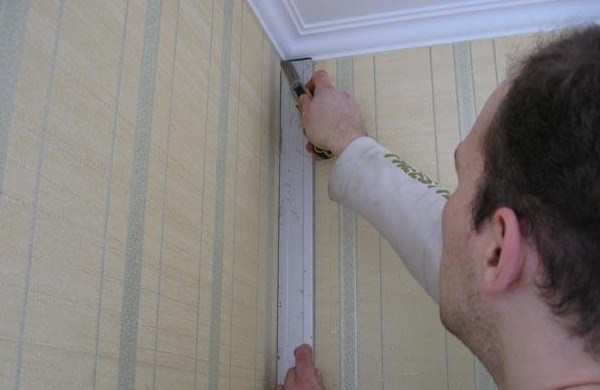
The scheme of applying glue to the wallpaper: 1. The oiling of the canvas with paste. 2. Folding the canvas in half. It is important to choose the right adhesive, which is suitable for gluing non-woven wallpaper. Any employee who specializes in the sale of materials for building and finishing can help with this choice. It is important to know that the advantage of this material is that in this case it is not necessary to withstand a certain amount of time to soak the wallpaper. Such material is able to ensure the stability of the shape and size of the sheets. Before applying the glue on the wall, it is recommended to read the information that is indicated on the packaging of the adhesive mixture and on the roll of wallpaper. Glue must be applied to the wall, which was previously prepared. How to glue wallpaper on non-woven base: the sequence of worksAfter applying the adhesive solution, you need to take the first strip of wallpaper, adjust it in height, and then stick it on the broken line on the wall. The second side needs to be turned on the corner. Do not worry if you can not get an exact match at the top of the wall, because at the end of the wallpaper, which will act, you can cut. First, you just need to tuck. Next, you need to start smoothing the material, expelling air from under it. To do this, use a wallpaper roller, spatula or a piece of clean cloth. After completing the smoothing you need to take a spatula from a large-width metal and a sharp knife. The spatula is used as a guide for the knife, it is applied to the joint of the wall and the ceiling. After that, the knife must be cut off the excess wallpaper. If you can’t cut the raw wallpaper, you will need to wait until it dries, and then try to cut it again. If the wallpaper in some places were not fully glued, you may need to paste the material. How to glue meter non-woven wallpaper butt?
Each layer is glued end to end. In this case, there will be no problems if the wall was aligned during the preparation phase. In the process of sticking a new layer to the previous one, it will be necessary to adjust it in height. A clear joint is not allowed to be achieved by stretching the material.Even if it can be done first, the wallpaper will disperse after the glue dries. If you can not achieve a perfect joint and use monotonous wallpaper without pictures, you can go to the trick. The canvas should be glued with the previous one, the intersection should be about 2-3 cm. Then, using a sharp construction knife, it is necessary to make a through cut in the place where the blades intersect. It is important to cut through 2 layers simultaneously. In the end it is necessary to remove the trim, fluff the joint adhesive mixture and straighten the layers, getting a flat joint. How to glue wallpaper in hard to reach places and corners?Particular attention should be paid to the process of wallpapering the walls in hard-to-reach places. In this case, referring to the location of sockets, batteries, switches and ceiling. The edges of the wallpaper should be lubricated with an adhesive mixture to ensure the reliability of their attachment to the base of the wall. It is not recommended to allow adhesives to get on the main side of the canvas. If for any reason this has happened, you will need to quickly remove the glue from the wallpaper using a damp cloth. Next, the wallpaper must be wiped with a dry base.
Glue non-woven wallpaper near the sockets and switches must be carefully, while the electricity will need to turn off. Before that, measure what size strips will be needed, and then cut them. After the adhesive mixture dries, the necessary dimensions should be made in the hole. At the end of all the work you will need to screw in place all the sockets and other elements. If you plan to glue the material of this type on the ceiling, then you should know that the technology is no different from pasting the walls. The only difference is that in this case you need to find an assistant who can hold a canvas of wallpaper. In the corners, the canvas must be glued so that the overlap on the next wall is approximately 2-3 cm. If in the process of gluing a layer of large dimensions is turned, then it must be trimmed with a sharp knife to the required size. There are 2 options for how to glue the finishing material of this type in the corners of the room:
How to paint non-woven wallpaper?If, after pasting the room with wallpaper, you need to paint the material, then you need to know that water-based paints that are resistant to abrasion and cleaning are best suited. It is recommended to use latex or acrylic paints that have a silk effect. If you select these materials, you can emphasize the texture of the wallpaper. The first coat of paint is applied approximately 24 hours after the glue dries. To do this, use a roller that matches the type of paint purchased. Select it will help the employee of the same store. The second and all other layers of paint are applied in a few hours. It is quite simple to glue such wallpapers, it is only important to prepare the base and follow the sequence of actions. There is nothing better and more convenient, as glues non-woven meter wallpaper as a finish. The main advantage of this material is the simplicity of the pasting process without special skills. This option is not subject to stretching, not torn or compressed. The non-woven base wallpaper allows you to hide the defects of the uneven surfaces of the walls and with the appearance of cracks under them do not crack. Another advantage - plain wallpaper can be painted, making it possible to update the interior of the room. Room preparationAt the beginning, the required number of rolls of material is calculated. To do this, measure the width and height of each glued surface. When performing the calculations, an additional reserve is added a few centimeters to the length. The material is purchased with the same batch number on each roll. If there is a pattern, it must be identical everywhere. The preparation of the premises assumes the presence of smooth walls for their careful pasting with wallpaper.
Switches and sockets are removed, and the wires are insulated from moisture in the box. Next is the priming of the glued surface and its drying. InstrumentsTo carry out the process of pasting will need the following tools:
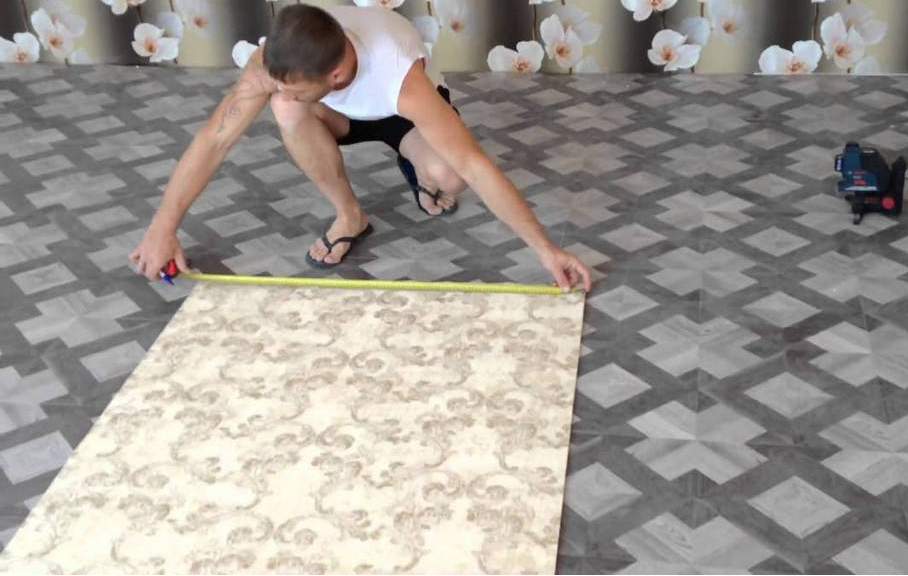
Benefits: Due to the meter width, the number of joints is reduced. Increased wear resistance to mechanical stress. Ease of removal in a dry form. UV resistant. The possibility of pasting the wall from the roll - reducing the working area. Good throughput of steam and air without changing the texture and size of the material. Clean the process of pasting without debris and dirt and susceptibility to wet cleaning. We offer to watch the video: Environmental friendliness and functionality of use of material. Pasting processBefore you begin to glue non-woven meter wallpaper, done with a corner. Thanks to its edge butt. In the corners of the walls of the cloth are glued overlap. With a width of finished panels of 1.06 m, 1 m is left in both sides of the corner. According to the master's height, a line is drawn vertically, from which the tape measure is indented to 1.06 m. This procedure is done for all walls. The roll is laid on the film, spread on the floor, face down. The pattern should be taken into account when cutting panels. If the wallpaper is plain, the height of their location is measured and 10 cm is added. For even bending, the roll is adjusted to the rolled part with the coincidence of its edges. The bend is smoothed by hand and cut. The cut sheets are rolled into rolls face inward. Glue for non-woven wallpaper divorced portions strictly according to the instructions. In a container of water, the glue is poured little by little, constantly stirring it to obtain a homogeneous composition without lumps. After which it is left for swelling. The roller is dipped into the glue mass and the remaining glue is squeezed out by holding it on a special grid. Now you can make the application of glue to the surface under one canvas.
Wallpaper should be well pressed to the surface without bubbles and folds. After sticking several cloths all seams are rolled with a roller. The remaining part is cut off after drying. The plinth is completely covered with wallpaper. The angle is prepared at. In the corners set plastic corners, attached to the putty to the wall structures. After drying, you can proceed to the further pasting. Gluing the canvas to the corner, the wall surface and the corner is impregnated with adhesive. Whole areas of non-woven fabrics in the corner is not recommended to glue because of their location overlap. Because of the non-ideal angles, the wallpaper will frown, so a small overlap of 2 cm is made on the adjacent wall. The next canvas is glued on the adjacent wall to an angle with an overlap, which is cut off with a knife with the vertical orientation of the angle. CeilingIt will be cheaper and easier than making new repairs to change the interior of the room. Care for this decor is very simple. Master class on the topic of the article: For their cleaning is enough to use a vacuum cleaner or a damp cloth. Many of those who are thinking about doing the repair themselves are interested in how to glue non-woven meter-long wallpaper. However, it is not even so important what material they are made of, since people are primarily interested in the peculiarities of gluing large-sized canvases, that is, how to glue meter-sized wallpapers in general, without reference to what they are made of. However, the raw materials used in the production of all-so has a certain value. Nevertheless, to begin with, I would like to note that 1 meter wide wallpapers are becoming more and more popular, despite the fact that they are a fairly new type of finish. In terms of its structure and general gluing rules, this material does not differ from more familiar rolls, whose width is 0.5 meters (or, to be more precise, 53 cm). At the same time, the meter width significantly reduces the time and labor costs for sticking. Today we will talk about how to glue wide wallpapers and what are the features of such sticking. By the way, if we talk about different countries, it should be noted that in Europe, the United States and other “far-abroad countries” there are often sold wallpapers that have nothing to do with our standards, which were traditionally distributed in the countries of the former USSR and the present CIS. The width of 0.8 or 1 meter for them is quite ordinary, and no one calls such canvases exclusive or non-standard.
Pros and cons of useLet's talk in more detail about the advantages and disadvantages of this material. If you are thinking about how to glue meter wallpaper on non-woven base (however, you can talk about any other fabrics, for example, paper or vinyl), then you should consider both the positive and negative qualities that this type of decorative finishes possess. Benefits
disadvantagesAt the same time, it should be noted that the gluing of meter-sized wallpaper is fraught with difficulties, which should also be taken into account:
How to glue non-woven meter wallpapers, video: Step-by-step instructionSo, let's consider the process of gluing in more detail, stopping at each of the stages. Here's how to glue meter wallpaper. Preparatory work
Sticking
What else needs to be consideredIn addition to all the instructions, you need to remember and useful tips, which, in any case, it is desirable to take into account before you think about sticking. Here are some recommendations:
DryingAs for the time, during which the wallpaper of different types finally dry, then it certainly differs. For drying vinyl wallpapers, the temperature between 18 and 30 degrees is considered normal. Of course, at the same time in all places of the room it should be the same: if, say, the temperature is 22 degrees in one part of the room, then it should be kept at the same level in other corners. In general, heavier and denser varieties of canvases tend to dry longer. Some (under certain circumstances) - up to 7 days. As for paper wallpaper, they, as the lightest, dry no more than three days, and even then, if we are talking about the so-called "duplex" (two-layer canvases). More simple, single-layer options are sometimes quite enough, and 20 hours.
ConclusionIn any case, before sticking, it is recommended to watch a video on how to glue wide meter wallpapers. Flizelinovye, vinyl or paper - this is a separate conversation. Of course, each of these species has its own specific features. Not only the durability of the wallpaper covering, but also the attractiveness of the interior of your room, and in general, of the whole apartment depends on the proper sticking. Therefore, try to approach repair with full responsibility and remember that everything is in your hands! The variety of textures and sizes, reliability and practicality, convenience and simplicity of the pasting process brought non-woven wallpaper into the leaders of wall finishing materials. The most popular are canvases, conventionally referred to as meter-long, whose width is 90–140 cm, in contrast to the standard 53 cm. Finishing wizards recognize that it is a pleasure to glue non-woven meter-long wallpaper. Due to the structure of non-woven material from cellulose fibers, fastened with polymer, they do not stretch, do not tear and easily slide on the working surface. Advantages of wide non-woven fabricsMeter non-woven wallpaper have a number of important advantages over other finishing materials due to the combination of composition and increased width.
Some disadvantages and disadvantagesAlong with the advantages, it is worthwhile to point out a few drawbacks of this type of wall covering, which turn into inconvenience during installation.
Tools and materialsGluing non-woven fabrics should occur quickly to prevent the glue from drying out. So, the necessary materials and tools should worry about in advance. A sample list is as follows:
Surface preparationThe stages of the rough finish for pasting with meter-size non-woven wallpaper are standard, but are carried out very carefully. The surface should be flat, dry, clean and one-color.
Preparation GKL for pasting wallpaper described in detail in. Marking and cutting clothsNon-woven meter wallpaper glue butt. To simplify the work, it is better to pre-mark the surface and cut the required number of strips.
Glueing processWhen the surface is prepared, dried and marked up, the sheets are cut, the inventory is selected, proceed to pasting.
Pasting of difficult sitesTechnology pasting non-woven wallpaper straight sections is simple. Difficulties are usually caused by such “uncomfortable” places as the surface of the wall behind the radiator, openings and external corners.
ColoringPaint non-woven wallpaper designed for this purpose is possible after complete drying. This will happen in 2-4 days after gluing. Recruit relevance annually. This is not surprising, since pokleit such wallpaper will turn out at least 2 times faster than the material of the standard footage. To stick such wallpaper no special skills are required. It is important to align the concrete walls very well, otherwise the joints will be uneven. Once the walls are aligned, you have to wait until the putty dries out and primed, then glue the wallpaper. How to glue non-woven meter wallpaper - where to startAfter the wall is prepared according to the rules, it is necessary to apply pre-prepared glue on it. The advantages of this type of finishing material are obvious:
All this can not affect the quality of work and appearance. But, in spite of the advantages of wide non-woven wallpapers, there are still suspicious people who buy ordinary wallpapers, believing that they can be pasted on without any problems, faster and better. In fact, working with non-woven wallpaper is quite simple. The main thing is to properly prepare the walls and stick with your own hands, it will turn out flawlessly.
After the glue is applied, you must perform the following steps:
Tools such as a rubber spatula, wallpaper roll, or a piece of clean, dense fabric are well suited for smoothing. As soon as smoothing is finished, it is necessary to cut off the excess remnants of wallpaper at the ceiling and at the bottom plinth. It is convenient to cut off with a sharp stationery knife, and use a metal spatula as a guide. If cropped badly, you can wait until the material dries. Self-sticking non-woven wallpaper buttButt-wrap technology will be fully completed if the walls were carefully aligned. When the walls are perfectly flat non-woven fabric glued end-to-end to the second glued canvas, without overlap.
The process of gluing end-to-end is carried out as follows:
Masters recommend using one small trick. If you cannot butt-glue, you can stick it with an overlap of about 3-4 cm, and after the wallpaper has dried with a sharp clerical knife, you can make a through cut in the place where the sheets intersect. In this case, both blades are cut through. After the cut is made, trimming must be removed, the joint greased with glue, and straighten the canvas, the result will be a smooth, neat joint. How to glue non-woven wallpaper in the corners of the room
This method involves sticking the canvas strictly from the corner with an overlap of the previous canvas of 2-3 cm. This method allows you to hide flaws in the case of a curved angle. The second method is ideal for non-woven, material without a pattern. Phased implementation methodology
This technique can not be applied when gluing wallpaper with a pattern, since the structure of the pattern will be disturbed when trimming. It is also important to properly glue the glue, it should not be as much, just enough so that the canvases could be fastened to the wall. An equal amount is applied to the concrete wall and the drywall glue, and the composition is not applied to the canvas at all. As you can see, it is very simple to paste a wide wallpaper, a little time, patience and the result will impress you. At least, it is much easier and faster to glue non-woven fabrics than ordinary narrow wallpapers. If a person has bought non-woven wallpaper and plans to repair it himself, then he will be interested to know a few nuances, for example, information on which surface you can and better glue the finishing material. Non-woven wallpaper can be glued to different surfaces, including:
To glue non-woven wallpaper on the paint should not be, as they are unstuck, you also can not glue the canvas on the old wallpaper. Masters say that the old ones have a peculiarity after re-pasting to bubble, which will not have a positive effect on the result of the work. Why it is impossible to glue on the old wallpaper and paint is clear, so the best option is to remove the old coating, preparing the wall and pasting good, high-quality non-woven wallpaper. When pasting this type of wallpaper, you should eliminate the possibility of a draft, besides, you need to turn off the air conditioner, and begin to glue from the window or corner. As mentioned above, gluing non-woven wallpaper on the old surface is not recommended. The result may not please. Interior decorators recommend working with a pre-cleaned and prepared wall. Masters like to work with this material, and they note the following advantages of non-woven wallpapers:
To make the repair easy, experts recommend getting started with the rules, which describe in detail what you should pay attention to and what you should not do. Knowing the rules to properly glue each one, special skills in this case are not required. Home master: the rules of sticking non-woven wallpaperBefore you unpack the wallpaper, you must check for defects. Next, experts recommend to study the icons and their description, located on the wallpaper. Carefully read the rules for preparing the walls. If you plan to glue thin non-woven wallpaper, then you need to prepare the surface as well as with glueing and thin paper wallpaper. Next, you need to correctly calculate the amount of material used. When cutting canvases it is necessary to comply with the technique, then it will be possible to avoid a large expense. Clay should be bought just for non-woven wallpaper and before breeding it, you should carefully read the instructions. The glue is applied not to the canvas, but to the wall; one should not forget about this nuance.
During the work it is necessary to apply only the qualitative tool, the wallpaper spatula which:
It is necessary to work only in the daytime, when it is possible not to turn on the light, it will allow to avoid electric shocks during pasting of wallpaper around the outlets. Also avoid cold air currents. For the device of a border it is necessary to apply special glue. If the canvas is smooth, then you can glue the border already on the glued canvas, if it is relief, then you should first glue the border, and then begin work on pasting the room.
The room should be warm and dry, the optimum temperature in the room is 22 degrees. In order to glue the place around the outlet, it is necessary to turn off the electricity, remove the outlet, paste the canvas, cut the cross inside and cut off the corners. It is necessary to work with glue as carefully as possible, do not smear a lot of glue, you should also avoid getting glue on the front side of the wallpaper. It is better to glue end-to-end, because when overlapping, the result will be horrendous, the wallpapers are very dense. It is necessary to glue very quickly, as the glue dries quickly. How to glue non-woven wallpaper (video) |


| Read: |
|---|
Popular:
How to fix a grip profile to a wall
|
New
- The interior of the room with wallpaper in flowers
- Piercing - “8 earrings, a lot of photos, how to care, how many heal, where to do, how to accelerate healing, what would I bring back?
- Window opening in a brick wall
- Finishing the bathroom with plastic panels
- Long narrow kitchen - layout (41 photos) of comfortable space
- White apron on the white kitchen - a classic combination
- Selection, consumption and features of applying paint on the wallpaper
- Designing a wardrobe - six simple steps
- Rating of the best oil heaters by user reviews
- What ear pierce guys normal orientation


