Site sections
Editor's Choice:
- Bedroom design options in blue for a couple
- How to paint wallpaper for painting: tips and tricks
- Kitchen design in Khrushchev: useful tips for those who have a small kitchen
- How to punish noisy neighbors from above
- Design of a nursery for children of different sexes
- Shower cabin in the interior of a small bathroom
- Which light is better - warm or cold
- How to care for recently pierced ears
- What to do if the neighbors above are constantly poured
- Materials used for suspended kitchen ceilings
Advertising
| Brick arch do it yourself. Do-it-yourself brick arch: the best solution for your home |
|
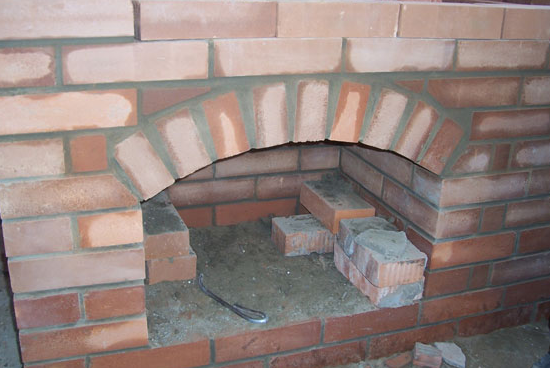
To begin the process of erecting an arch, a formwork template is required. It is for him that the whole tub will occur, from beginning to end. The template is constructed from two parts, directly the arch (made of boards) and a pair of racks. Racks bear the function of support. In shape, they should be pointed along the plane. This format is necessary for easy retrieval.template from the finished arch (to save masonry). The first row of masonry should be made wedge brick (tychkovy edge). All masonry for reliabilitydone without gaps, strictly according to the template.The gap should be present only between the straight part of the arch and the supporting posts. This is necessary to facilitate the removal of the formwork from the finished arch. Little subtlety. When using cement mortar to remove the template is better not earlier than two weeks. What is a wedge brick? This is a brick used for the erection of arches and other finishing works. Special trapezoidal, it is good in the first row of arches (helps to better fix the masonry). If there is no such material, then it can be made independently of ordinary bricks. The main thing in it is that the thickness of the seams does not exceed 1 cm. For the construction of arches is used not only an unusual brick, but also various special solutions for fastening. For outdoor door and window arches, cement mortar is needed.But the arches under construction for fireplaces and stoves categorically such a compositiondo not like. The heat will simply destroy the cement structure (the temperature is too high). So in this case it is better to use special compositions, for example, from clay and chamotte sand with fine gravel. To obtain the required consistency of gravel, it must be sifted through a sieve (cell diameter up to 0.8 cm). Even the thickness of the seams in the furnace structures, despite the special solution,should be minimal. How to make a patternFirst you need to understand that the formwork during the construction will take on two main functions - carrier and shaping.The making of the template itself (circling) is a very laborious and complicated process. Forthe construction thereof will require a piece of wood, a semicircle of particle board (thickness 19 mm), a hardboard strip (6 mm). A semicircle of chipboard nailed to the board. On the arcuate side is fixed hardboard. Accordingly, the width of the strip of hardboard should be equal to the width of the semicircles, or it can be more, it can not be less. How to install support columnsIn order to install the columns you need totheir inner side to place the props. To do this, use the board or a fairly strong stick. The template is placed on the end of the props. To ensure smooth laying on the template you need to make a markup.With the help of a brick set in the middlecircling and compass, calculated the thickness of the bricks and the thickness of the seam between them (about 0.5 mm). Every distanceon the edge of the formwork template is necessarily marked. This procedure must be carried out on both sides. Getting layingThe erection of the arch must begin from two sides, gradually approaching the middle of the template.Special attention must be paid to what has been done.previously tagged. Each laid brick must match the markup. Before completion (3 bricks left until the end of the laying), you will need to check the verticality and evenness of the arch. To complete the first row should brick with a wedge-shaped section.If the brick is normal, then you will need to increase the thickness of the seam (put more mortar on top). In order not to break the symmetry you need to use a cord when laying the next row. A pointed trowel is used to protect the seams. Also seams are passed by jointing.It is better to remove excess pieces of the solution with a wet brush without letting it dry out, and you can add cleanness to the whole brickwork with a dry brush.
Subtleties of the construction of the furnace archesIn private houses and cottages, furnaces and fireplaces with arches are often built. If this process is thoroughly prepared for and try to take into account all the subtleties, then there will be no difficulty with this work.Erection of the arch for the stove or fireplaceno different from the process of building a standard arch.Masonry starts about from two sides to the middle. The last brick is put with effort to achieve the effect of bursting (stress).Of course, it is better to use a wedge-shaped brick, but if there is none, you can use a regular one (only hewn to the bottom). The vault of the fireplace requires an even more careful fit of the brick to each other, almost to the touch. After the erection of the archin the fireplace there may be a problem with the removal of the formwork.Do not be too zealous in this case, the template can be leftto burn in the process of stoking the fireplace.
We build an arch for the garageThe garage is certainly not a home, but beauty and reliability for this room is just as important. Arch for the garage would be quite appropriate andits construction must be consideredsome nuances.It is important to know that the lower the arch (small arc), the weakerand less reliable design. Just do not forget about the weight of the semicircle. Wide, low or double in height, in these cases weightthe arch will not be weak. For this you need to build strong enough and durabletemplate. Installing racks for the template must be thoroughly cleaned of debris. So there will be no subsidence in the arch laying.The semicircle for the garage will be large compared to the usual doorway, so in this case it is necessary to calculate the number of bricks well and try not to make thick seams in the front row. At the place of contact of the masonry with the formwork, the thickness of the mortar should be no more than 6 mm. All construction is usually carried out from the walls to the center. In the middle is drivenlast lock brick. The stitches with him need to close up with great care. The arched opening for the garage is usually very large. Whereinwall with such an opening to becomeweak, especially over the arch. To eliminate this problem, before erecting an arch, a pair of reinforcement bars and a channel bar should be laid above it for additional strength.
Each case requires care and patience, and with the erection of arches.The most important thing is to prepare well and choose quality material.Materials for the construction of walls. All kinds of materials Arched doorways look more beautiful and stylish than the usual rectangular. Those who want to make their home as comfortable as possible prefer to patter more, but then enjoy the results of their labors. A brick arch is not easy, but the result is worth the effort. And if you take into account some of the tips in its construction, success is inevitable. Builders distinguish between three main types of arches, which are used in the construction of doorways. They differ in the way of connecting the side vertical supports:
These technologies are used to build door and window openings.
In the same way, an arch is being built of brick with its own hands for a barbecue, stove, or fireplace. Step by step instructions to the erection of the archAll three of the above-mentioned types of arched openings are similar in laying technology. Therefore, the process of building any of them will be phased in this way:
Making and installing a templateThe pattern can be made from materials such as chipboard and wooden bars. Do not be negligent in the manufacture of this part, because of its quality depends on the strength.
You should pay attention to the fact that the template should be several centimeters smaller than the height of the opening. This is important, in order to avoid difficulties with the removal of this temporary structure, when the brick is already laid out. Start making the template should be from the drawings. First, you need to put the center of the arch design, identify and mark the points above and below and connect them in an arc shape. It is necessary to cut two such structures and connect them with each other using screws and bars. It should be a frame equal to the natural size of the arch. The finished template is attached to the aperture with wooden supports. The construction of the arch of brickBefore you begin work on laying out bricks, you need to establish penalties, thanks to which the arch will be made quickly and reliably. Laying bricks should be starting from the bottom, and moving up. This should be done symmetrically, so that both sides move toward completion in parallel. In the center of the construction, the main brick is mounted, which is responsible for fixing the entire arch.
When the main work is done, and the arch is laid out beautifully and efficiently. And also securely fastened, you can remove the template. Then you should clean the surface of the bricks and align the seams to bring the arch to an aesthetically appealing look. What to consider when building a brick archIf you do not take into account some of the features of the arched openings, the design may simply burst. Therefore, before starting, you need to take into account the following factors:
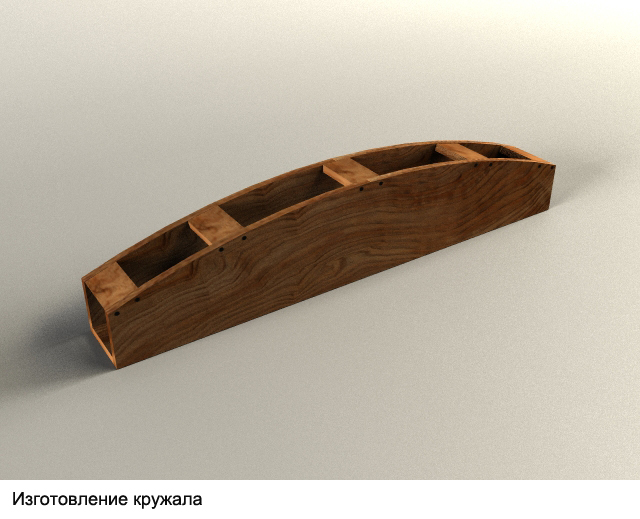
Brick arch to be built one or two days, no more. The most important thing in this business is to acquire quality materials and work strictly on technology. How to make yourself an arch of brick - presented in the video: Arched windows and doors can often be found in historical films. Semicircular windows of castles, palaces, monasteries - without them you can not fully imagine the medieval architecture. But even in the construction of modern buildings, this seemingly old element is not rare. Many believe that the arch is an exclusively design element of the building, but this is far from the case. In addition to the stylish look, the arched lintel evenly distributes the weight of the upper rows of bricks over the opening, which improves the reliability of the structure. The natural disadvantage of the arch is the need to use curved frames and jambs, the cost of which is significantly higher than the straight ones. To date, the most common two types of arches - onion and semi-circular. The arch arch is an arc of a circle, and its degree is less than 180. Simply put, the diameter of such an arch must be greater than the width of the aperture. Semicircular arch has the shape of a semicircle. The main difficulty in the construction of an arched lintel is the correct calculation of spinning. Circled - this is a special device that supports the brick during the laying of the arch. Circling, as a rule, is made of plywood or chipboard, at least - of wood. To do this, two semicircular elements are cut out of the sheet of material, then they are fastened with jumpers. The calculation of the circle is carried out in such a way that along the arc it can fit the required number of bricks. At the same time it is necessary to take into account the thickness of the seam between the bricks. The seam is a trapezoid shape, the smallest base of which is 5 mm. Thus, the circle can be divided into equal sectors, the chord of which will be equal to the sum of the width of the brick and the thickness of the seam. To simplify the dismantling the width of the circle should be slightly less than the width of the opening.
An important element of the arched lintel is a lock. The castle brick plays the role of a wedge that ruptures the arch, while strengthening the entire structure. The lock must be installed strictly vertically, so the number of bricks in the arch must be odd. Sometimes the castle bricks are installed so that it slightly protrudes from the lintel while playing a decorative role.
The laying of the arched lintel begins with the installation circling in the opening. Circling is installed on wooden struts and leveled by level. The laying begins simultaneously from two sides to the center, with special attention being paid to the thickness and identity of the seams. The lock brick is installed with some effort so that the arch is securely fixed in the opening. At the same time, the use of a hammer is excluded, as sharp blows can damage the structure. After 1-2 hours, the supports are relaxed, and the arch is covered with plastic wrap to prevent the wooden templates from swelling. Kruzhalo cleaned after a few days, after the solution will pick up the necessary strength.
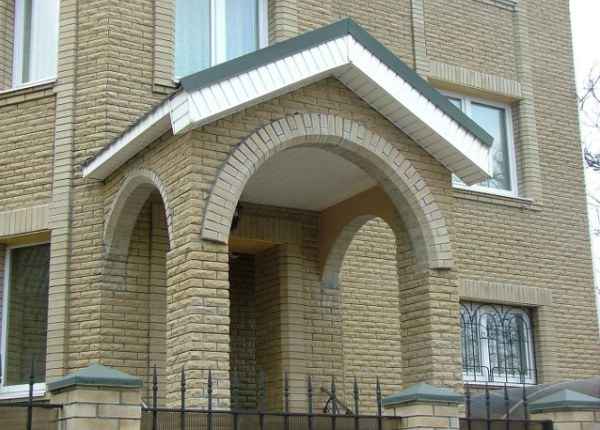
Arched lintel often can be found not only in the openings of the windows of external walls. The arch in the room can significantly increase its volume, while externally it is more attractive than the standard straight jamb. In addition, the arches are found above the furnaces of stoves and fireplaces, in the arches of buildings, in the construction of gazebos and sheds.
It is no secret that a doorway designed as an arch looks aesthetically much more attractive than a standard rectangular one. Thanks to the arched vaults, non-standard design solutions can be used. One of these options in the interior design can be in your home. Arched forms have certain difficulties, so you need sufficient skill to make such an architectural structure yourself. This lesson will show you how to properly build a brick arch on your own, with minimal construction skills. Types of brick archesThe arch is a jumper in the form of a semicircle, which connects two vertical supports between them. The strength of the arch is ensured by distributing the load to the side (thrust). Usually arches spread over the window or door openings. Also, the arches are made by stoves and barbecues. In the existing construction practice, there are 3 forms of brick arches:
Brick masonry technology of the above types of arches is almost the same. It remains only to prepare the necessary tools and materials to fold the arch of the brick with his own hands, which will become part of your designed interior design.
At the initial stage, when the shape of the future brick arch is already known, it is necessary to design and manufacture a vaulted pattern. The material for the manufacture of the template used wooden sticks and sheets of chipboard.
The template is easily made by hand. A horizontal line is drawn on a chipboard sheet, which is equal to the width of the opening, marks the center of the arched vault, as well as its extreme lower and upper points, which are then also connected by lines to each other. The result should be a truncated semicircle (circled) of the future arch.
Further, using a hacksaw or jigsaw, saw around two marked circles along the marked lines, which must be joined together with screws and bars. Then the resulting pattern of the future arch must be installed in the opening and fixed in it with struts and supports. Before starting the layouts, on both sides of the arch, at the level of its lower boundary, penalties are established that will allow the structure to be clamped, ensuring its stability and durability. The arch of brick with his own hands must be made without interruption in the work at one time. The laying is made, moving on an arch of a template from below up simultaneously laying bricks from both parties. At the end of the set, a brick (lock) is tightly driven into the top of the masonry, the main function of which is to fix the entire arch structure. After that, the template is removed, and the surface of the brickwork is cleaned from the remnants of the solution. To lay out the arched design, use a special wedge brick, having the shape of a trapezoid, which provides the best fixation of the brick arch. Such a brick is not a problem to buy. It is sold in specialized hardware stores, but it can be made independently by processing the grinder to the desired shape. A properly assembled brick arch with your own hands can last for a very long time, giving your home an original look and filling it with homely warmth and coziness. Additional information to the lesson you will find by viewing the arch of brick with your own hands video. Photos of brick arches
Architects often in their works use architectural and design elements that give the structure originality and beauty. One of these decorative parts is the arch. Internal structures are easily made using drywall. For the construction of exterior geometric elements used brick. Many novice masters are interested in the question: how is an arch made of brick with your own hands? Types of archesArches in architecture are used in the architecture of various nations. Accordingly, their form was influenced by the cultural heritage of the countries. An example of this is the Arabian arch, widespread in the architecture of the Middle Eastern states. The most common types of arches are:
In modern architecture, the first two types are used as a decorative element - semicircular (they are now called complete) and arched. Blade arches are also no less popular - they got this name due to construction technology: they lay bricks with a wedge and then fix them with a “lock”. General technology masonry brick archesMasonry brick arch, regardless of the selected type, is made in the following order:
At the last stage, the finish of the formed opening is performed. Pattern calculationBefore you make an arch of brick, you need to make an auxiliary structure - a template. Its quality has a direct impact on the final result. For this reason, it is necessary to carefully calculate its size. As an example, you can consider the design of the window width of 1500 mm using the luchnoj type. Please note: for the design of the arch aperture, not its width is important, but the length of the arc along which the brick will be laid out. In order not to create problems for yourself in the future, it is necessary to adjust this size at the calculation stage so that it is a multiple of 70-75 mm. The width of the template must be less than the opening by 5 mm. This small gap will facilitate its installation and disassembly operations (even if it is damp). The height of the auxiliary structure should coincide with the analogous arch parameter. By the way, it should not be too low - it is fraught with subsidence of the brickwork under the influence of the load. Now it remains to determine the thickness of the template. If it is too large, the weight of the structure will complicate the work. In our example, the optimum thickness is 200 mm. Making a templateWe begin the work with the marking of the arch on a sheet of chipboard. For this you need:
The template consists of two such parts - circled - interconnected in bars. If the circle cut cut exactly on the markup, then the sharp corners will not allow them to fasten with each other. Therefore, before proceeding to cutting, it is necessary to postpone down 100 mm from the lower points of the arched profile, thus increasing the body of the part. After that you can cut the part with an electric jigsaw. The second one was much easier to mark up: for this you need to use the already cut part as a pattern. Just put it on a new sheet of chipboard and circle around the contour. The bars intended for the fastening of the circle should correspond in length to the specified thickness of the template. Twist the prepared parts with self-tapping screws. A strip of fiberboard is nailed along the top of the template - in this way all possible irregularities of the device are smoothed out.
Circled in the window opening for the laying of a brick arch Installing the template in the openingUnder the edges of the template are installed props of edged boards with a thickness of 20 mm. To prevent them from falling, a spacer is inserted between them. The template is mounted on top of the supports, flush with the edge of the shaped face brick. It should be borne in mind one thing: too protruding arch (more than 60 mm) during operation will be destroyed by frost and rain. If, nevertheless, you decide to take such a step, cover it from above with ceramic tiles or metal. Masonry arch brickworkFirst lay out the right left heel of the arch. After that, you can proceed to the layout of the order. This is done with the help of roulette. For convenience, make a pattern on the template every five bricks. The thickness of the seam decision is made on the spot. After that, you can lay out the arch from the heels to the highest point - on both sides. The last one or two bricks (depending on whether an even or an odd number turned out when marking up) are called locking bricks. After laying them in place, the seams are carefully clogged with mortar. If this is not done, the arch can "sit down." The arch - front and back - must be laid out in one step. The template can be removed in two to three hours after masonry is compressed. If you can’t remove the auxiliary structure on the same day, protect it from possible rain with plastic wrap. Otherwise, the swollen tree can undermine the fresh masonry, and the work will have to be completely redone. |


| Read: |
|---|
Popular:
How to fix a grip profile to a wall
|
New
- The interior of the room with wallpaper in flowers
- Piercing - “8 earrings, a lot of photos, how to care, how many heal, where to do, how to accelerate healing, what would I bring back?
- Window opening in a brick wall
- Finishing the bathroom with plastic panels
- Long narrow kitchen - layout (41 photos) of comfortable space
- White apron on the white kitchen - a classic combination
- Selection, consumption and features of applying paint on the wallpaper
- Designing a wardrobe - six simple steps
- Rating of the best oil heaters by user reviews
- What ear pierce guys normal orientation


