Site sections
Editor's Choice:
- Bedroom design options in blue for a couple
- How to paint wallpaper for painting: tips and tricks
- Kitchen design in Khrushchev: useful tips for those who have a small kitchen
- How to punish noisy neighbors from above
- Design of a nursery for children of different sexes
- Shower cabin in the interior of a small bathroom
- Which light is better - warm or cold
- How to care for recently pierced ears
- What to do if the neighbors above are constantly poured
- Materials used for suspended kitchen ceilings
Advertising
| Assemble the plasterboard partition. Plasterboard partition in the room |
|
Installation of gypsum partitions is able to do it yourself. They are mounted on a metal frame, you just need to prepare the tools and see 2-3 lessons on the Internet. This method allows you to achieve incredible design effects. Profile views Sophisticated designs and amazing built-in lighting you can do yourself, and it will be economical. If you order the work from the masters, then the cost of drywall will be a smaller part of the cost, this material is so affordable. That is why beautiful ceilings increasingly decorate our homes. In order not to be mistaken with the choice of the frame, it is worth knowing how one of its views differs from another. It all depends on the functional purpose of the design.
 Making the frame for the ceiling Making the frame for the ceiling Markup rulesBefore creating the partitioning frame, make sure that the liquid solutions used in the repair have dried out sufficiently. spend up to the installation of clean floors and ceiling decoration. The first stage of installation is a markup that starts from the floor. This rule can not be broken, since the walls and the perimeter of the room may not be as smooth as we would like. In any interior, even in new homes, there are small defects - deviations from symmetry. For high-quality markup, get a good plumb and level. Using a plumb line on the floor is transferred to the plane of the ceiling. Metal profiles are mounted on them, and after that nothing can be fixed. A simple plumb line is a load on a string. It can be done independently, but professionals use the plumb of proven manufacturers. As a cargo there is used a part of heavy steel with a sharp tip, which specifies the direction. The rope is made of strong and elastic fibers. Too tight twisted rope and light weight will create inaccuracies in measurement. For those who want to repair professionally, you should think about purchasing a laser plummet. True, they are still difficult to find on sale. If you do it yourself if you wish, then everything is not so simple with the level. When buying, check it out. Otherwise polusite curvature of the shelves and the ceiling. Experienced builders know cases where none of the proposed options in the store showed even approximate accuracy.  Guide profile Guide profile Mounting frame frameworkInstallation of partitions begins with gluing sound insulation tape. It passes through the internal concave surface of the profile. Material for the purpose of convenience is sold self-adhesive. It can be made of foam rubber or polyurethane. When the profile is prepared, the installation begins. Profiles are attached first to the floor, forming a frame. Installation of guide parts is performed on the floor with an interval of one meter. Rack profiles are mounted on the wall. Fastening occurs with dowels. When the installation of the guide parts is completed on the floor and walls, the profiles are then attached to the ceiling. The partitioning device implies that the perimeter of the wall is first installed according to precise marking. Rack profile cut into the limits of the greatest height of the room. Deviation is possible, but it should not exceed 1 cm. Rack profiles are installed at a distance of 60 cm from each other. For fastening use screws. If the ceiling is ribbed, then additionally install guide profiles. Slot holes have already been created in them, but it is allowed to create additional holes. This is true for ceilings of complex configurations. If the profile is to be extended, it should be done with at least three short screws, otherwise the strength of the structure will suffer. Wall fillingWhen installing sheets, the requirements, standards and technology are the same. The only difference is in the rules for mounting the base of the wall itself, but the work with the sheets is the same. Sheets are measured with a conventional tape measure or a long metal ruler. The latter is more accurate. After checking the size of the sheet (this is a mandatory procedure, as small deviations from the standard are possible), the cutting is carried out.  High wall option High wall option Cut sheets for partitions with a knife or saw. The knife will hold the line neatly, but will not be able to pass through the material. Therefore, they are cut from two sides, taking into account chamfers, or they create a right angle of cut. At the end of the item chip off. To perform round holes using a drill. Although professionals recommend punch, which is more effective when working with hard materials. Often the design of the room provides curly lines. For holes of complex shape, a piercing saw is used. If you want to change the angle of the edge, then use the usual plane. Work with him carefully so as not to spoil the edge. When shearing the base plate set vertically and fasten with a screwdriver or screwdriver. Details fit to each other, trying not to leave wide gaps. Small gaps will not be a problem, as they are subsequently filled with a putty. The gap between the joints of the sheets is 1 cm, so as not to create excessive stress in the material. Installation provides that each sheet is installed at a distance of 1 cm from the floor. No more and no less. Then under the structure of the partition pave a flat wooden rail of this thickness. ShutdownThe distance between the screws is not more than 25 and not less than 10 cm. The latter will not make sense and will break the strength of the material. An important caveat - if the vertical joints of the sheets can do without the use of the profile, then for the horizontal metal support is required. This is true for high partitions that exceed a height of 3 m. Standard sheets do not produce more length.  Room Divider Room Divider For beauty, the screw head should be pressed into the material by 1 mm. This place is later puttied. It is necessary to lay a self-adhesive film between the elements of the room, since concrete and gypsum have different capacity for moisture swelling and deformation. Installation continues by laying electrical wiring in corrugated pipes. After that mount the insulating material. It is best to use mineral wool for this purpose. The filler is laid tightly. It should not crawl over time, because it greatly reduces the insulating properties. Therefore, methods are used to prevent its accumulation at the bottom. It may be drywall shelves, although it is time consuming. The second side of the gypsum is installed on the same technology as the first. This is followed by a cosmetic treatment of the wall. The seams are sealed with a special mounting grid and leveled with a putty. In contact with How to accommodate a bedroom, living room and two study rooms in a one-room apartment? Probably many faced with similar tasks, because according to statistics in our country, one-room housing is confidently leading. Our situation is similar and the plasterboard partition allowed us to solve two problems simultaneously. First of all, it is zoning of the space and separation of the bed from the main space of the room and the second is the preparation of the basis for fixing book shelves. That is, I wanted to create a workplace that includes a table for work and a place to store books and documents. Ideally, the table design should look something like this: The table in the photo is made of solid wood by the hands of one good master. To create something similar from wood, I, perhaps, if I get together, then next time, and now I intend to make a table and book shelves from laminated chipboard. But regardless of the material used, for the stability of such a construction, fixing to the wall is necessary. The role of the wall will be performed by the construction of metal frame and plasterboard. This results in two profile requirements from which the partition will be assembled - as small as possible the width of the rack profile and at the same time sufficient rigidity to carry (albeit insignificant) stress on the fracture. Phased installation of partition walls of plasterboard with their own handsAs you know, over the past 13 years, the quality of the metal profile for GCR structures has only decreased. In the distant past, there were times when it was not an easy task to cut a profile with scissors for metal. Today, it is more or less similar to the real one, produced by Knauf and Giproc factories. These manufacturers, if they optimized the cost of using metal for rolling a profile, then made it not so frank images as many not so large firms. But the retail prices for Knauf products are 1.5 - 2 times higher (!) Than the surrogates for the production of offices unfamiliar with the concept of “compliance with GOST”. How to solve the problem of choice for yourself? First of all, you need to understand where in the device constructions of drywall can save on the quality of the profile (without prejudice to the quality of the functions performed by the design and the aesthetics of the appearance) and in which cases it is absolutely not recommended. Of course, each case is individual, but the general principle is as follows: do not save on the acquisition of a quality profile if
In my case, there is no need to worry about significant loads and the profile was purchased on the basis of the convenience of delivery (there is no sale for this profile just next to the house). Rack profile 45 mm. with wide side edges - 50 mm. The geometrical dimensions of the guides do not play a special role, that is, the "height" of the sides does not improve the physical properties of the future partition, so 46 by 30 and 46 by 40 - there is no difference. So, the principal decision on the construction of the plasterboard partition was made, the location was selected (we separated the bed leaving a passage of 30 cm), the length of the partition would be equal to the width of the table (140 cm) and the profile was acquired on the basis of these dimensions. It's time to start marking the position of the guides. In order to withstand a 90 degree angle between the wall and the partition, we use the square and tape measure. I do not have a big square (as well as a laser builder, which gives two beams perpendicular to each other on the floor), so we adjust the angle values with the help of a tape measure. Let me remind you - a triangle with sides multiples of 3, 4 and 5 is rectangular. Putting 80 cm from the point of junction of the partition to the wall, we will get point A. 60 cm along the wall - we will get point B. Check the length of the segment AB, it should be equal to 1000 mm. Draw a line on the floor along which the lower guideline will pass. We note the length of the bottom guide, which in our case will be equal to 1400 - 12.5 = 1387.5 mm. from the wall. Perpendicular to the crosshair. We transfer by means of a plumb (ultimately the most accurate way, even if it requires the presence of two people) this point to the ceiling.
It is worth paying attention to the choice of a plumb. When buying, pay attention to the weight (30 - 50 grams are of little use) and the shape of the plumb line. Cone-shaped plumb lines are uncomfortable when hanging near the wall. The thread that comes with it is better to replace it with a more suitable one (kapron 0.8 - 1.2 mm). We repeat the weighing next to the wall, retreating for convenience 5 - 10 cm. We draw a line through the obtained two points on the ceiling (we beat it off with the help of a paint cord). Now we have a marking of the position of the upper and lower guide, you can proceed to the mount. Let me remind you that a screed is poured in the room and a layer of self-leveling mixture is applied to make a flat sub-floor. Both of these compositions work in compression, that is, they are resistant to loads, for example, when walking or installing furniture. But, unfortunately, almost not able to bear the load on the fracture. This means that when fixing the bottom guide, it is not advisable to drill "with a blow." The force transmitted by the perforator through the drill may cause cracks. Therefore, apply the bottom guide to the floor, and drill 3 - 3.5 mm. mark the position of attachment points.
On the points outlined on the floor (marks from the drill), drill holes for the dowels. Punch in the "rotation" mode!
We insert plastic dowels. In 90% of cases, when working with drywall constructions, dowels with a diameter of 6 mm are used. length from 30 to 40 mm.
We pull the guide to the floor with 41 mm wood screws. There are various options, from using dowel-nails, to fixing screws with an enlarged cap (press washer). About the tape, which sellers love so much to vparivat and managers highly recommend. I mean a self-adhesive foam polystyrene tape (resembling a backing), which is proposed to be glued under guides during the construction of plasterboard partitions, as well as in ceilings and other structures. Personally, my opinion is that there’s nothing but a marketing move - “surely buy our tape and you will be happy” there is no sense in using it. However, a whole generation of hyprochs, which are confident that without it, did not grow. I do not see the difference and therefore do not put the tape.
In the case when the wall to which the partition will abut is fairly flat, it can be marked on it (connecting the line on the ceiling and on the floor) to control the position of the first post fixed to the wall. In my case, such a markup is not performed because of the rounding between the ceiling and the wall. Therefore, we fasten the first rack to the wall by controlling the vertical with a level.
In the field of bending of the wall, we make an incision profile.
Measure the length of the top rail. The fact that the ceiling is "slightly crooked" is not a big deal in this case.
Some features of mounting guide unknown manufacturers. Unlike normal iron, which I put on, I drilled it and fixed it, there are problems with this "falga". Even a new auger, entering the concrete through such a profile, leaves holes in it through which the caps of the self-tapping screws fail. Therefore, we produce washers, cutting direct suspension.
The next step in the manufacture of partitions, the preparation of racks. We measure the size of the rack (the distance between the guides is minus 5-7mm) and if the floor or ceiling is not in the horizon, then measurements should be made for each rack directly at the place of its installation.
Noting the required length on the rack, mark the cutting line on the square. Exactly cut off the rack and install nicer.
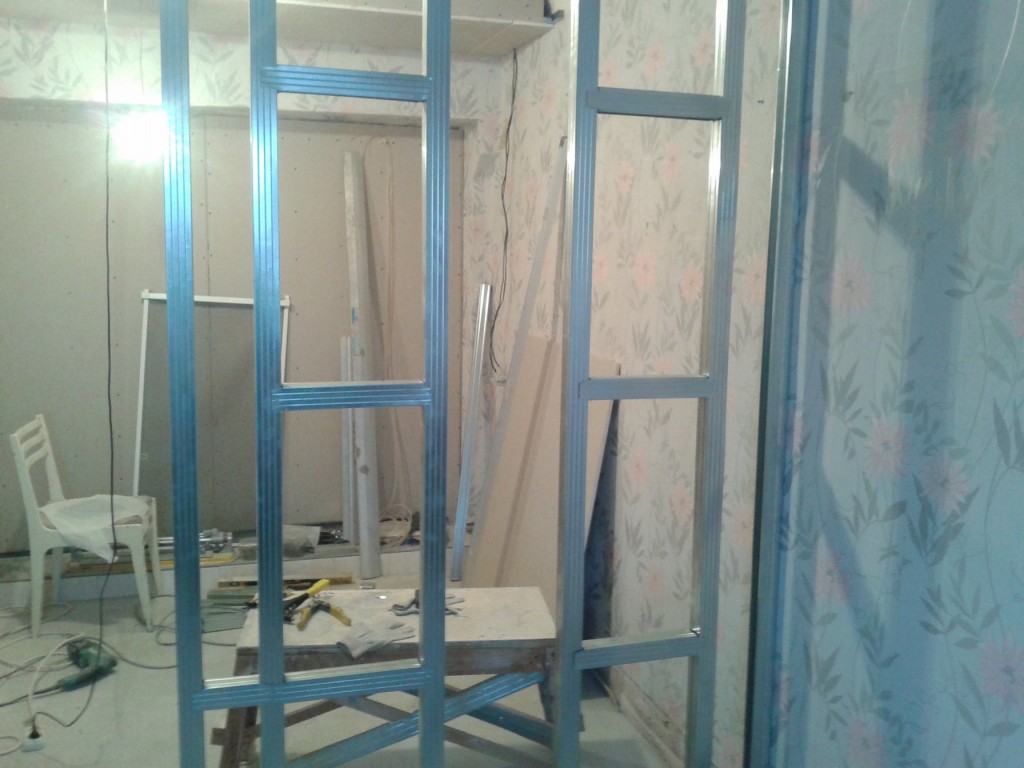
We begin to fix the rack using a prosekatel. The main requirement for the installation of racks is a strict observance of the vertical and preventing the turn of the rack around the vertical axis. That is, the "back" of the rack (in the photo above it is the face on which the pencil line is applied) must be perpendicular to the plane of the partition. The easiest to install is the last stand, since the edges of the guides accurately determine its position.
Now you need to mark the installation location of the remaining racks. The plasterboard partition has a length of 1400 mm. while the width of a standard sheet is dry - 1200 mm. When installing drywall, it is necessary to shift the sheets relative to each other on different sides of the partition, that is, it is necessary to arrange the sheets so that the junction of the sheets does not fall on one side at the same time from both sides. Therefore, on the one side of the partition a whole sheet will start from the wall, and on the other side - from the edge. Mark the position of the center of the two pillars, measuring 120 cm from the most distant point of the wall (it is tilted) and from the last profile.
Mark for two risers are obtained. We measure the distance between them - 1012 mm. How many intermediate racks to put in our version of the partition? If for a normal (real) metal profile, I recommend to put the rack in 400 mm pitch., Then for this "iron" step should be no more. Accordingly, we divide 1012 by 3 and we get a step for two intermediate posts. Perform the markup and install:
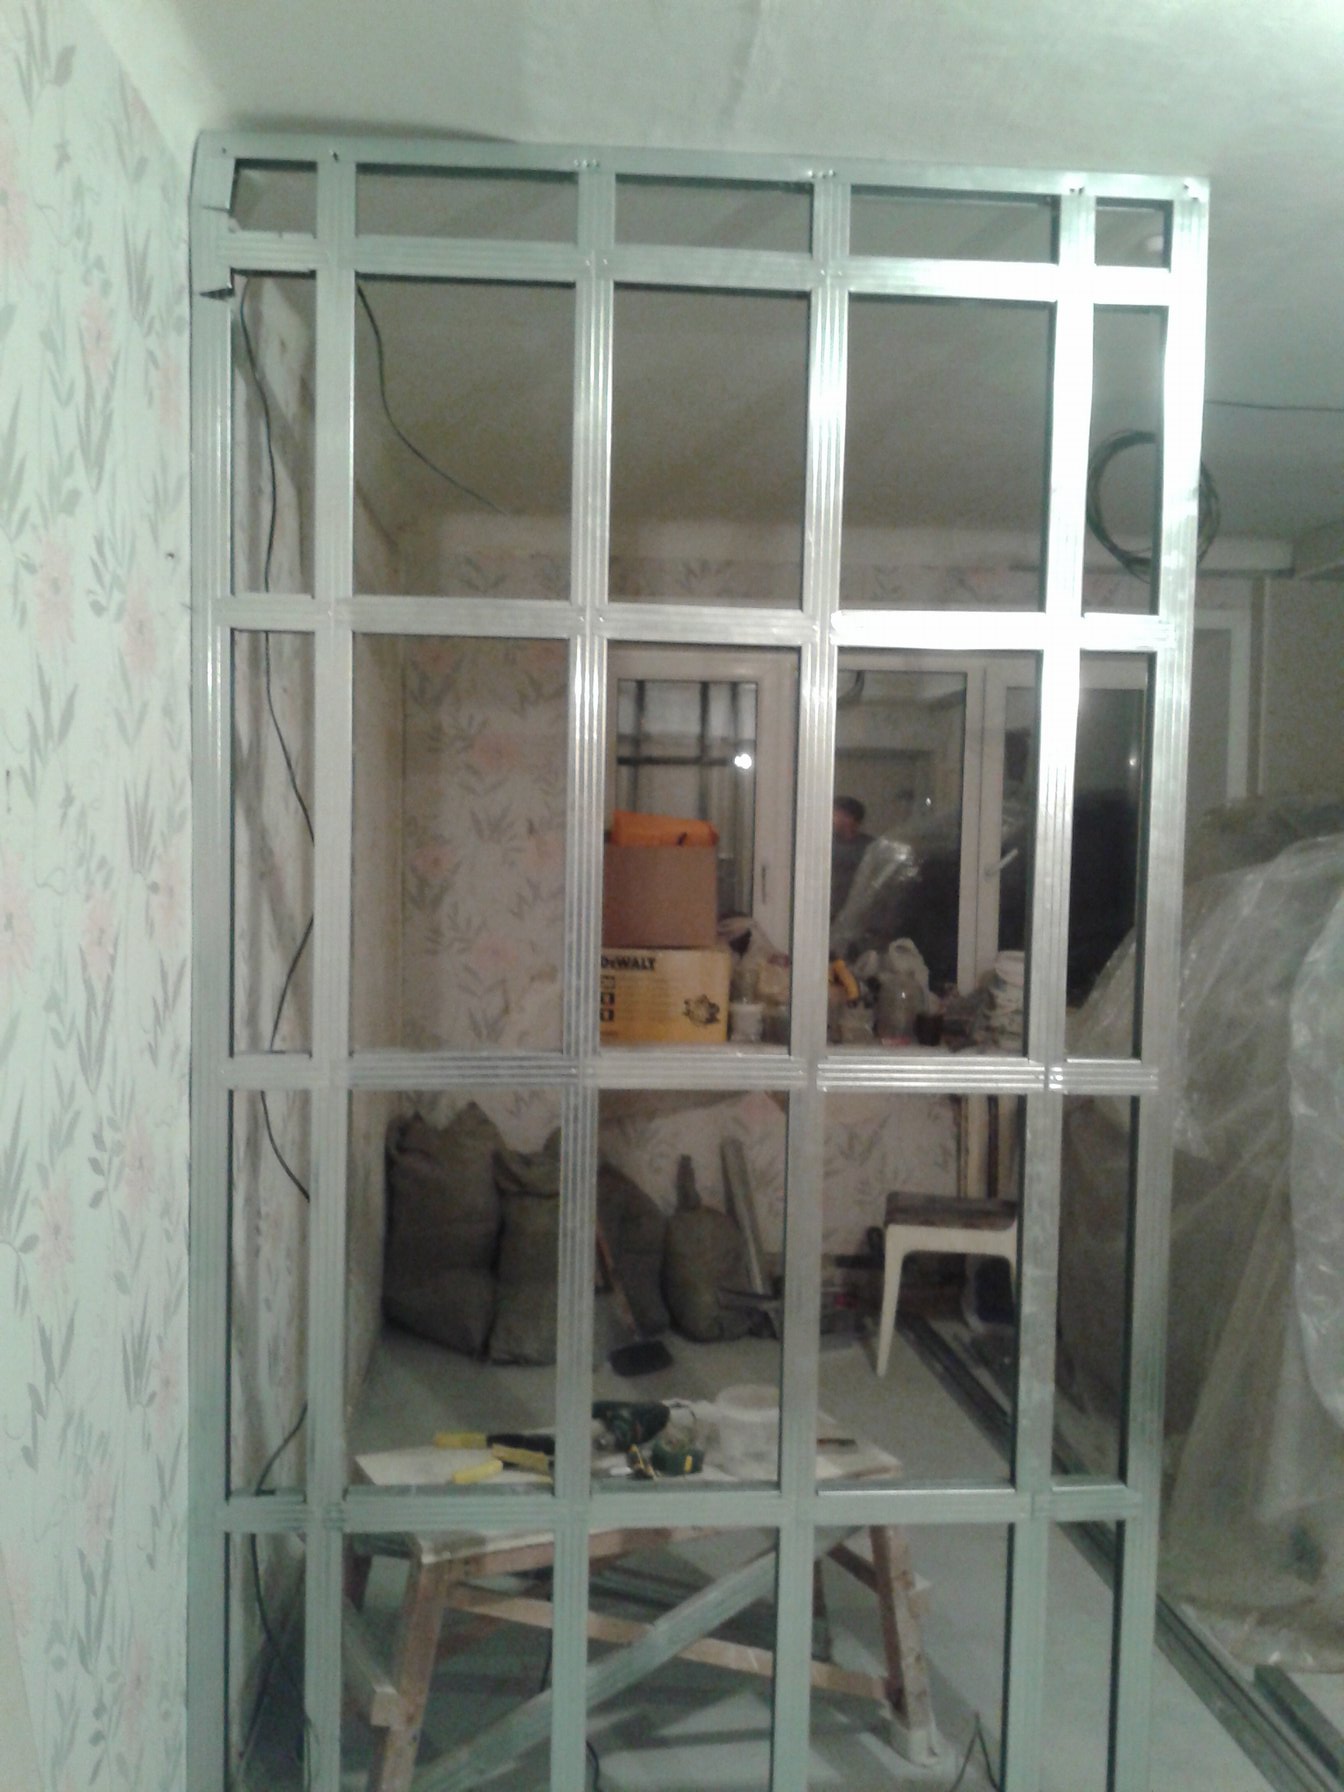
It is necessary to monitor the position of the stand relative to the plane of the partition. The simplest device is a trimmed guide having a factory end. Fixing one side of the stand, we press the trim and we get an aligned angle of 90 degrees. We install all the racks and ... it would be possible to consider the process of mounting the skeleton for the partition as finished, if the iron got to us from the past and allowed us to create the necessary rigidity. In our case it is necessary to reinforce the frame with horizontal bridges. From a certain point, even Knauf recommends using a profile that allows you to scroll a sheet of drywall across, that is, to use the properties of the sheet at 100%. The physics of this process is not so obvious, but if you imagine a standard sheet, for example, 2500 * 1200 * 12.5 and estimate which way it is easier to bend (it is clear that 2500), then a transverse fold (1200) will require much more effort. If we fasten the sheet vertically to the existing racks, then only longitudinal resistance forces will be involved (if so to speak). By adding rows of self-tapping screws "across" the sheet, we thereby significantly increase the rigidity of the structure, since in this direction the bending resistance of the sheet is much higher. What would be where to tighten the screws, prepare jumpers, cut from the rack profile. It is more convenient to perform the markup and make cuts grinder.
Cutting the side of the rack with scissors is not difficult. For further operations on the installation of the partition, you need a riveter, traction rivets (I use 6-8 mm by 3.2) and a drill 3-3,2 mm. on metal. Using a marker or pencil, draw horizontal lines corresponding to the position of the jumpers and begin to set:
The number of horizontal rows, with a drywall partition wall height of 2500 mm. equals 2- 3. In my case, 4 rows are supplied, since the top one serves as a mortgage element for the subsequent fastening of the box. During the fixing of the jumpers it is necessary to control the straight position of the racks. Deployed around the vertical axis of the rack leads to the formation of a wavy surface on the drywall. Drilling and reworking a rivet in a new place is much easier than deducing the curvature of the surface with a putty.
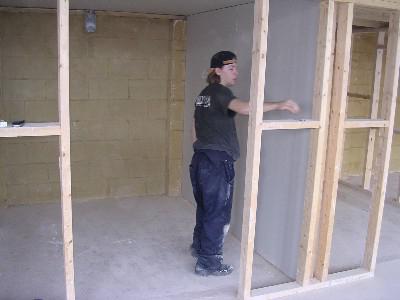
The skeleton of the partition wall is assembled and you can proceed to the plasterboard plastering. Of course, do not forget to carry out the necessary communications (in the case of installation of sockets and switches). Be sure to check the performance of the wiring before closing the drywall. When installing the sheet, first be sure to press the sheet from below (to the bottom guide) and fasten it with several screws, then in other places of the uprights and lintels. For convenience, we draw on the sheet the lines corresponding to the position of the frame.
There are some types of work where actions are completed, and the result is still far from final. The installation of a plasterboard partition in the room is one example. The tools are assembled, all are free ... but what about the final look that was imagined? Looking ahead, bypassing intermediate work - this is how a partition without a table with book shelves looks like.
Often in apartments, houses or other premises there is a need to create an additional partition or hide the structures that spoil the interior. In such situations, plasterboard partitions are the most simple and reliable way to achieve this goal. What is drywallThis material is used in various finishing works. It consists of paper, laid in two layers, and a core, which is made of hardened plaster mass and contains fillers. The sheet with standard dimensions is 120 cm. It is very flexible and allows you to create different designs for all craftsmen, regardless of their experience. StoryDrywall invented in the nineteenth century in the United States. This was facilitated by the owner of the paper enterprise, Augustin Sakett. Seeking new uses for paper, he decided to create a kind of paper board. The result was a material of ten paper layers held together by a thin strip of gypsum. Augustine immediately patented the invention, but another American, Clarence Utsman, introduced the material used in the modern world.
Partition: gypsum plasterboardOf the total mass of the sheet, more than 90 percent is plaster, and about 6 percent is on cardboard. Moisture, starch and organic matter make up only 1 percent. There are several types of material: Usual; Moisture resistant - for installation in rooms with high humidity; Fire resistant - used for finishing surfaces near fire sources; Gypsum fiber - this species has a higher strength; Acoustic - used for sound insulation.
The composition of the structurePlasterboard partitions (frame) consist of several elements.
With the help of a plaster product, plasterboard partitions with various parameters can be erected. Also in the partition can be a door and window opening, but to install it you should carefully calculate the load based on the weight and size of the door or window, as well as use the thickest plaster sheets.
The edge of the door frame should not converge with the seams of drywall. And electrical wires and various cables need to be laid in metal rails. Insulating materials must be of high quality. Plasterboard partitionFirst of all, performing the installation of plasterboard partitions, you need to accurately determine their location and make the markup. It is applied to the floor and ceiling. A holistic drawing of the object is laid out on the floor, and then it is transferred to the ceiling. For exact transfer of the drawing use an upholstery cord.
Next, a sealant is applied to the profile from the inside and fixed to the ceiling and walls, using special dowels suitable for this situation. Under dowel drill holes keeping the right distance between them. If plasterboard partitions are installed in wooden buildings, then you should use special screws with large threads for wood, in this case you do not need to drill holes. When the skeleton of the partition is installed, you can proceed to work with electrical wiring. It is laid in an insulating tube. It is also advisable to immediately place the outlet, using for this special devices - plates. At the final stage, plasterboard sheets are coated. It is necessary to make very carefully measurements and monitor the quality of the seams, they should not be noticeable.
Of course, when installing plasterboard partitions, there may be various issues and difficulties. To solve these or other problems can help professionals training videos. And, of course, our review. Door installationThe doorway should be ready already at the stage of building the basis of the structure. Measuring the parameters of the door frame and focusing on the external contour, it is necessary to install the profile. Its outer side should be flat, without joints and seams. If the plasterboard plating is finished, you can begin the installation of the door. First, a box is placed in the opening and secured with self-tapping screws. Then the hinges are hung, and after adjusting them, you can complete the work and install the door itself. The main difficulty lies in strict adherence to dimensions: you can not deviate from the specified parameters, otherwise there will be a deformation of the entire door. Sliding door in plasterboard partitionThe sliding door, despite the apparent complexity, is installed somewhat easier than the usual one. The fact is that the design is built under it immediately. Guides, on which the door slides, are mounted at the very first stage together with the main profiles. It is important to pay attention to some points when working with sliding doors:
Preparatory workBefore the installation of drywall partitions is started, as much information and training materials as possible should be studied. Those who have never done such work and are not familiar with this type of work should carefully consider the choice of material, the set of necessary tools and the creation of a preliminary drawing. Experts do not recommend beginner amateur masters to immediately take on complex structures with an abundance of decorative cuts and other difficulties. First of all, you need to think over the device of drywall partitions, work with the material on a small scale in order to “feel” it and check your level of skill. For example, install a shelf. To create complex objects of drywall in the living room may still need the help of a master or his advice. It is also better not to take up the installation of electrical wiring, and provide this part of the work specialist. Marking and siding are the most difficult stages in the whole process, so a lack of skill or lack of knowledge of certain subtleties can lead to an unsatisfactory result. Fine finishAt the end of all the rough work you can start finishing. In most cases, plasterboard partitions paste over with different types of wallpaper or paint. To strengthen the seams should be glued mounting tape. Plates of gypsum are fairly smooth, so for their preparation for finishing it will be enough to treat the surface with universal plaster, paying attention to the seams. As soon as the applied layer dries, you can proceed to pasting or painting the partition. Another important material is glue. Almost all subsequent work depends on its properties and qualities. You can use glue based on cement. Despite the fact that this is not the best option, it is acceptable, if it is not possible to purchase something else. The best view adhesive for drywall is elastic. It is sold dry or already mixed in plastic containers. The cost of this material is quite high. Laying tile on drywall using liquid Nails, professionals do not recommend. They can correct several missing instances. After the selection of ceramics and glue, it is necessary to carefully prepare the surface, namely, to prime it. It should also be calculated on the basis of the size of the tile, its number in each row. And if, after counting, a whole series does not come out, then it is better to start the work from the middle of the wall so that the trimmings appear in the background and become inconspicuous. |


 Marking should reflect all the specifics of the erected structure, the exact location of all the profiles of racks, the sheet thickness of the drywall, the location of the doors and cuts. The thickness of the plasterboard walls can be 75-150 mm.

| Read: |
|---|
Popular:
How to fix a grip profile to a wall
|
New
- The interior of the room with wallpaper in flowers
- Piercing - “8 earrings, a lot of photos, how to care, how many heal, where to do, how to accelerate healing, what would I bring back?
- Window opening in a brick wall
- Finishing the bathroom with plastic panels
- Long narrow kitchen - layout (41 photos) of comfortable space
- White apron on the white kitchen - a classic combination
- Selection, consumption and features of applying paint on the wallpaper
- Designing a wardrobe - six simple steps
- Rating of the best oil heaters by user reviews
- What ear pierce guys normal orientation


