Website sections
Editor's Choice:
- In a dream, the burner is on.
- partridge - all interpretations
- partridge - all interpretations
- Direct position of the card Nine Pentacles
- Exercise “I want to change”
- I dreamed about gas - interpretation of sleep in dream books
- In combination with the suit of Wands
- Tarot Card Meaning - Queen (Queen) Of Swords
- What is partridge dreaming of? Dream Interpretation Partridge. Why do partridges dream? Interpretation of sleep Partridge in the Noble Dream Book
- “What is the dream of a rope?”
Advertising
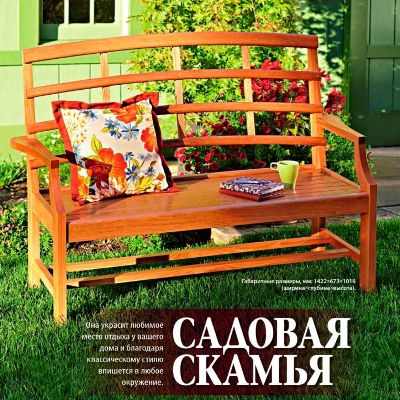
| Garden benches do-it-yourself scheme drawings. How to make a bench with a wooden back with your own hands - step by step instructions. |
Benches are installed mainly in the recreation area. Depending on the climatic conditions, the benches in the recreation area are positioned so that they spend part of the day in the sun and part of the day in the shade. If the bench is installed alone, then an awning is built above it, which will protect it from rain and direct sunlight. Install it on a hill or near a flower garden with a small pond. In any case, in the most beautiful place on the site. Before starting work, you should determine the size of the bench, and whether it will be portable or stationary.
Decide on the material, assemble the necessary tool, think over the sequence of processing and assembling the bench. If the set of tools necessary for the construction of the bench is not complete, then the order of work will be determined based on the available. That is, the work will go slower than we would like. When planning, an independent builder should be well aware of building materials, their advantages and disadvantages. This knowledge sometimes helps to solve complex problems. When making bench details, we must remember that only as a result of careful finishing can we achieve high quality. Choosing your model, determine its size. Will it be stationary or portable.
Tool Needed:
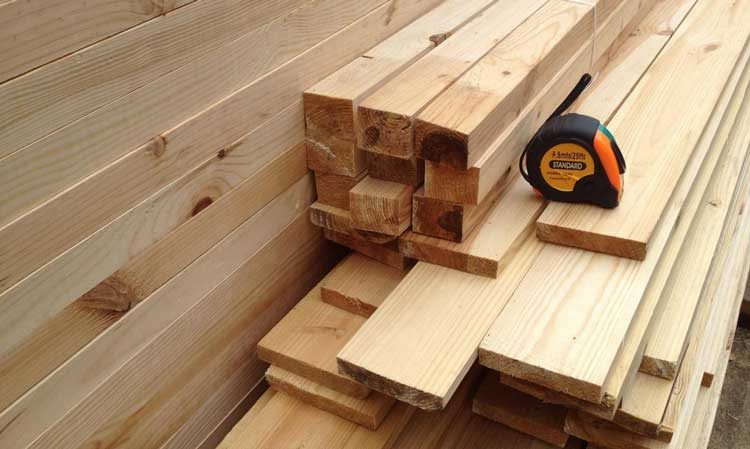
Wooden benchAs the main material for home-made furniture, it is desirable to use hardwoods: beech, oak, etc. However, if there is no such wood, coniferous species can be used. They are more difficult to ennoble, but nevertheless, it is possible. The selected lumber must be dry. When processing softwood, resin is released, so it must necessarily be tarred. The simplest solution for demineralization is a solution of acetone in water in a ratio of 1: 4. Effectively resins the composition of caustic soda (4 parts) and acetone (20 parts). Coat the surface of the boards several times with a solution. Then flush the surface with water. Observe safety precautions during work. Wear gloves and preferably wear safety glasses. After the wood dries, to prevent the formation of rotting processes, it should be treated with an antiseptic. Necessary lumber:
Saw boards to the specified size. Surface treatment can be carried out, if possible, on a milling machine. If this is not possible, you can carry out a jogging with an electric plane or work manually - with a simple plane.
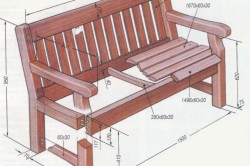
From the bars prepare the legs of the bench. They should also be curtailed. On those bars that will be connected to the backrest bars, we make a cut for the gear connection, taking into account the angle of inclination of the backrest. On the bars of the legs we make a cut in half its thickness and with a chisel we knock out the groove. Then we connect the bars with screws. On top (or side), 2 boards are attached to these bars. The boards should be equal to the width of the seat. On a bar for the back of the bench, we make a cut of wood for a gear connection. We fasten the gear connection with screws. In order to create additional rigidity in the board, located at the base of the back, we make 2 notches of wood according to the size of the bars and fasten it with screws to the base. At an equal interval from the first board we fix the second board and then all the others. In this case, the distance between the boards should be the same. To stiffen the bench, we fix 1 more board under the seat, connecting its legs additionally. We connect the upper part of the back with screws to the board. Boards of a back also fasten at an equal distance from each other. Back to the table of contents Material FinishBefore grinding the surface, it is necessary to repair the cracks, remove dirt and dust, and clean the surface of the wood. With a sandpaper, all irregularities and roughness are removed from the surface of the boards. First, with a grain of sand with large grain, then with fine. To improve the quality of grinding, the surface of the boards is moistened with water to raise the pile of cut wood fibers. If this is not done, then the surface of the boards will be rough. Now you can primer the surface. The primer fills the pores of the wood, creating a continuous film. After priming, the bench can be varnished or painted. When the paint dries, it can be installed in the recreation area. Back to the table of contents Combined OptionA bench made of metal and wood will be practical. The design of the bench made of metal should be light and durable. Prior to its production, it is advisable to draw a drawing indicating the dimensions of the parts. In the recreation area, choose a place for the future location of the bench, taking into account comfort .. For the manufacture of a bench frame, a rectangular profile pipe with a section of 40 * 20 mm will be required. To give the desired shape, the pipe is easy to bend on a pipe bender. With light weight and high strength, it is well suited for work in the furniture industry. The profile pipe has a length of 11 m. Mark the pipe according to the dimensions of the frame and cut it with a hacksaw for metal:
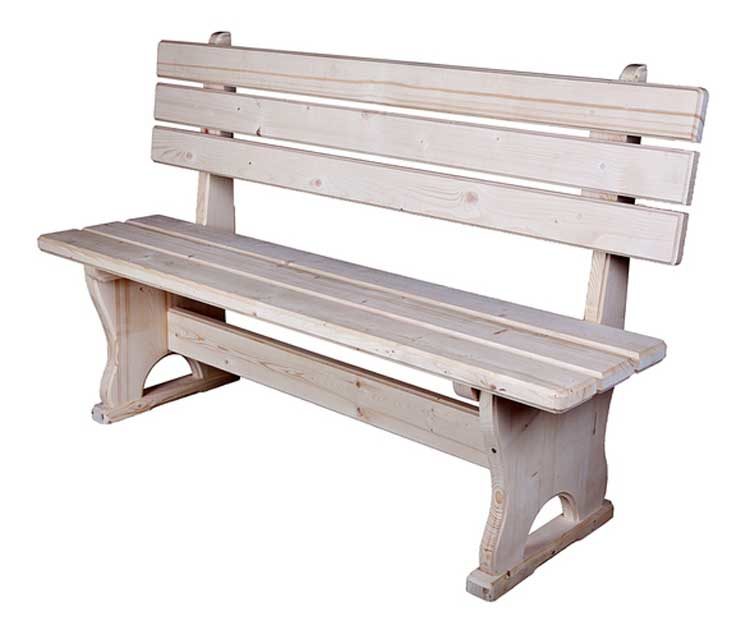
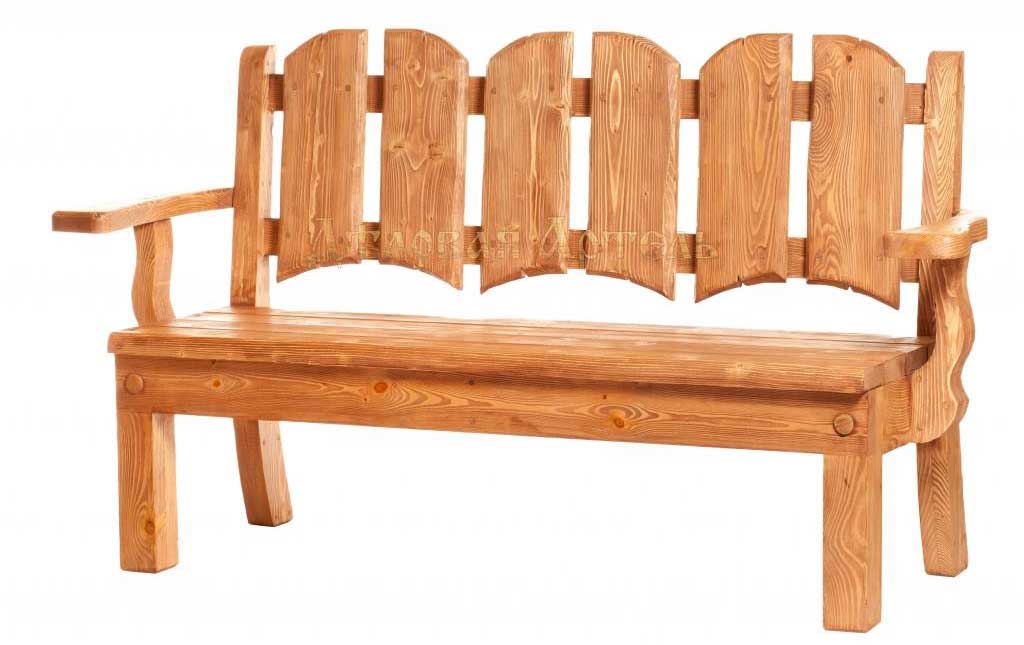
Bend 2 pieces of pipe (L 1000 mm) on a pipe bender, at an angle of 10 - 15 degrees. The fastening of the frame is best cooked by welding. For this, electrodes d 3 mm are suitable. At the end of the welding work, the joints must be cleaned with a grinder and painted. . For the seat and backrest, it is necessary to prepare lumber - a rail with dimensions of 1600 * 25 * 40 mm. The surface of the rail should be smooth, without knots and roughness. To do this, she planed a plane or an electric plane. Sandpaper. First coarse, then fine. Primer and coat 2 times with varnish or paint. Fasten the wooden parts of the bench to the frame on galvanized bolts. The distance between the rails should be the same. Having fixed the 1st rail, the 2nd and 3rd are laid side by side. They fix the 3rd, and the 2nd ruy again put for her. Thus, the distance between the fixed rails will be the same. If the distance between the rails seems large, then you can use a bar with a size of 50 mm. For greater stability, small metal plates are welded onto the legs of the bench. Thanks to them, the legs of the bench will not fall into the ground. When cooking the metal elements of the bench, safety regulations must be observed. A bench with armrests looks more spectacular. For the manufacture of the armrests, 2 pieces of pipe measuring 75 cm in size should be bent on a pipe bender and welded to a metal frame. Joints should be cleaned with a grinder (file) and painted. Thus, you can make a bench of any material with your own hands. Benches in the garden are an indispensable attribute both in the country house and near a private house, because they are comfortable sitting in the summer and relaxing in the shade of trees. But to make the bench fit beautifully into the overall design and be comfortable, you need to try. In this article we will look at how to make a bench with a back made of wood with your own hands. Drawings and sequence of work you can see below. It’s not difficult to make a bench with a backrest with your own hands, but in order to make it not only beautiful and durable, you need to choose the appropriate material. After all, the bench will be outdoors under the influence of moisture and sunlight, and at some times of the year it will also succumb to temperature differences. It is necessary to choose wood resistant to decay and moisture, as these are two main problems of garden elements made of wood. The cheapest option is pine, because due to the high concentration of resins in the wood, it does not decay quickly. Although this is not the most beautiful option and working with a pine tree is quite difficult, there are a lot of knots in it.
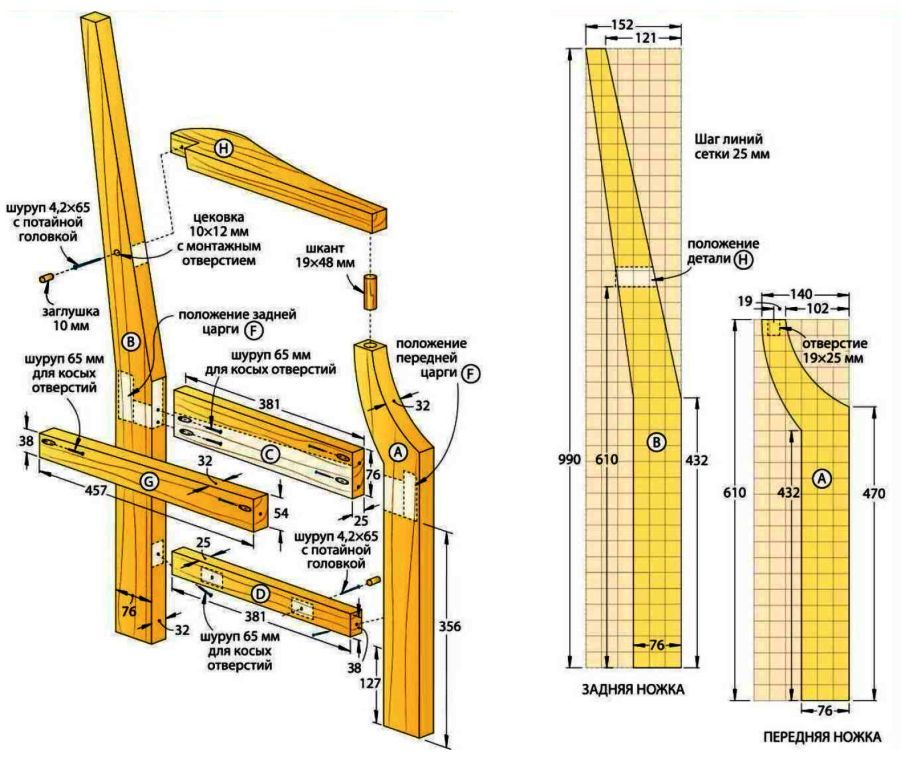
A wooden bench with a back made of oak will be beautiful and durable. Oak is one of the most durable trees and its core practically does not lend itself to decay and the negative effects of moisture. Therefore, such a bench will decorate your garden for several years without losing its beautiful appearance. You can also use other solid varieties of wood such as ash, beech, but spruce is not recommended, since it is short-lived. All wood must be well dried at the time of manufacture, since when dried, it can warp and damage the design of the bench. SidewallsDoing it yourself with a backrest should begin from the sidewalls, since they have the most complex structure and a large number of details. In the figure you can see the sizes and shapes of the sidewall parts.
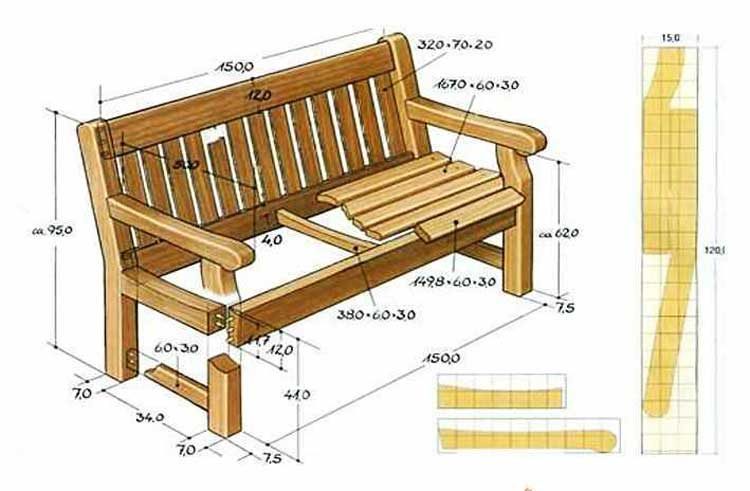
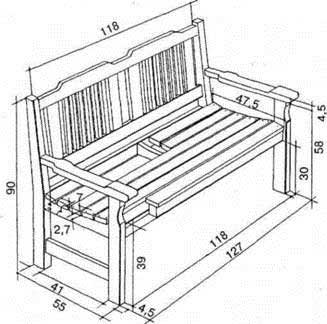
Click to Enlarge To begin with, it is worth making parts A and B, they need to be cut from a solid board using a jigsaw. The most important thing is to make the markup correctly. You can make markings directly on the board, but it is better to cut two templates for the front and back boards from hard cardboard and use them to draw the contours of the parts on the workpiece. If you plan to make several garden benches with your own hands from a tree, then these templates will be very useful to you in the future. Those who refuse to purchase finished products are absolutely right. Firstly, with your own hands it will be possible to make a shop of any shape and size, and not just take what the outlets offer. Secondly, there will be no problems with its transportation to the place. Thirdly, wood is an accessible material, and the work itself does not present any complexity. About how to properly draw up a drawing of a bench with a back and make it yourself - this article. Few establish shops with a backrest in a residential building, unless lovers of antiquity. But there are not so many of them, and the drawings are made up special, individual, with the decoration of all the elements. More simple samples, as a rule, are used for placement in recreation areas on the house adjoining (country) territories, in baths (saunas), arbors, open verandas and the like. The design of most of the benches is of the same type, therefore, having understood the assembly methodology and nuances, it’s not difficult to make a bench with a back of any size and configuration with your own hands, according to your own needs, focusing on local conditions. If we think about ergonomics, that is, convenience at minimal cost, in relation to a bench for 1 person, you should focus on a length of the order of half a meter. Accordingly, it increases by a factor depending on the estimated capacity. But the width of the seat and the height of the back are unchanged - 400 and 900. The distance of its first board from the seat is about 200. The recommended angle of inclination of the back is 20 ± 2º. The indicated dimensions are considered optimal, although, making a shop with your own hands, you can choose other ones.
We should also say about its height. The bench can be used by both adults and children. therefore the best decision - 450. Small deviations in one direction or another are not significant. But if the bench is supposed to be installed on the site, with the deepening of the legs, then their length needs to be increased.
Selection of material for the benchBasic sizesOne of the simplest options for a bench with a back is from a board.
The thickness of the blanks is at least 350. If it is decided to use a bar for the legs and backrest holders, then there will be enough samples with a side of 400. Here you should focus on the dimensions of the bench. But any increase in the parameters of the tree leads to a heavier product. Thermal conductivity of the materialFew people pay attention to this, but since we are talking about a bench, that is, a piece of furniture intended for seating, it is still worth considering this criterion. In different breeds, these characteristics differ, and quite significantly. The so-called "warm" trees include cedar, spruce, birch, fir, pine, larch, poplar. Cork does not count - too expensive and impractical due to the low strength.
But to make a bench from oak, despite the durability of the material, is hardly advisable - it will always be cold. The principle of selection for thermal conductivity is simple - the lower the numerical value of the characteristic, the better. DurabilityThe tree collapses over time, as it has enough “enemies”. Of the affordable materials, it is advisable to choose larch. This is probably one of the most common rocks in the construction industry, which is not afraid of moisture. When wet, this wood only gains strength. Since benches (with or without a back) are mainly made for installation in the open air or in rooms with excessive humidity, an important factor. It is not for nothing that this particular tree is universally used for laying the lower crown of a log house.
Features of manufacturing a bench with a backIt is a waste of time to tell someone who is used to doing everything with their own (and not someone else's) hands what tools are needed to work with wood and how to use them. But it’s worth recalling some nuances. The material must be thoroughly dried. Otherwise, over time, the tree will “lead”, and the shop will either have to be repaired, or completely disassemble, change individual elements and again engage in installation of the structure. Since what is at hand is mainly used, individual defects of the board (timber) are possible. But this a priori does not mean that the workpiece is not suitable for the manufacture of a bench. For example, small cracks can be repaired with a special filler, for wood. There are such formulations on sale. It remains only to carefully grind (to help) and apply a layer of varnish or paint.
When processing boards manually or on a machine, it is necessary to round the edges. The same applies to the end parts. By the way, the strict symmetry of all elements does not have the best effect on everything that is done by oneself. Indeed, this is the whole “highlight” - to make something special, not “like everyone else”. Yes, and discomfort will be minimized when the sharp edges do not touch the body. Before you engage in the external design of the shop, the wood should be soaked with soil. Many neglect this, although the benefits of this treatment are many. Firstly, the strength of the outer layer of the tree will increase, it will be less susceptible to destruction from changes in humidity and temperature. Secondly, the consumption of the applied paintwork composition will decrease, and it will lie much more evenly. Already this is enough to understand - it is worth doing just that. If the shop is made on the basis of its periodic carrying, it is advisable to strengthen the entire structure. First of all, this concerns the supporting part - legs. For this, they are strapped. As "crossbars" is used or narrow boards. The efficient owner of this information is quite enough. And for those who do not have any practical experience, the above drawings and drawings will help to better understand how to make a bench with your own hands with a back. Good luck, home masters! |


| Read: |
|---|
Popular:
Tarot of the Sacred Feminine
|
New
- Consider a Japanese horoscope by date of birth
- Tarot cards - a mirror of human fate: examples of fortune-telling
- Interpretation of sleep stove in dream books
- Dream of applause, why applause in a dream
- A psychological portrait of the tarot layouts from alicia hshanovskaya
- Why in a dream does the Warehouse dream?
- Why do I dream of a bun with poppy seeds, is this a good sign?
- Characteristics of a female lion
- Boar: what a dream
- Dream grouse, what a partridge dreams about in a dream


