Site sections
Editor's Choice:
- Artificial flowers and their secret
- Completion of country houses
- Design project of a three-room apartment
- Is it possible to build a balcony on the second floor
- Overview of the room interior with a balcony
- Kill neighbors that interfere with sleep
- Sample collective complaint against neighbors
- How to teach lesson to noisy neighbors
- We put things in order in kitchen cabinets and drawers
- Interesting interior solutions for different rooms
Advertising
| How to disassemble an aluminum heating battery. DIY radiator assembly: connecting sections and securing |
|
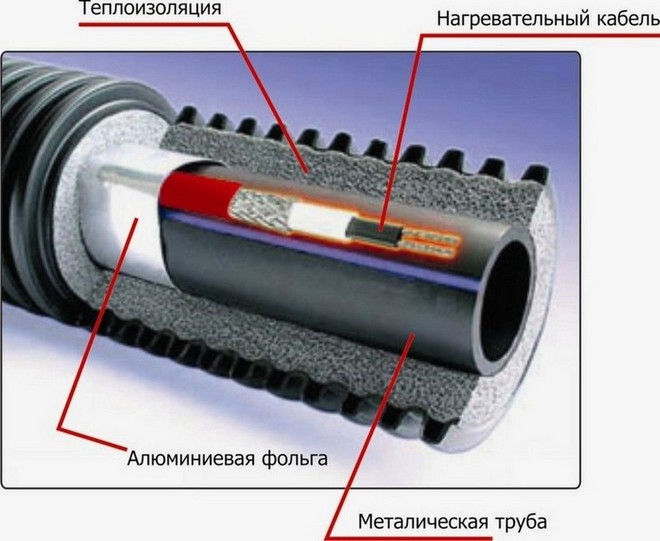
There is a wide variety of appliances that help to get heat in the house. On the modern market there is a wide variety of devices that need not only to be bought, but also correctly installed to obtain the desired effect. Most people, when buying heating systems, are wondering how to assemble an aluminum heating radiator. Some features of aluminum radiatorsThe main advantage of this device is its operation. At any time when needed, a person can add the number of sections, which will lead to an increase in the efficiency of the thermal system. It should be noted that aluminum radiators can be used both in a closed version of heating systems and in open ones. When using this equipment, the room temperature changes almost instantly. The main disadvantage is the increased perception of corrosion. The main features of the radiator include:
The features of aluminum radiators are the main aspect of their price. The higher the price of the product, the more efficient it works and has the best quality.
How to assemble the radiator and its maintenanceAnd yet, where to start assembling the radiator? First of all, by checking the availability of all the component parts that are supplied with the equipment. In a complete set with the sections of the device itself should be:
The outlet pipe can be installed on the side that is more beneficial to the consumer. Although the assembly of aluminum heating radiators is not easy (for its effectiveness and proper operation, you should invite an expert in the installation of heating systems), it can be done independently. The first step is to assemble all the components of the device together. Initially, all plugs and plugs that are included are installed. Shut-off and thermoregulatory fittings are immediately mounted. Do not clean surfaces, as at this stage it can lead to holes and leaks. A prerequisite is the complete installation of air valves. They should be in place on each used part of the product. The Majewski valve is installed with the exhaust head up. There is no need to apply more than 12 kg of force.
The phased assembly of aluminum radiators involves marking the future places in which the mounting points will be installed. They must be created in such places that will maximally correspond to the highest heat transfer rate of the apparatus. In most cases, they are carried out at 10 centimeters from the surface of the windowsill, if any. If it is absent, it is necessary to measure about 15 centimeters from the bottom surface of the window.
It should be used when assembling the heating mechanism and an additional tool. You may need a key to assemble aluminum radiators. It can either be purchased separately from the device, or use the one that may be in the owner of the heating system in a closet or a set of tools.
The stages of assembly of the radiator are completed, the brackets are installed, which means that we should proceed to the last final stage of installation, in which we will consider connecting it to a common heating system. This process can be difficult, as it has its own nuances. The finished assembled design is connected exclusively to those pipes that are supplied from the heating system of the entire building. They can be equipped with a valve, faucet or a special thermostat. During operation of the heating system, an unplanned breakdown or accident may occur, which should be excluded. For this, attention is drawn to shut-off equipment, which can be located on both sides of the pipeline. At that moment when the radiator is completely filled with water, it must not be completely disconnected from the system. The one exception is the open air vent valve, which can drain water. It should be noted that before the heating device is installed in a new place in your home, you should check the radiator assembly. This final chord must necessarily occur, as it significantly reduces the risk of equipment breakdown at the time of connection. Hot water is constantly circulating in the radiator, which can cause irreparable damage to the skin of a person. Be careful, as an extra check can save your life and protect you from injuries. Use of materials is allowed only if there is an indexed link to a page with the material. We need: a universal wrench for an American and a ring wrench. Note:when using metal keys - ring spanners and especially carob keys, it is likely to damage the finish on the surface of the listed products, as happened in my case, so pay attention to this removal and do not repeat my mistake. I recommend using a plastic key for radiator plugs, futorok and air vents, an example of which is shown in the photo. Kit for aluminum heating radiatorsVisually consider the standard kit for aluminum heating radiators:
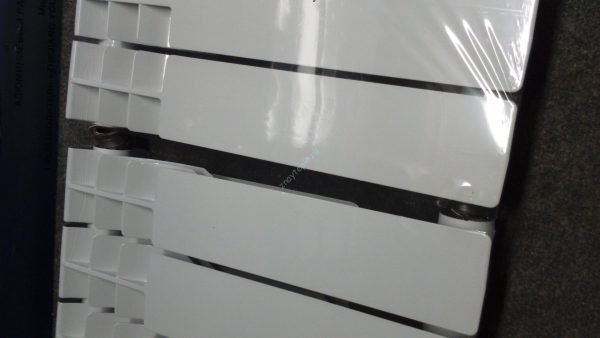
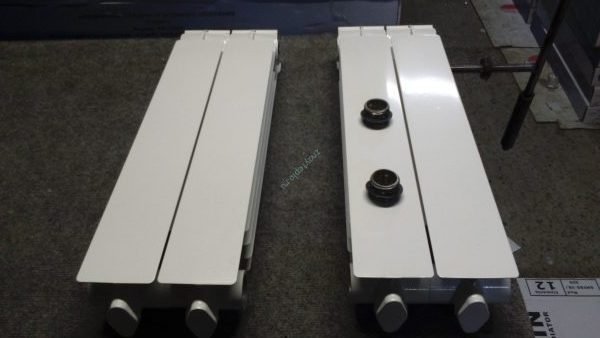
It is also necessary to purchase brackets for attaching heating radiators to the wall of the house. I bought corner brackets from the calculation - three brackets for one radiator, two installed at the top, one at the bottom in the center of the heating radiator. Assembly of aluminum heating radiatorsAs I said earlier, I have made a one-pipe heating system with a diagonal connection of heating radiators. Accordingly, based on this, the installation of the kit on heating radiators was carried out in the following order: First, I installed in the threaded holes of the heatsink the radiator with left and right threads. The main thing here is not to confuse which futors where to put. If the foot has a left-hand thread, and you mistakenly screw it into the radiator hole with the right-hand thread (on the right side of the radiator), then, of course, you will not be able to twist the foot. In this case, you don’t have to make an effort and try to wrap the foot using the pipe wrench - just take another one with the desired (right) thread. The installation of the legs was carried out through the silicone gaskets that were included.
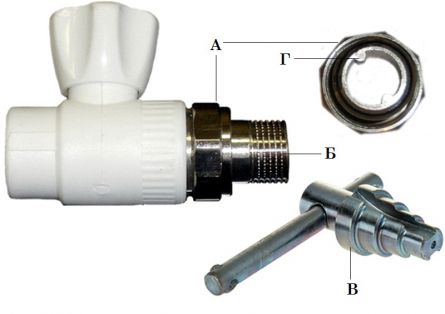
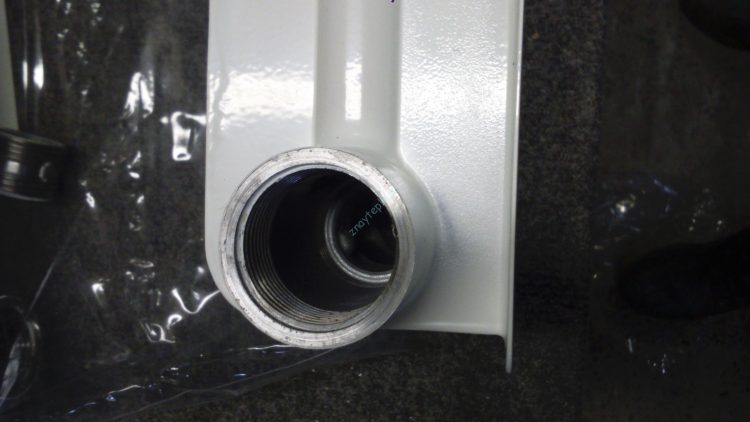
At the inlet of the heat carrier to the aluminum heating radiator, I installed a ball valve with an American 25х3 / 4 ”, the same valve was installed at the outlet of the heat carrier from the heating radiator (below). First, I twisted the American (A) from the tap and installed it on the heating radiator (thread B is screwed into the threaded hole of the foot). This method allows you to conveniently and reliably fix the threaded connection of the foot and the American woman, in order to further completely eliminate the leakage of the coolant. As you can see in photo 5, the American has two slots (G) on the inner diameter, these slots are designed to tighten the American with a special key (B), with which I tightened the American polypropylene tap. When the American was fixed to a radiator, connected it to a faucet. On the left side (at the bottom of the radiator), I installed a plug, and in the upper part of the radiator on the right side I installed a “Mayevsky” tap, to prevent airing both the heating radiator and the whole system. Important! When installing the kit on an aluminum heating radiator, do not forget to install the existing gaskets so that you do not have to disassemble threaded joints after supplying the coolant to the heating system to prevent leaks at their joints. When kits were installed on all five heating radiators, I proceeded to the next stage of work -. Before the assembly of the heating radiators and their installation begins, it is necessary to purchase all the necessary materials and tools. Calculate the number of necessary sections, distribute this number among the rooms. Having bought all the materials and tools, you can proceed to assembly and installation. When buying a heating device, you should pay attention to the power and type of heater. Naturally, you need the radiators themselves. They will additionally need certain details: plugs, plugs, dowels, brackets and a Mayevsky crane. Brackets can be used if the walls of your house are concrete or brick, that is, from solid materials that can be drilled and inserted dowels. The plugs in the kit may have threads of different sizes. Two plugs in the radiators are pass-through - through them connect the supply and return pipes. One of the other two plugs is drowned out, the Mayevsky crane is screwed into the other. What fittings may be required to assemble the batteries?
Cast iron battery installation diagram. If the heating system is single-pipe, then tees of the following diameters will be needed: for the inlet main pipe, for example, 25 mm, for the outlet pipe to the radiator and the bypass pipe of 20 mm each. If the main feed pipe has a diameter of 35 mm, then the pipes will have diameters of 32-25-25. Each heating radiator will require two of these tees. On sale are both polypropylene radiator taps, and metal, which are slightly more expensive. Reliability and durability of taps depends on the quality of the coolant. Each radiator needs two of these taps. If the walls are constructed of insufficiently hard material, special brackets must be used. After all the necessary materials have been purchased, you can proceed with the assembly and installation of radiators. Before the assembly and installation of bimetallic or cast-iron batteries begins, it is necessary to mark out the place where they will hang. To do this, make marks on the wall with a pencil in places where the brackets are attached. Marking must be done by level. In addition, please note that the brackets must be mounted so that they are located in the gap between the battery sections. When marking, it is necessary to take into account the height of the radiators from the windowsill and floor. In order not to make mistakes, heating radiators are applied to the walls and marked so that the brackets after mounting are between the battery sections. After marking the walls, holes of the corresponding diameter are drilled. The diameter of the hole must match the size of the dowel that comes with the radiator. Then the dowel is inserted and the bracket itself is screwed into it.
Scheme of a bimetallic radiator. Before installing a bimetallic radiator, it must be assembled. To do this, you will need the following materials and tools:
A part with a threaded connection must be unscrewed from the radiator tap, a winding is wound on the thread. For these purposes, it is best to use tow in combination with a special Unipak paste that can withstand high temperatures. The paste helps to achieve high tightness of threaded joints of bimetal radiators. Instead of tow with paste, you can use fum tape or tow with paint. Before winding the tow, you need to apply paste or paint on the threaded part of the part, evenly distributing it throughout the thread. After that, they take a pre-prepared bundle of tow and wrap it along the thread. Next, put on the tap nut of the tap on the wrapped part and screw it into the cork of bimetallic radiators. First you can twist it by hand, and then with a wrench. In the same way, the Mayevsky crane and plugs are screwed into the remaining plugs. You can install special rubber gaskets on the bimetal radiator plugs, which can be purchased separately. Another, more reliable option is winding from tow with special paste. After that, screw the plugs into the radiator. It should be noted that two plugs have a left-hand thread and two plugs have a right-hand thread. O-rings on radiator taps have O-rings, so no winding is required. This O-ring will lie in the chamfer on the threads of the taps; in this case, the connection will be tight. When the plugs in the batteries are screwed in, the radiator valves are screwed. Now you can begin to solder the pipe-branches with one side to the radiator tap, the second - to the tee. Here you should pay attention to the length of the pipe-layering, given the distance from the floor and the fact that part of the pipe goes into the inner diameter of the connected part.
To do everything right, you can place the tap and pipe on a flat surface and make notes with a pencil on all the details. During soldering, make sure that all pencil marks match. http://youtu.be/9BAZDGQIlSA The next step will be to screw the radiator taps directly to the radiator. This is necessary to determine the distance to the bypass section of the supply pipe in a single-pipe heating system. After that, bimetallic radiators are directly mounted on the brackets and checked by level. All radiators after assembly are mounted in the same way. After that, they are tied to the boiler and to each other using a pipeline. Assembly and installation of bimetallic radiators can be considered completed. The main condition for such work is the accuracy of the markings. The radiator must be installed carefully, the connections should not be skewed.
Scheme technical specifications cast iron radiator. Before installation cast iron radiators it is advisable to unscrew them, tighten the nipples and assemble them. Assembling such batteries is usually performed by two. To do this, you need the following materials and tools:
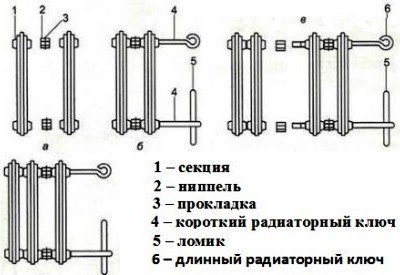
Cast iron radiators are assembled on a workbench using two special keys that are inserted into the nipple holes (each nipple has both an upper and a lower hole). For convenience, a crowbar is inserted into the lower ear of the radiator key. The lower and upper nipples unfold at the same time so that the radiator does not warp. It must be remembered that the nipples on different sides of the battery have threaded connections that are different in direction.
Installation diagram of cast-iron radiators. After dismantling the cast-iron radiators and unscrewing all the sections, they begin to group them. To group two sections together, they first grab several threaded threads on each side with nipples. After that, screw both nipples at the same time. In the same way, you can collect cast iron battery with any required number of sections. The assembled battery is subsequently crimped. If water leaks are detected, the nipples are tightened. After assembly, it is advisable to paint the radiator. Before installing a cast-iron battery, you need to install a mount for it. In a house with wooden walls, batteries are installed on stands that are located directly on the floor, and supporting devices are mounted on the wall. When buying a radiator, you need to check the compliance of the mount with the type of your wall on which the heating devices will be mounted. When installing the battery, make sure that its center coincides with the center of the window. The top of the radiator should be at a distance of 5 cm from the windowsill, the bottom should not reach the floor for at least 6 cm. The radiator must be attached to the wall, observing all these parameters, and mark the mounting points so that for each m of heating devices one bracket each. All heaters installed in one room must be at the same level. The brackets are usually installed to a depth of at least 12 cm and bricked with cement mortar. After the battery is suspended on the mount, it is connected to the heating system. To do this, unscrew the plugs, connect the valve and mount the radiator with the help of the drives. Most Popular Blog Articles of the WeekHello to all! This short post will be devoted to the assembly or disassembly of sectional heating radiators. Here we talk about three types of radiators:
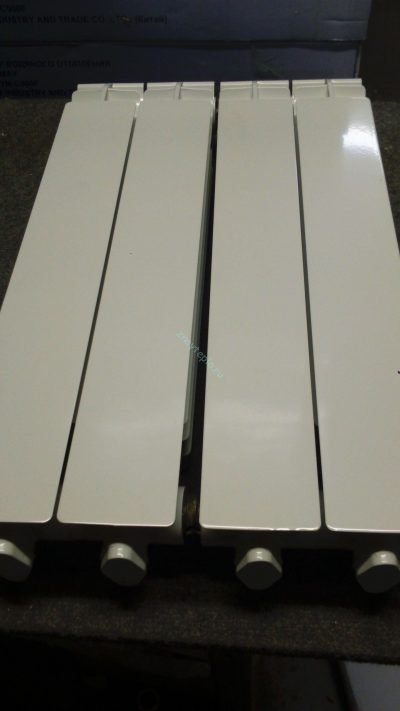
All of them are sectional and therefore they can be assembled and disassembled. Although some manufacturers specifically modify the nipples so that their radiator can not be disassembled with a conventional key. So, I said an incomprehensible word - nipple. Now I will show what it is: This is an ordinary piece of iron, on which there is a left-hand thread on the one hand and a right-hand thread on the other. White ring in the middle - inter-sectional gasket. In this case, it is made of silicone, but can be made of paronite. The diameter of the nipple for aluminum and bimetallic radiators is one inch, but for Soviet cast-iron radiators, the nipples have a diameter of 1¼ inch. This means that different keys are needed for these radiators. Now let's talk about the keys. To disassemble and assemble the radiator, you will need a tool. This “miracle of technology” looks like this: This is not the only embodiment of this kind of tool. In stores you can find many design solutions. For example, these: Regardless of how the key looks, its task is to unscrew and twist the nipples. Personally, I always collected radiators using the first option of the key. It is advisable that the tool be made of hardened steel. Otherwise, one key will suffice you for only a few joints, and then it will become unusable and you will have to buy a new one. In order to build up the radiator you will need a pair of nipples, a pair of gaskets, a key and it is advisable to have an assistant. Twisting radiators to one is an extremely inconvenient task. First, inspect the ends of the sections. The paint layer at the end may be thick and will need to be cleaned with a knife. At the end there should not be any influx and unevenness. This mainly applies to Chinese heating appliances, while in Europe the paint layer is usually thin, even and does not need to be finalized with a knife. After processing the ends you should see the following picture:
Only no need to use a file to clean the end! You can damage the plane of the ends and they will no longer compress the gasket. Now I will show a brief photo instruction for assembling / disassembling the radiator. So let's get started:
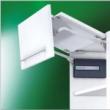
Lay the radiator face up on the table. Then insert the key into it until the joint that you want to untwist. In this figure, the key must be turned towards the fins.
Having slightly unscrewed one joint, rearrange the key (to the bottom or top) and repeat the operation. At the end should be the following result:
Unscrew the nipples to the end and that's it! Radiator disassembled! The radiator is assembled in the reverse order. We look at the following photos:
Here the ends of the sections are already stripped and gaskets are put on the nipples. Go ahead!
The nipples are twisted alternately. In this case, it is necessary to compress the radiator so that the nipple equally fits into both sections. Otherwise, the joint will flow. Then we begin to alternately tighten the joints. You need to do this a little bit, rearranging the key from one joint to another. If you sharply twist one joint, then the second cannot be twisted due to the distortion of the nipple. He just won't go carving. Everything should be as shown below:
After the sections are closed, you need to stretch the joints with effort. Without it, they will leak. You don’t need to exert too much force, otherwise you can break the key or it will slip in the nipple and you will injure yourself with its handle. Unfortunately, I did not have the opportunity to shoot my own video on the assembly-disassembly of the radiator, so I have to use someone else's, but as soon as possible I will replace it with mine: For a change, let's see how cast-iron radiators are disassembled: Results of the article.So what can be said in the end? If you need to remove sections from the radiator, then you need to remember one thing - easier to do it on a new deviceheating!The nipples in the radiator that has stood for several seasons can stick and it will not be possible to disassemble it. But you can add sections without any problems, except for the addition of extra brackets for attaching to the wall. In general, it’s easier to do everything right away and then not to redo it! That's all, I'm waiting for your questions in the comments!
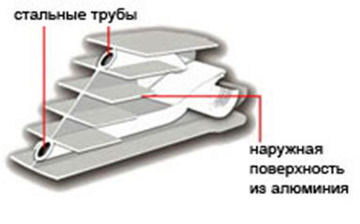
Bimetallic radiators are not inferior in power to cast-iron radiators, but it is lighter. The very name of these heating appliances suggests that they are made of two different types of metals, namely aluminum and steel. A radiator frame is made of aluminum, and pipes are made of steel. Bimetal provides a combination of properties such as high strength and good thermal conductivity. As well as the installation of sectional radiators, this type of work involves the use of both standard right and left threads. This specificity of work is often the most problematic moment when installing bimetallic batteries, if you plan to do it yourself. This feature often leads to the fact that the components are twisted in the wrong direction. This can lead to leaks in the future. Before you begin installation, you must assemble them. As a rule, bimetallic radiators are assembled immediately at the manufacturing plant or at points of sale, however, in some cases, buyers have to assemble the radiators themselves, directly at the installation site. These works are carried out using a special radiator key, which can be used to connect all sections to each other. To perform this assembly requires some experience in plumbing. Moreover, it is almost impossible to assemble radiators alone. If you are faced with the need to assemble sections, it is best to contact specialists in this field. Preparation for installation
Before proceeding with the installation of bimetallic radiators, you need to determine their location, in other words, draw up a diagram of the heating system, and also consider what additional steps you may have to take. For example, you may need to install or replace taps, replace pipes. In this case, you should pre-stock all the components and tools. Of the tools you may need:
It will also require additional details, the exact list of which you can find at the point of sale of radiators. A sample list of these materials looks like this:
For bimetallic radiators, diagonal mounting is considered the most optimal. Basic installation rules
Installation of bimetallic heating batteries requires the following basic rules:
Before you begin installing any elements of the heating system, including batteries, you need to find out if water is running in the heating system and, if so, take measures to shut off the water supply.
The procedure for installing heating batteries is as follows:
Heating batteries during installation do not allow such actions:
The correct installation of bimetallic radiators requires a responsible approach that will ensure the correct operation of the entire heating system. Therefore, take a responsible approach to the implementation of these works. |


| Read: |
|---|
New
- Drawer guides
- Design bedroom classic style wallpaper
- How to make ventilation in the apartment yourself?
- Surfboard - all about surfboards: type, size, shape
- Is it possible to carry out noise work on Sunday
- We preserve vision: the right light
- Color in the interior of the living room (50 photos): beautiful combinations
- Family horoscope for august
- Which foam rubber is better to use for a sofa
- How to choose an interior style if you like everything


