Website sections
Editor's Choice:
- The claim for damages from the gulf of the apartment
- Damage assessment from the gulf of non-residential premises
- How can a woman make repairs in an apartment alone?
- Sample collective complaint against neighbors
- What repairs should be done in a new building
- Artificial flowers and their secret
- Completion of country houses
- Design project of a three-room apartment
- Is it possible to build a balcony on the second floor
- Overview of the room interior with a balcony
Advertising
| We design a sliding wardrobe. Design of a wardrobe |
|
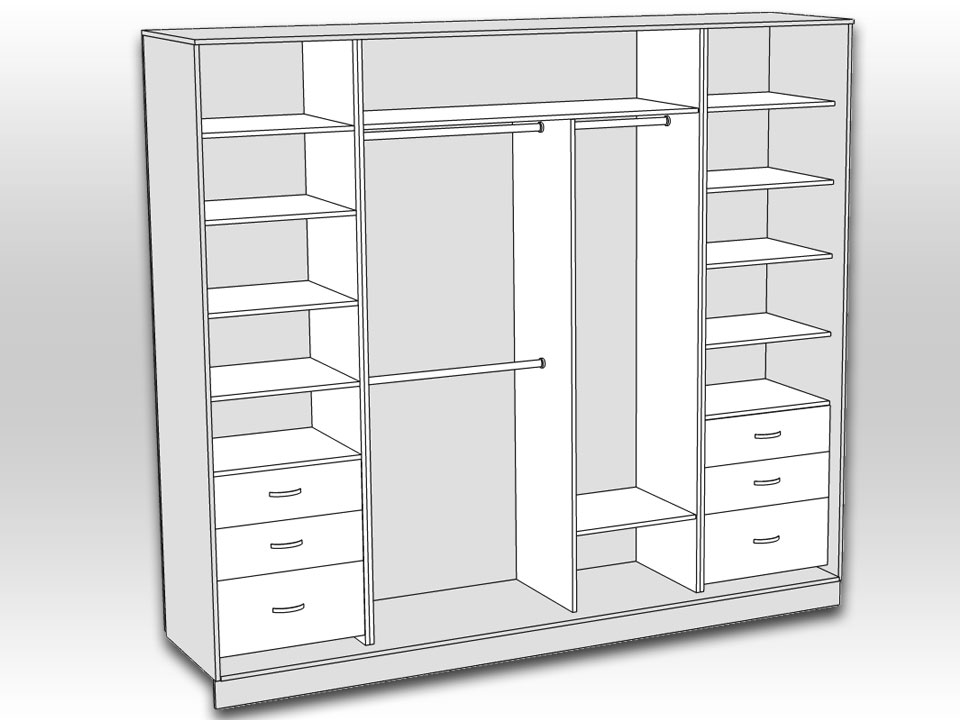
An article for those who decided to independently design a sliding door wardrobe and at the same time encountered a common problem when the dimensions of the cabinet parts significantly exceed the size of the chipboard sheet. A non-standard sliding wardrobe, a large sliding wardrobe, a tall or wide wardrobe is not a problem, I will explain the principle of home design, on the basis of which even a novice can easily calculate and subsequently correctly assemble any cabinet furniture. Where to start designing a custom closet?1 Measurements of the room where it is planned to install a large cabinet in the future. 2 Calculation of the actual dimensions of the wardrobe. 3 Design. The first two points are no different from measurements and calculating the dimensions of ordinary sliding wardrobes, which I wrote about. Designing a non-standard (large) size sliding wardrobeOutdoor structureSliding wardrobes, the length of which exceeds 1200-1500 mm, must have supports in the form of adjustable legs, thanks to which a huge wardrobe can be adjusted and installed in level. In the future, adjustable supports can be closed with a decorative strip (base) or remain open. This is at your discretion. If the length or height of the wardrobe is greater than the size of the chipboard sheet, that is, longer than 2730 mm, the future wardrobe will have to consist of two or more parts. This moment is very important not only for massive, large furniture, but also, in principle, for those cabinet elements that exceed 1800-2000 mm. The modular principle applies here. Non-standard cabinets are twisted from several parts and ultimately are a monolithic design. In the drawing, I specially painted each of the three parts of the sliding door wardrobe in a different color, so that it would be clearer for you to understand what kind of separation I'm talking about. As you can see, a sliding wardrobe with a length of 3000 mm (3 meters) is divided into unequal parts. Two left on 700 mm and average - 1600 mm, this separation is convenient for four sliding doors. The next project is a tall sliding wardrobe, which also consists of the main part and the “extension”. In this case, the usual mezzanine took on the role of the smaller part.
And in both cases, when the wardrobe will be completely covered with facades, no one will even guess that there is not a single module behind the doors, but furniture made of several elements. That is, neither for the mezzanine, nor for the vertical dividers, individual facades should be ordered.
Internal constructionIn order to truly cover the entire non-standard sliding wardrobe with a single sliding system, it is necessary take two points into account:
For aluminum and steel profiles, this size is - 5000 mm (5 m) in length and 5000 mm (5 m) in height. If we disengage, then in fact, the largest cabinet will turn out 5 x 5 meters. Of course, I do not recommend such a height of the wardrobe, it should be no more than 3500 mm so that the structure does not collapse and lasts a long time. But it’s really possible to do more in length, by technically lengthening the upper and lower guide, adding and adding profiles to infinity.
All internal parts should be reduced by the size of the depth of the sliding system. That is, all shelves, drawers and baskets, all kinds of functional fittings, should not protrude beyond the line where the sliding facades are installed. Usually it is enough to recess the internal elements of the cabinet relative to the front by 100 mm. Look at my sketches. On them, all that is white is the inside of the wardrobe, which must be done already at 100 mm. But the roof, bottom and outer sides of the cabinet remain unchanged relative to the overall dimensions of the non-standard sliding wardrobe.
Site search: When designing due to the inexperience or negligence of the designer, certain errors may occur that can lead to incorrect operation of compartment doors, swing facades or to overlapping sliding elements, etc. If you have trusted the company, then you must assume that a professional will come to you who can get around all the pitfalls. But, unfortunately, professionals are also mistaken, especially beginners. Almost all the factories are now littered with defective parts, which were replaced with new ones due to errors of measurers and designers, and this is also nerves, precious time of customers. This article describes the most common mistakes in the design of furniture, in particular wardrobes. This information will be useful for both beginner furniture designers and handymen who want to plan and install a cabinet on their own.
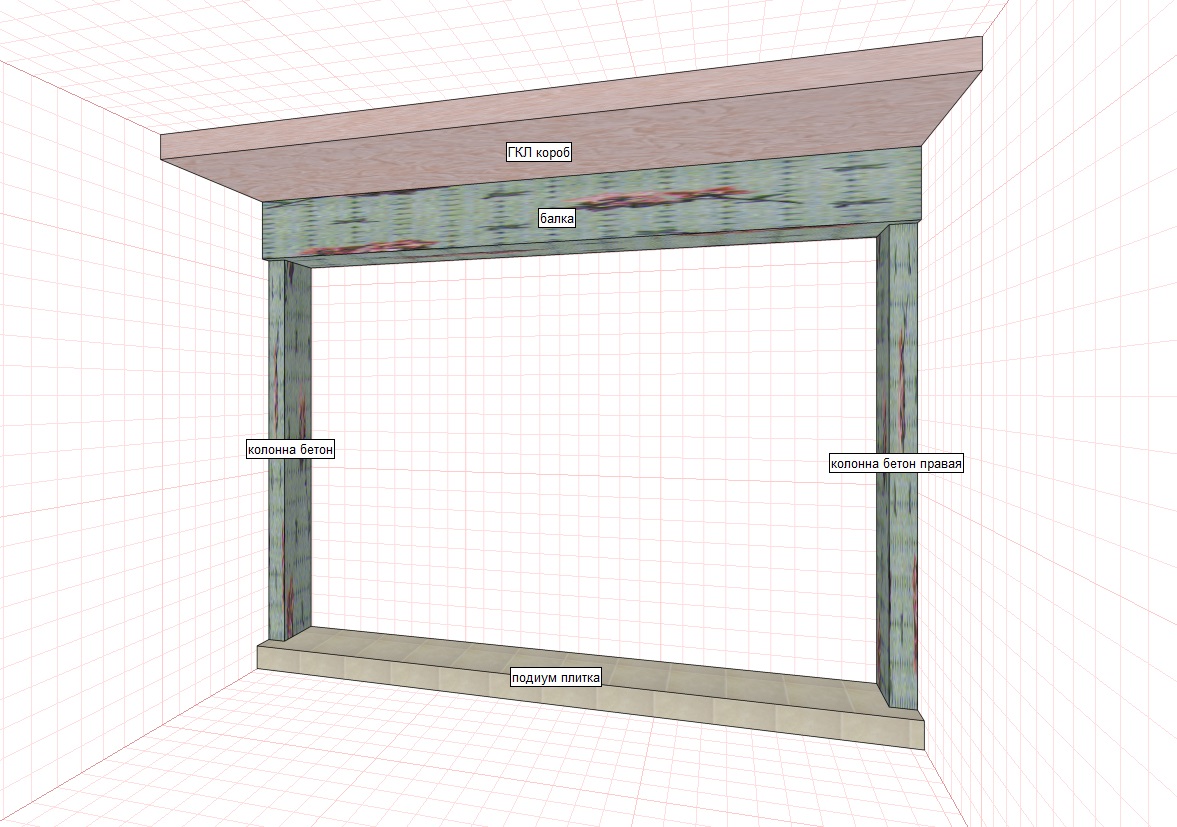
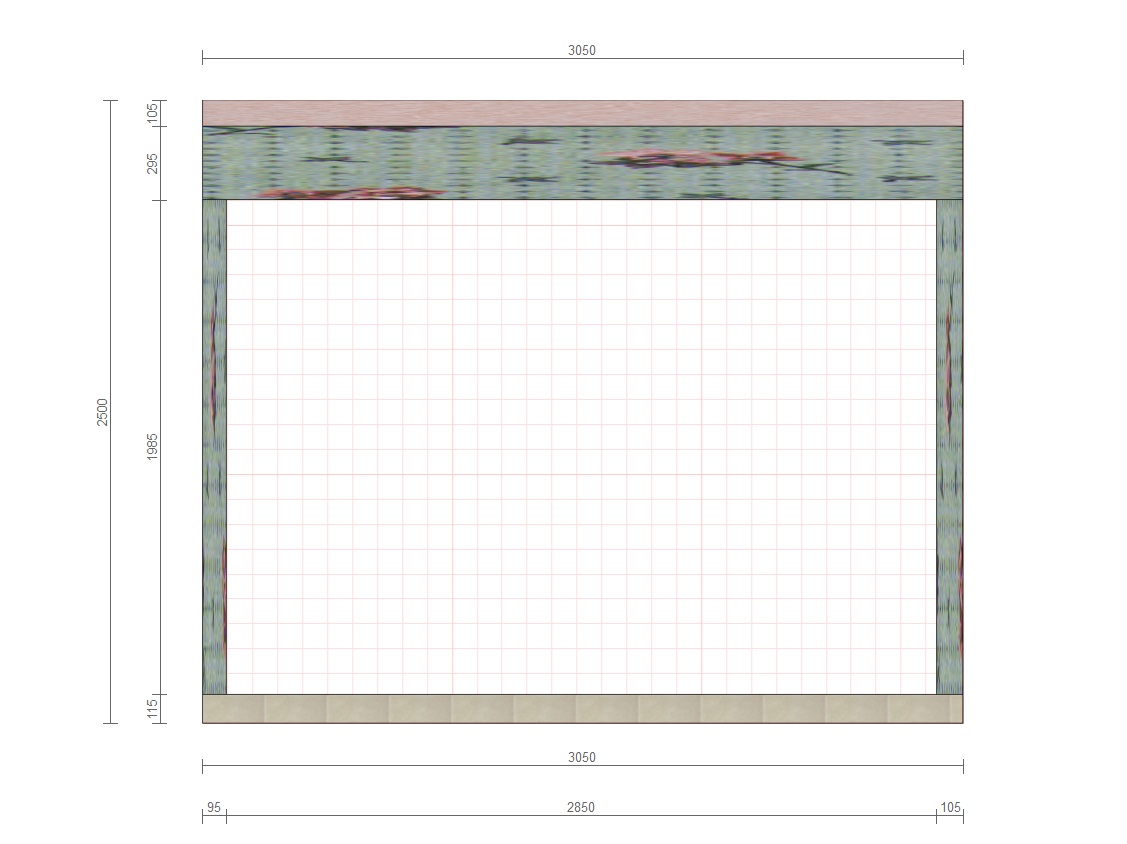
These are the most basic points that you need to pay attention to a novice designer. In fact, there are a lot of pitfalls. To avoid mistakes when designing furniture, entrust this work to experienced professionals. To consult or call our specialist, call us at 8 499 409 60 55, we will be happy to answer all your questions. Are you planning to make a sliding wardrobe in size? This is great, as it allows you to effectively use every centimeter of occupied space. That's just in order to properly design everything, it is advisable to independently understand a little bit on this issue before approving the project and starting any work. Floor planBefore you begin designing any changes to the interior, you should prepare and sketch a floor plan. You will need not only the size of the room itself, but also the furniture placed there. Thanks to this, you will be able to correctly choose the location of new items, taking into account the existing furniture. If you plan to make repairs or rearrangements in the entire apartment, taking measurements accordingly will be necessary everywhere. This will help to arrange and plan everything correctly. Choosing a wardrobe typeBefore designing a wardrobe, you should determine its type. There are 6 main types of designs for this piece of furniture: - built-in. This arrangement allows you to maximize the use of every centimeter of occupied space and save on materials. You can order a built-in wardrobe without side, rear and top walls. If in the room stretch ceiling, the wall-cover and sidewalls are required, as they are needed to fix the profile of the doors; - case. A full-fledged cabinet with all the necessary components, which at any time can be moved to another place; angular L-shaped. It consists of two cabinets that stand in a corner next to each other. Place the bar for hangers in the corner for efficient use of space. The doors of such a cabinet can be all sliding (2 + 2 or 2 + 1) or two sliding and one swing; - angular diagonal. It takes up more space than the L-shaped, but costs less due to fewer doors. Usually, 2 sliding compartment doors that are fixed between the side walls are enough for him; - angular triangular. It differs from the previous design in that the cabinet walls are absent, and the profile is fixed to the walls of the room. In this case, a little uncomfortable triangular shelves are obtained on the sides of the cabinet; - trapezoidal. In some rooms, it is advisable to install a cabinet with side walls of different widths. Sometimes this is a requirement of the room itself, in other cases - the room looks better. For example, if the furniture is right next to the front door. Exact sizeIf you order a sliding wardrobe, then removal of the correct sizes is the concern of an employee of the manufacturer. If you are doing this, then after determining the location of the furniture, use not only a centimeter or tape measure, but also a level to take into account all kinds of irregularities in the walls, floor and ceiling. Number of doorsMost often, doors and a sliding system (profile) are the most expensive parts of a wardrobe design. You can influence their cost by choosing cheaper components and materials. The minimum number of sliding doors is 2. To reduce the cost of construction, you can even put only 2 doors on a long cabinet or install swing doors. Filling for a sliding wardrobeThe convenience of a wardrobe with your own hands or on order is that you can control and select all its components and their location. This is especially important when choosing internal storage systems. Most often they put shelves made of chipboard and metal rods for hangers. You can choose exactly the options of storage systems that you like (nets, boxes, hooks) and at the place where they will be most convenient for you. Cheaper the filling of the wardrobe can be through the use of metal storage systems for wardrobes. Sketch wardrobeA sketch or drawing of a sliding wardrobe can be done by hand on paper or in numerous special programs (for example, Pro100, bCAD). Designing a sliding wardrobe yourself is not so difficult, since there are a lot of simple free online designers for this. But to make and assemble a cabinet is already a task several orders of magnitude more difficult. Site search: It is quite clear that the creation of any piece of furniture is preceded by a design period, this fully applies to any cabinet furniture, including, and. In the design process, it is important to take into account many factors that will determine the design and dimensions of our sliding wardrobe, its equipment and ease of use in the future. For greater clarity and convenience, we divided the entire development process into five stages, which should be performed sequentially one after another. Step one - draw up a floor planThe place where it stands will greatly affect the configuration of the furniture. Therefore, first you need to decide where we intend to put our designed wardrobe. A niche in the wall, an end face of a small room, or other little-used places is well suited for its installation. For greater clarity, we recommend making a plan of the room, which will clearly show what kind of space we can allocate for installation. Accordingly, it will be possible to calculate its width, height and depth of the projected object. Step Two - Choose Housed or Built-inDepending on the type of accommodation and owners' preferences, cabinet furniture can be built-in or have a cabinet structure. In short, the built-in version is different in that it may lack some (or all) of the outer surfaces - both lateral and horizontal. They may well be replaced by floor, walls and ceiling. It is the saving on parts of the material that is most often attributed primarily to the advantages of built-in furniture - in some cases, you can do without part of the details - the back or side walls, top or bottom. The most advantageous option in this regard is the installation of a built-in cabinet in a niche - in some cases, you can do without making a frame for installing doors. The disadvantage of this option is that such an object can no longer be moved or moved to another place. You will also need to somehow refine the walls inside. And if there are uneven walls, a careful adjustment of the shelves will be required. As for cabinet furniture, this drawback is eliminated here - all parts are manufactured in the factory and do not require additional adjustment, which means they fit snugly together. In addition, such furniture can be easily moved or relocated to another room. Step three - determine the configuration and sizeWhen designing, it is important to take into account the size of the created object - when doing this, it is better to be guided by the availability of free space and practical considerations. If the wardrobe will be installed in a niche, then it is most rational to make it the entire volume of the niche. If the furniture will be located in the room, it is important to maintain a balance between its size and free space. Avoid blocking the aisles, the standard value of the aisle that must be observed is at least 80 cm. The depth of the cabinet is generally accepted as 60-70 cm, if less is done, then the volume of useful internal space will be small. If you make this value more, it is possible that using such furniture will not be too convenient. As for the height of the designed furniture, it is often done in the entire height of the room - then you can refuse to manufacture the top cover. However, if the room has stretch ceilings, then you can not do without such a cover, in addition, there must be a gap between it and the ceiling. Fourth step - determine the number of doorsBased on the size of the cabinet and its internal layout, you can calculate the number of doors. An ideal option would be if the number of doors equals the number of sections. According to professionals, the optimal width for a sliding door is 65-90 cm. In extreme cases, this size can be reduced to 55 cm, but, as practice has shown, using such a door is inconvenient, in addition, an excessively narrow sash can swing when opened and even jump off the guides. Too wide a door can also reduce the usability of furniture. The fifth step - we plan the internal structure and fillingThe optimal width of the sections of your cabinet should approximately correspond to the width of the sash of the sliding door. If in the open position the door of the compartment door will overlap part of the section, it will not be very convenient to use such furniture. The most important thing inside the cabinet is the shelves, the height of which depends on what you plan to store there and on the depth of the cabinet. For a cabinet that is too deep, it is better to provide for a slightly higher shelf height, otherwise it will be inconvenient to use them. To store long or large items, you can leave the mezzanine shelf and not divide it into sections. As for the sections for clothes hangers, it is customary to use longitudinal rods for a cabinet with a depth of more than 60 cm, but if the depth is less, it is better to use transverse rods. The standard compartment height for long outerwear is 170 cm, but if the section is planned for jackets and jackets, its height should be at least 110 cm. It is convenient to use drawers for storing all kinds of small things. When designing a section with such drawers (or with other sliding devices), try to take into account the width of the section and the position of the door in the open state - so that the door does not interfere with the drawers. Also today it is possible to use various specialized systems for storing various things - lowering hangers, devices for trousers, belts or ties. If you plan to use them, we advise you to plan this in advance. Some people store various large-sized home appliances in a closet, for example, a vacuum cleaner - in this case, foresee the necessary volume in advance and determine the appropriate place. Step six - draw a sketchNo need to be scared - at this stage of design, you will not need drawing or painting skills. We just prepare a sketch of the internal layout of the cabinet - that’s why we spent so much effort and time on completely deciding on its content and organization of space. We will draw on a piece of paper in a box from an ordinary school notebook - it's easier. Let's take a scale - 1 cell is 10 cm. That is, with a future cabinet width of 2 meters in the sketch, it will have a width of 20 cells. Everything is very simple. It is better to draw with a simple drawing pencil - in which case you can always erase the failed part and fix it. The presence of such a sketch will greatly simplify and reduce the time for communication with representatives of the manufacturer. It’s easier to show in a sketch than to explain in words. After you have distributed the internal space, determine the color of the body and doors. If you are at a loss, you can turn to a specialist for help - many companies specializing in the manufacture of furniture will be happy to help you. After all the details become known, specialists will be able to calculate the cost of the future order and the time required for its manufacture. There are elements of building structures in apartments of the old foundation that are asked to be hidden from sight. One of the obvious decisions is to place a sliding wardrobe, which allows you to correct the imperfections in the appearance of the room and make rational use of space. If you make a sliding wardrobe with your own hands, then a significant cost saving and the pleasure of a creative process will be added to the aesthetic component. Designing a cabinet is the first and extremely important stage in the process of creating furniture. Having a ready-made drawing, you will protect yourself from errors when ordering parts and, accordingly, unnecessary expenses. Cabinet design with a concrete exampleOne-room apartment, in a house built in 1965, in the process of repair. The living room is 19 sq.m., disproportionately extended in length, with such a wall on the short side: In fact, this is a niche framed on both sides by supporting columns. On the floor there is a podium leveled by me with tiles, on the ceiling there is old, not working ventilation. It’s impossible to tear down all this disgrace, and to sew up with a false wall is an impermissible luxury in conditions small apartment. Therefore, the decision to erect a cabinet in this place is final and it remains only to "walk around the market", that is, ask the price. We take the dimensions of the niche and taking into account the desire to see a cabinet the size from wall to wall, we go to Google: "online wardrobe calculator." Here it is possible to roughly estimate the minimum that companies will have to pay for the manufacture of custom-made wardrobes. Choosing various materials and options, as well as adding or decreasing your Wishlist, you can notice how the price of the product changes. We are interested in one main dependence - the closer your wishes to certain standardized values \u200b\u200b(fit into certain dimensions and do not require individual design solutions), the less you save by deciding to make a cabinet yourself. The higher the number of individual requirements and the more forced deviations from the "standard", the higher the likelihood of savings of 50 percent or more if you do it yourself. In my case, almost immediately it became clear that a “sliding wardrobe to order” is not our method. Yes, and I wanted to quickly test the theoretical knowledge in practice, and to start with such a product is not a bad option. In fact, they are scared only by the significant size of the product, and in complexity - not above the average level. Open PRO100 and create a new project. We enter the dimensions of the room, or rather the part where the cabinet is supposed to be installed. We create all the elements of building structures with which the future cabinet will border, and we take into account their maximum values \u200b\u200bobtained as a result of measurements.
For example, if the beam above the niche bends in the center and its shape is a curved line, we are interested in the lowest point. If the side columns deviate from the vertical, again we are looking for the point of maximum distance from the wall (from the vertical) to which it adjoins. You can immediately add a tolerance of 10 - 15 mm to the dimensions of these elements in order to design the cabinet dimensions to zero.
If everything is clear with dimensions in width and height (it is necessary to fit the product into a space limited by building fronts), then refinements are needed along the depth of the cabinet. There is a certain minimum requirements for the wardrobe, which make the vast majority of users. Among others, the desire to use a closet for storing clothes hanging on a coat hanger. The implementation of this function sets the smallest permissible product size in depth, since the installation of a rod (bar for hangers) requires a minimum of 550 mm. But the size is 550 mm. - this is the minimum depth of usable space, and the total depth of the product will be obtained by adding 100 mm. necessary for installing a sliding system. It turns out that the minimum depth of the wardrobe is 650 mm., But this is in theory. In practice, there is very little space so that the clothes hang directly and the doors do not touch it when opening. You will have to turn the shoulders relative to the bar, which means that it will fit much less objects in width, etc. Therefore, I recommend starting from a size of 600 mm., At least for the useful space of the cabinet and the total depth of the product - 700 mm. As for the maximum cabinet size in depth, here it is worth taking a look at the calculator again. Most companies offer the manufacture of cabinets with a depth of up to 800 mm., Which may be due to optimal values \u200b\u200bfrom the point of view of cutting sheets of chipboard, but this is not entirely true. On the practical side, using an overly deep cupboard is just as inconvenient - you can put more things on the shelves, but look and get it?
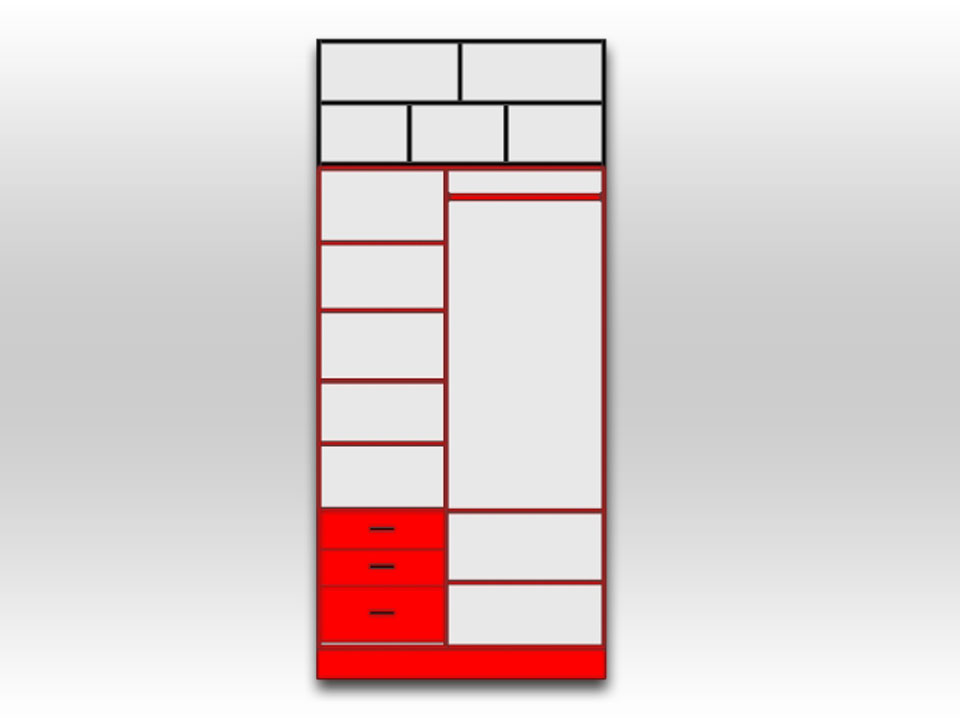
In this project, the features of the room where the cabinet will be installed are taken into account and those types of internal filling are selected that seemed to me the most convenient in terms of operation. Access to the lower right of the wardrobe is partially blocked by the bed, which also had to be taken into account when distributing the elements. In fact, these are two cabinets with a width of 1425 mm., Pulled together and complemented on both sides by additional slats. This approach is due to the limited length of the part (which can be cut from a standard chipboard) and, no less important, the convenience of assembly and installation. The number of sections, in this case 4, is determined by such recommendations as the maximum shelf width made of chipboard 16 mm. I would call the figure of 800 mm., As the maximum permissible width, and then, when it comes to high-quality material, such as Egger products. Exceeding these parameters, as well as the use of low-quality and loose chipboard, leads to sagging shelves.
The cabinet design provides for a 4-door sliding system. They are not indicated in the figure, but a few points should be clarified. The number of doors - does not have to match the number of sections. It is possible to make only 3 doors for a given project, which is sometimes justified from the point of view of design - for example, the use of a pattern that opens better on wide, open surfaces. But here I do not agree to sacrifice the convenience of operation, for the sake of a dubious (in my opinion) improvement in appearance. I would like to get full access to the section, with a minimum of actions, and this is just possible with the 4-door version. And another important point related to the doors and the size of the sections. Here I (schematically, without reference to the content) depicted two doors, as it was conceived in the project and made according to these sizes. In fact, the width of each 720 mm. plus a buffer tape of 6 mm., other doors are absolutely the same. They are captured in the position in which to be when all doors are closed at the wardrobe.
Now open the drawer section by sliding the first door to the right:
Regarding the manufacture of doors yourself - there are several options. The first option is to purchase a profile, guides, rollers, an order to cut the filling material, and to independently calculate all sizes. This approach is justified if you are going to produce furniture not in a single copy. Then it makes sense to study all the subtleties and really get a reduction in cost. If we are talking about assembling one cabinet with our own hands, the best option is to order the manufacture of a sliding system in the company where you order the chipboard. You need to name the exact dimensions of the closing "opening" (for example, in my project it is 2832 * 2248 mm.), Indicate the number of doors and the option of filling them. But do not order the assembly! Accordingly, you will cut everything, equip with all consumables, and you will have to complete the assembly yourself. Believe me, for the first time this is the best option to avoid errors and losses from incorrect calculations and unaccounted for tolerances. After making sure that all dimensions are met (the PRO100 program sometimes makes an error of 1 mm., When dividing) and all the elements are drawn, you can go order a chipboard cut. But here it is necessary to make a few comments - not every employee who takes your order will remind you of the cutting card. Do not forget to ask how the price of your order changes if you pay for the card-making service. And the second point is the edge. People with an iron in their hands, gluing an edge to the ends of parts, are a thing of the past. Nobody forbids, but the savings are scanty, and the operational properties of the edge are 0.4 mm thick. very mediocre. PVC edge 1-2 mm thick., Knurled on a special machine - these are today's choices and, of course, the edge should be taken into account when drawing up the project. You may be interested in:
|
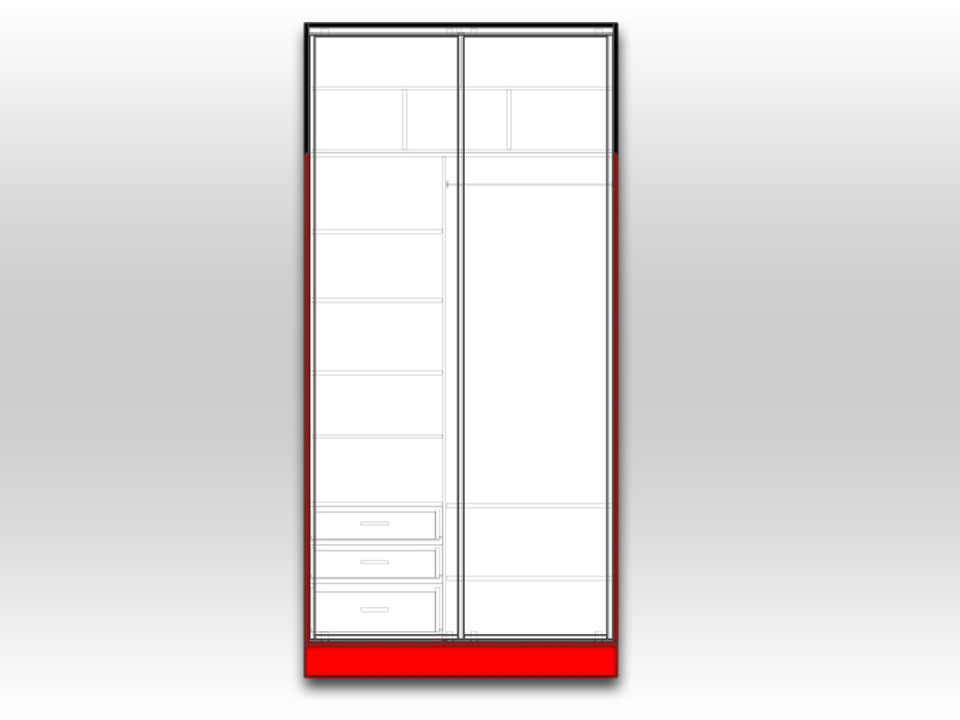


 As can be seen in the figure, the drawers are freely extendable and there is no need to move 2 doors or, as in the worst case, remove the door from the rails to get to the contents of the cabinet.
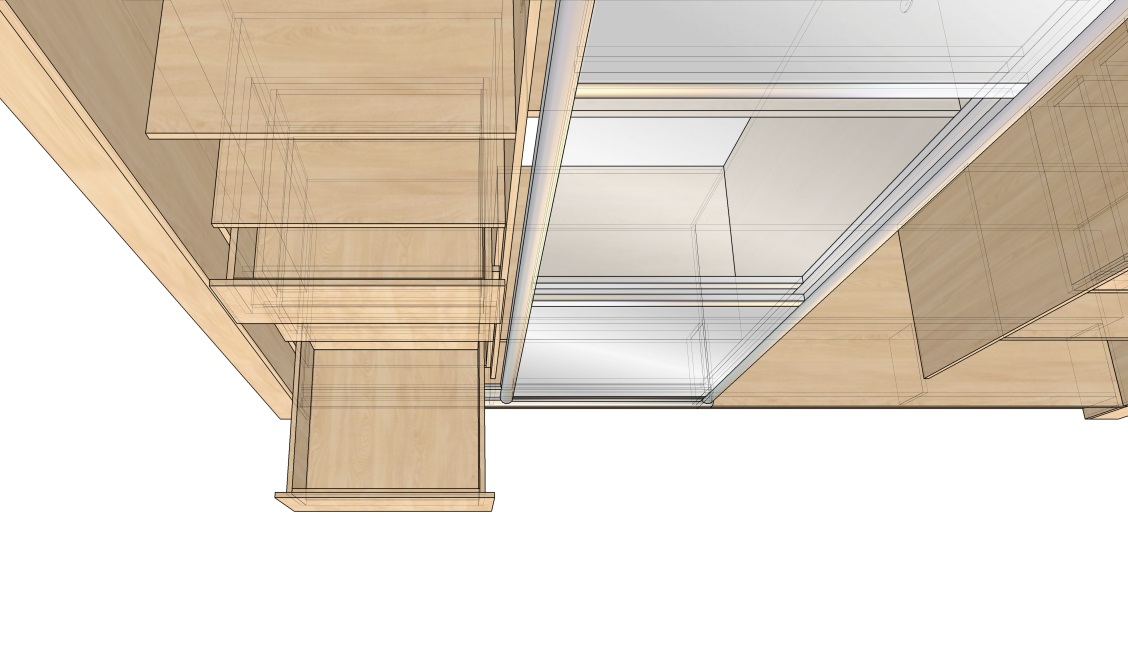 To avoid design errors, there is a simple rule - make sections with sliding elements narrower than sections without them. The PRO100 program is extremely convenient for demonstrating the operation of the sliding system and making a project in it, you can take into account all the nuances.
| Read: |
|---|

New
- Kitchen without upper cupboards: fresh solutions in the design of kitchen furniture
- Cellar ventilation in the garage: rules for implementation
- The handle of the water mixer has broken
- Neighbor groundlessly complains about us in various instances: what to do
- Modern Art Nouveau Requirements
- Drawer guides
- Design bedroom classic style wallpaper
- How to make ventilation in the apartment yourself?
- Surfboard - all about surfboards: type, size, shape
- Is it possible to carry out noise work on Sunday


